Format Object (3-D Rotation pane)
Use these options to change the orientation and perspective of a selected shape.
Notes:
-
When you change options in this dialog box, the changes are immediately applied to your shape, making it easy to see the effects of the changes in your SmartArt graphic or shape without closing the dialog box. However, since the changes are instantly applied, it is not possible to click Cancel in this dialog box. To remove changes, you must click Undo
 on the Quick Access Toolbar for each change that you want to remove.
 -
You can simultaneously undo multiple changes that you made to one dialog box option, as long as you did not make changes to another dialog box option in between.
-
You may want to move the dialog box so that you can see both the shape and the dialog box at the same time.
Presets To choose a built-in rotation or perspective effect, click Presets, and then click the option that you want.
Rotation
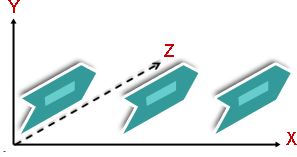
The X, Y, and Z axes define the orientation (rotation) and position of the camera (view) that is viewing the shapes. X is the horizontal axis; Y is the vertical axis; and Z is the third dimension of depth. Values for these axes are additive and the camera is first rotated by the X value, then the Y value, and finally the Z value. When you use the "nudge" buttons to change the X, Y, or Z value, the change is always made relative to the camera's current position.

Tip: If you want the rotation and perspective settings to be identical for multiple SmartArt graphics or charts, you can copy the settings from one SmartArt graphic or chart to another.
X To change the orientation of the horizontal axis, enter a number in the box. You can use the arrow buttons to "nudge" this position to the right or left.
Left To decrease the orientation of the horizontal axis, click this button.
Right To increase the orientation of the horizontal axis, click this button.
Y To change the orientation of the vertical axis, enter a number in the box. You can use the arrow buttons to "nudge" this position up or down.
Up To increase the orientation of the vertical axis, click this button.
Down To increase the orientation of the vertical axis, click this button.
Z This dimension allows shapes to be positioned higher or lower than other shapes. To change the position of the Z axis, enter a number in the box. You can use the arrow buttons to "nudge" this position clockwise or counter-clockwise.
Clockwise To decrease the position of the Z axis, click this button.
Counter-clockwise To increase the position of the Z axis, click this button.
Perspective Describes how much foreshortening (depth dependent growing and shrinking) is applied to a shape. To change the depth appearance, enter a number in the box. The smallest number (0) is identical to having a parallel camera, and the largest number (120) produces the most exaggerated perspective, similar to what is produced with a wide-angle camera.
Narrow field of view To decrease the amount of foreshortening, click this button.
Widen field of view To increase the amount of foreshortening, click this button.
Text
Keep text flat To prevent text inside of a shape from rotating when you rotate the shape, click Keep text flat. When this option is selected, the text is always on the top of the shape. When this option is cleared, the text inside of the shape follows the shape's front surface as it rotates.
Object position
Distance from ground To move the shape backward or forward in 3-D space, enter a number in the box.
Reset To remove 3-D rotation and perspective effects and restore the default settings, click this button.
No comments:
Post a Comment