Filter data in a desktop database
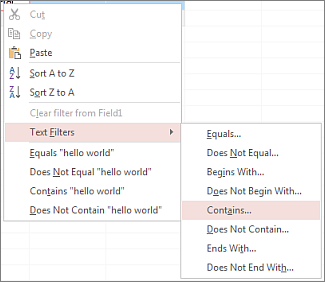
To apply a filter, right-click the field or control that you want to use for filtering, and then choose a filtering command in the lower half of the menu that pops up. To use a particular value as the basis for your filter, select the value, right-click it, and then choose a filtering command. The filtering options depend on the data type of the field that you use. Here's what the filtering options look like for a text field with the value hello world selected:
You can use filters to display specific records in a form, report, query, or datasheet, or to print only certain records from a report, table, or query. By applying a filter, you are able to limit the data in a view without altering the design of the underlying object.
This article explains how to apply, save and remove filters in an Access desktop database. For information about filtering in an Access app, see the blog post Filter Your Data with Access 2013. For more information about Access apps in general, see the article Create an Access app.
In this article
About filtering
Limiting the data that's displayed is a basic database task, and filtering is one way to do it – but sometimes a query is a better choice. Once you decide to use a filter, there are several different ways to go: common filters, filter by selection, and filter by form.
When would I use a query?
Sometimes when you want to limit displayed data a query is a better option than filtering. Creating a query does take a bit of work – you have to open the query designer, add tables, and so on. But once you are done, you've got a new data source that you can use to supply data to forms, reports, other queries – anything that takes a data source. Consider using a query in the following cases:
-
You plan to use the same limited set of data over and over, possibly with more than one object. You can save a filter, and you remove and reapply a filter, but you can't use a filter with any object besides the one you created it for.
-
You need to include several possibilities at the same time – several alternate sets of criteria. Although this is possible with Filter by Form, in a query you see all your alternate criteria sets together at the same time, not on different tabs as they appear in Filter by Form.
Filters support different data types
There are various types of filters, some of which apply to only one type of data, and other which will work with several data types. The filters that you can use depend on the type and values of the field that you want to filter. Here's an illustration that shows the common filters for Date/Time data.
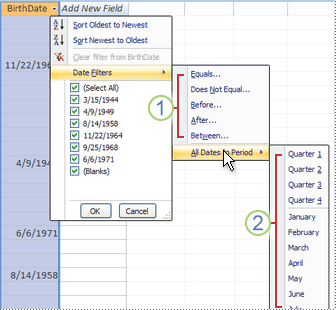
1. Date/Time data common filters
2. All Dates in Period filter is only available for date/time data. It ignores the day and year portion of the date values.
Reusing a filter
If you save an object with a filter applied, the filter will be available the next time you open the object. You can set the FilterOnLoad property to control whether the filter is applied when the object opens.
If you want to reuse a filter with other database objects, you can save it as a query.
Different ways to filter
There are three main ways to filter:
-
Common filters – Right at your fingertips, common filters let you pick and choose values from the data to filter, and also provide a set of built-in comparison filters, such as Contains.
-
Filter by selection – Also at your fingertips, this method works well if you see a value you want to use as a filter.
-
Filter by form – If you want to apply a set of filters at the same time, Filter by Form gives you a little bit more control over the process.
Common filters
Common filters are built-in for most types of data, and provide basic filtering that's specific to the data. For example, when filtering Date/Time data, you can use the Before common filter to exclude dates occurring on or after a particular date.
Note: Common filters work on one field at a time. To filter on multiple fields or controls, you can apply a filter to each separately, or use an advanced filter option.
To use a common filter Click the heading of the field you want to filter – the common filters appear in the lower part of the menu that pops up.
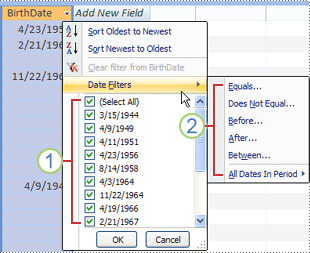
1. To filter for specific values, use the check box list. The list displays all the values that are currently stored in the field.
2. To filter for a range of values, click a comparison filter and specify the required values.
Common filter tips
-
To filter a value list using only one or a few of the values, clear the (Select All) check box and then select the values you want.
-
To filter for null values (show records where there is no data for the filtered field), clear the (Select All) check box, and then select the check box next to (Blanks).
-
You can use wildcard characters in a common filter to match less exactly – for example, the asterisk wildcard (*) matches any string of characters. So, you might apply the Equals common filter on a FirstName field using the filter string Miche*l* to match a variety of spellings for Michele.
-
To include a wildcard character in your filter just as itself (not as a wildcard), enclose the character in square brackets.
Why don't I see the common filters?
Common filters aren't available in the following circumstances:
-
Data-specific filters are not available for Yes/No, OLE Object, and Attachment fields.
-
The values list is not available for memo fields.
-
Common filters aren't available at all in views other than Datasheet View, Form View, Report View, or Layout View.
Filter by selection
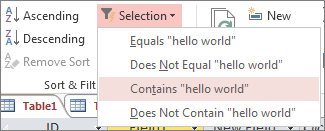
To apply a filter based on a currently-selected value, on the ribbon click Home, and then in the Sort & Filter group, click Selection. A drop-down list displays the available filtering options. As with common filters, filter by selection options vary based on the data type. You can also right-click a selected value to filter by selection.
Filter by Form
To filter by filling out a form, on the Home tab, in the Sort & Filter group, click Advanced, and then click Filter by Form. When you use Filter by Form, Access creates a blank form like the one you're filtering, and then allows you to complete as many of the fields as you want to. When you're done, Access finds the records that match. This is handy when you want to filter using values for several fields. The following illustration shows a simple Filter by Form:
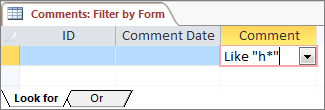
Note: When using Filter by Form, you can't specify field values using these field types: multivalued, Memo, Hyperlink, Yes/No, or OLE Object.
Add alternate Filter by Form values with the Or tab
To add a different set of values to use for filtering, click the Or tab at the bottom of the Filter by Form – this opens an empty new form to use for filtering. Each time you use an Or tab, Access creates another one; there's always one unused Or tab on a Filter by Form. When you supply multiple sets of values using Filter by Form, records that meet any set are included. In other words, the more Or tabs you use, the more data your filter will include.
Advanced Filter/Sort
On occasion, you might want to apply a filter that goes beyond what you can do using other filtering methods to write the filter criteria yourself. In these cases, you can use Advanced Filter/Sort – a filter design experience similar to designing a query.
-
Open a table, query, form, or report in any of the following views: Datasheet, Form, Report, or Layout.
-
Make sure that the view is not already filtered. On the record navigator bar, verify that No Filter appears dimmed (is unavailable). If the record navigator bar is not visible, click Advanced in the Sort & Filter group on the Home tab, and then click Clear All Filters (if Clear All Filters appears dimmed, there are no filters in effect).
-
On the ribbon click Home, then in the Sort & Filter group click Advanced, and then click Advanced Filter/Sort.
-
Add the fields on which you want to filter to the grid.
-
In the Criteria row of each field, specify a criterion. The criteria are applied as a set, and only records that match all of the criteria in the Criteria row are displayed. To specify alternate criteria for a single field, type the first criterion in the Criteria row and the second criterion in the Or row, and so on.
Tips:
-
The entire set of criteria in the Or row is applied as an alternative to the set of criteria in the Criteria row. Any criterion that you want to be applied for both sets of criteria must be typed in both the Criteria row and the Or row. Click Toggle Filter to see the filtered rows.
-
A good way to learn to write criteria is to apply a common filter or a filter based on selection that produces a result that is close to what you are looking for. Then, with the filter applied to the view, display the Filter object tab
-
Special commands on the Filter document tab
Two special commands are available to you on the Filter document tab. When you right-click anywhere above the design grid on the tab, the Load from Query and Save As Query commands are available on the shortcut menu.
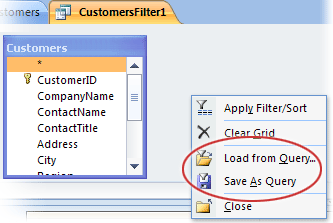
The Load from Query command loads the design of a selected query into the grid. This lets you use the query criteria as filter criteria.
The Save As Query command lets you save the filter settings as a new query.
Switch between Filtered and Unfiltered views of your data
To switch to the unfiltered view of data, click Filtered on the record navigator bar.

To switch back to the filtered view, click Unfiltered on the record navigator bar.
Clear a filter
Clear a filter to completely remove it. You can't reapply a cleared filter by clicking Unfiltered – you have to create the filter again. You can clear a single filter from a single field, or clear all filters from all fields in the view.
-
Clear one filter Right-click the filtered item, and then click Clear filter from field name.
-
Clear all filters On the Home tab, in the Sort & Filter group, click Advanced, and then click Clear All Filters.
Save a filter and apply it automatically
When you close a table, query, form, or report and a filter is in place the filter is saved with the object. The next time the object is opened, the unfiltered data is displayed but the saved filter is available to apply – just switch to Filtered view by clicking Unfiltered on the record navigator bar. If you want the filter to be applied when the object opens, set the FilterOnLoad property to Yes.
Note: The FilterOnLoad property setting is only applied when the object loads. Setting this property for an object in Design view and then switching to another view will not cause the setting to be applied. You must close and reopen the object for changes to the FilterOnLoad property setting to take effect.
Save a filter as a query
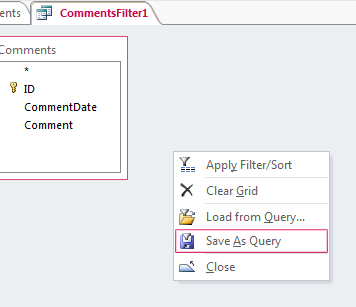
To save a filter as a query – so you can reuse it with other objects – use Advanced Filter/Sort: on the ribbon, click Home, and then in the Sort & Filter group, click Advanced, and then click Advanced Filter/Sort. Set up the filter the way you want, right-click an empty spot on the Filter tab, and then click Save As Query.
microsoft office 2013 professional plus (1PC), LifeTime License, Full Retail Version (1PC Take this home an improved and updated professional edition of Microsoft Office Professional Plus 2013,that works smartly and outshine among your competitors.This takes you one step ahead in expanding business and exclusively designed with the state-of the-art applications right at your fingertips to meet the growing business needs.
ReplyDelete