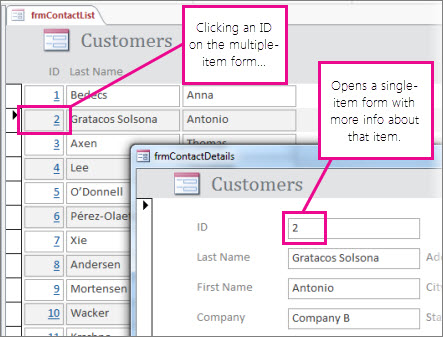
If you have a long multiple-item form, sometimes you want to quickly "drill down" to see more information about a single item. You can do this in Access by linking the multiple-item form to a single-item form. When you click an item in the multiple-item form, the single-item form opens to show the details.

Notes:
-
This article doesn't apply to Access web apps – the kind of database you design with Access and publish online.
-
If you meant something else by "linking", see Other types of form linking at the end of this article.
Create the forms
In most cases, the two forms in a drill-down configuration are based on the same table or query. If you already have a pair of forms you want to use (one being a datasheet or multiple item form, and the other being a single-item or "detail" form), you can skip this section. Otherwise, use these procedures to create them:
Create a datasheet or multiple-item form:
-
In the Navigation Pane, select the table or query that contains the data you want on the datasheet form.
-
Click Create > More Forms, then click Multiple Items or Datasheet, depending on which kind you want.
-
Make any design changes you want. Consider deleting as many columns as you can, leaving just enough information to identify each item.
-
Save and close the form.
For more information about Multiple Item forms, see Create a form by using the Multiple Items tool.
Create a single-item or "detail" form:
-
In the Navigation Pane, select the table or query that contains the data you want on the detail form. This will likely be the same table or query that you used for the first form.
-
Click Create > Form.
-
Make any design changes you want, and then save and close the form.
For more information, see Create a form by using the Form tool.
Add the logic that opens the detail form
Now to add a little macro to the multiple-item or datasheet form. The macro opens the detail form and makes sure the correct item is displayed.
Don't worry if you haven't done much work with macros; you can just copy and paste the XML that you'll find in this procedure.
-
If you're using a datasheet form, double-click it in the Navigation Pane to open it. For a multiple-item form, right-click it in the Navigation Pane and then click Layout View.
-
Press F4 to open the Property Sheet if it's not already open.
-
Click the column that you want to add the macro to. This will be the column that you click to open the detail form when the macro is finished. In the picture above, the macro is added to the ID column of frmContactList.
Tip: You can add the macro to more than one column.
-
On the Event tab of the Property Sheet, click in the On Click or On Dbl Click property box (depending on whether you want the form to open by single-clicking or double-clicking the field), and then click the Build button
 .
. -
If Access prompts you to choose a builder, select Macro Builder and click OK.
-
Select this block of XML, and then press Ctrl+C to copy it to the clipboard:
<?xml version="1.0" encoding="UTF-16" standalone="no"?> <UserInterfaceMacros xmlns="http://schemas.microsoft.com/office/accessservices/2009/11/application"> <UserInterfaceMacro For="ID" Event="OnClick"><Statements><Action Name="OnError"><Argument Name="Goto">Macro Name</Argument><Argument Name="MacroName">ErrorHandler</Argument></Action> <ConditionalBlock><If><Condition>[Form].[Dirty]</Condition><Statements><Action Name="SaveRecord"/></Statements></If></ConditionalBlock> <ConditionalBlock><If><Condition>IsNull([ID])</Condition><Statements><Comment>Open the form to a new record if the current ID is Null</Comment><Action Name="OpenForm"><Argument Name="FormName">frmContactDetails</Argument><Argument Name="DataMode">Add</Argument><Argument Name="WindowMode">Dialog</Argument></Action><Action Name="Requery"/></Statements></If><Else><Statements><Comment>Use a TempVar to pass a filter to the OpenForm action</Comment><Action Name="SetTempVar"><Argument Name="Name">Contact_ID</Argument><Argument Name="Expression">[ID]</Argument></Action><Action Name="OpenForm"><Argument Name="FormName">frmContactDetails</Argument><Argument Name="WhereCondition">[ID]=[TempVars]![Contact_ID]</Argument><Argument Name="DataMode">Edit</Argument><Argument Name="WindowMode">Dialog</Argument></Action><Action Name="RemoveTempVar"><Argument Name="Name">Contact_ID</Argument></Action><Action Name="RefreshRecord"/></Statements></Else></ConditionalBlock> </Statements></UserInterfaceMacro></UserInterfaceMacros> -
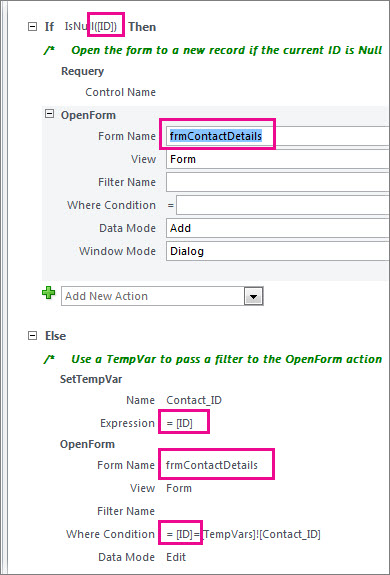
Click in the blank area of the Macro Builder (just underneath the Add New Action drop-down list), and then press Ctrl+V to paste in the macro actions. If all goes well, you won't see the XML in the Macro Builder at all—it will expand out into the more readable macro blocks as shown in the next step.
-
If necessary, replace the form name (frmContactDetails) and the linking column name (ID) with the name of your form and the column you're using to link the two forms. The picture below shows where you might need to make edits to match your own identifier names:

-
On the Design tab, click Save and then Close.
-
If you want the clickable column(s) to appear like a hyperlink so people know they can click it, make sure the column is still selected, and in the Property Sheet, click the Format tab, and set the Display As Hyperlink property to Always.
-
Save and close the form, then reopen it and test the macro by clicking or double-clicking the column you modified.
For more information about macros in desktop databases, see Add logic to a control in a desktop database.
Other types of form linking
To create a form/subform combination and link them together, see Create a form that contains a subform (a one-to-many form).
To create a form that is linked to a data source such as a table or query, see Create a form by using the Form tool.
No comments:
Post a Comment