You can use Outlook on the web for business to give someone in your organization permission to manage your calendar. You can give them editor access, which lets them edit your calendar, or delegate access, which lets them not only edit your calendar, but also schedule and respond to meetings on your behalf.
Note: If the instructions don't match what you see, you might be using an older version of Outlook on the web. Try the Instructions for classic Outlook on the web.
Assign an editor or delegate
You can give anyone within your organization editor or delegate access to your calendar. Editors can be assigned to your primary calendar (named "Calendar") or to any additional calendars that you created. Delegates can only be assigned to your primary calendar. You can't give editor or delegate access to people outside your organization.
-
In Outlook on the web, select
 at the bottom of the page.
 -
At the top of the page, select Share > Calendar.

-
In the Sharing and permissions page, type the name or email address of the person you want to share your calendar with. Though you can share your calendar with more than one person, you can only add one person at a time from Outlook on the web.
-
After you've added the person you want to manage your calendar, select the drop-down list next to their name, and choose the level of access you want them to have.
-
Select Can edit to give them permission to make changes to your calendar.
-
Select Delegate to give them the same permission as an editor, plus they will receive meeting requests and responses on your behalf.
Note: When a delegate responds to a meeting invitation on your behalf, you won't see the response on the invitation in your Inbox when using Outlook on the web. Meetings that are accepted or tentatively accepted will appear on your calendar and will show that your delegate accepted them.
-
The options Can view when I'm busy, Can view titles and locations, and Can view all details allow others to view your calendar but not make changes to it. Access for people from outside your organization is limited to these options.
-
-
After you've finished adding the person you want to share your calendar with and have chosen which permission you want to give them, select Share. If you decide not to share your calendar right now, select
 Remove.
The person you shared your calendar with will receive an email message telling them about it. When they select the Accept button in the invitation, it will add your calendar to their list of calendars.
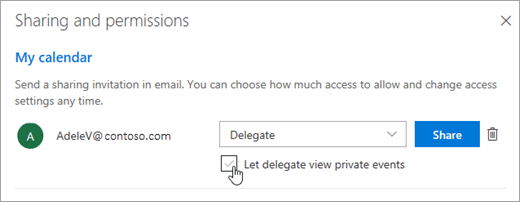
Note: Calendar items marked Private are protected. Most people you share your calendar with see only the time of items marked Private, not the subject, location, or other details. The exception to this is if you select the Let delegate view private events check box.
Other sharing options
In addition to editor and delegate options, which allow other people to edit your calendar, there are options that allow other people to view your calendar, but not edit it or act as a delegate on your behalf.
Note: Access for people from outside your organization is limited to these options.
-
In Outlook on the web, select
 at the bottom of the page.
 -
At the top of the page, select Share > Calendar.

-
In the Sharing and permissions page, type the name or email address of the person you want to share your calendar with. Though you can share your calendar with more than one person, you can only add one person at a time from Outlook on the web.
-
After you've added the person you want to manage your calendar, select the drop-down list next to their name, and choose the level of access you want them to have.
-
Select Can view when I'm busy to give them permission to see only when you are busy, but not the details of items on your calendar.
-
Select Can view titles and locations to give them permission to see when you're busy, plus the titles and locations of items on your calendar.
-
Select Can view all details to give them permission to see all details of items on your calendar. others to view your calendar but not make changes to it.
-
-
After you've finished adding the person you want to share your calendar with and have chosen which permission you want to give them, select Share. If you decide not to share your calendar right now, select
 Remove.
Set meeting request and response options
After you've given someone delegate access to your calendar, you'll see an additional option in Sharing and permissions that lets you control how meeting requests and responses are processed. If you have multiple delegates, this option will apply for all of your delegates.
To set these options:
-
In Outlook on the web, select
 at the bottom of the page.
 -
At the top of the page, select Share > Calendar.

-
Under Delegates, next to Send invitations and responses to, select one of the following options:
-
Delegate only Meeting requests and responses go only to your delegates.
-
Delegate and send me a copy Meeting requests and responses are sent to you and your delegates. Only your delegates see the option to accept or decline a meeting request, and the notification sent to you will appear like a normal email message. You can still respond to the meeting by opening the calendar item and responding.
-
Both my delegate and me Meeting requests and responses are sent both to you and your delegates. Either of you can respond to the meeting invitation.
-
Let delegates see details of private items
You can use the settings in the Sharing and permissions dialog to give delegates permission to see the details of items that have been marked as private.
-
In Outlook on the web, select
 at the bottom of the page.
 -
At the top of the page, select Share > Calendar.

-
Next to the delegate you want to give permission to see private appointments, select the check box for Let delegate view private events.
Stop sharing a calendar
If you would like to stop sharing your calendar with someone, use Outlook on the web to remove his or her permissions.
-
In Outlook on the web, select
 at the bottom of the page.
 -
At the top of the page, select Share, and choose the calendar you want to stop sharing.

By default, your primary calendar is called "Calendar". If you created other calendars, you can select one of them instead. You cannot remove sharing permissions from calendars owned by other people.
-
Select
 Remove next to the person with whom you want to stop sharing your calendar.
The person is now removed from the list of people with access to your calendar. If the person is inside your organization, your calendar will be removed from their list of calendars. If the person is outside your organization, their copy of your calendar isn't removed but will no longer sync to your calendar or receive updates.
Instructions for classic Outlook on the web
Assign a calendar editor or delegate
You can give anyone within your organization editor or delegate access to your calendar. Editors can be assigned to your primary calendar (named "Calendar") or to any additional calendars that you created. Delegates can only be assigned to your primary calendar. You can't give editor or delegate access to people outside your organization.
-
At the top of the page, select the app launcher
 , and select Calendar.
 -
On the navigation bar, select Share > Calendar.

-
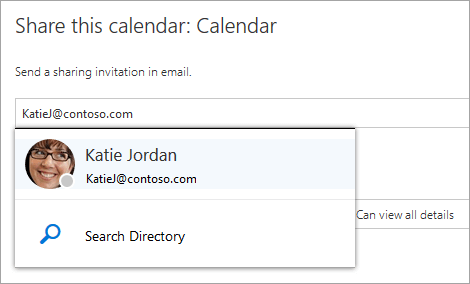
In the Share this calendar dialog, type the name or email address of the person with whom you want to share your calendar. This box works just like the To box in an email message. While you can share your calendar to more than one person, you can only add one person at a time from Outlook on the web.
-
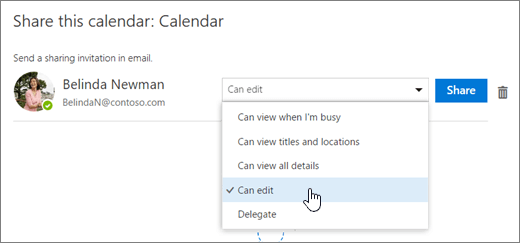
After you've added the person whom you want to manage your calendar, select the drop-down box next to their name, and select the level of access you want them to have.
-
Select Can edit to give them permission to make changes to your calendar.
-
Select Delegate to give them the same permission as an editor, plus they will receive requests and responses on your behalf.
-
The options Can view when I'm busy, Can view titles and locations, and Can view all details, allow others only to view your calendar, not make changes to it.
-
-
After you've finished adding the person with whom you want to share your calendar and have chosen which permission to share with him or her, select Share. If you decide not to share your calendar right now, select Remove
 .
.
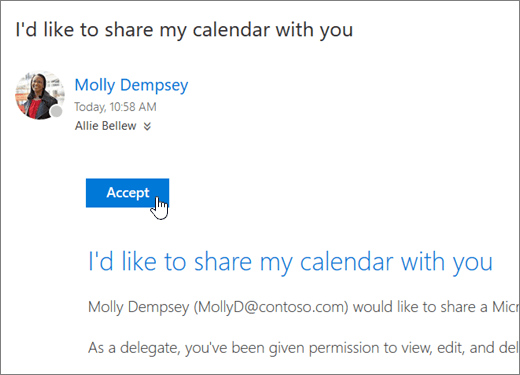
The person you shared your calendar with will receive an email message telling them about it. When they select the Accept button in the invitation, it will add your calendar to their list of calendars.
Notes:
-
Calendar items marked Private are protected. Most people you share your calendar with see only the time of items marked Private, not the subject, location, or other details. The exception to this is that you can give a delegate permission to see the details of items marked Private.
-
Set meeting request and response options
Once you've given someone delegate access to your calendar, you'll see an additional option under Share this calendar that lets you control how meeting requests and responses are processed. If you have multiple delegates, this option will apply for all of your delegates.
To set these options:
-
At the top of the page, select the app launcher
 , and select Calendar.
 -
On the navigation bar, select Share > Calendar.

-
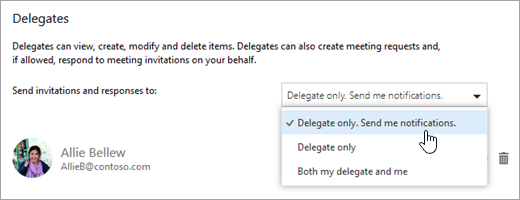
Under Delegates, next to Send invitations and responses to, select one of the following options:
-
Delegate only. Send me notifications. Meeting requests and responses are sent to you and your delegates. Only your delegates see the option to accept or decline a meeting request, and the notification sent to you will appear like a normal email. You can still respond to the meeting by opening the calendar item and responding.
-
Delegate only. Meeting requests and responses go only to your delegates.
-
Both my delegate and me. Meeting requests and responses are sent both to you and your delegates. Either of you can respond to the meeting invitation.
-
-
Select Done to save your changes.
Let delegates see details of private items
You can use the settings in the Share this calendar dialog to give delegates permission to see the details of items that have been marked as private.
-
At the top of the page, select the app launcher
 , and select Calendar.
 -
On the navigation bar, select Share > Calendar.

-
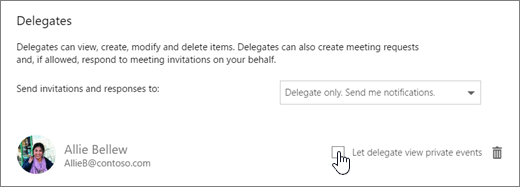
Next to the delegate you want to give permission to see private appointments, select the check box for Let delegate view private events.

-
Select Done to save your changes.
Stop sharing a calendar with an editor or delegate
If you would like to stop sharing your calendar with someone, use Outlook on the web to remove his or her permissions.
-
At the top of the page, select the app launcher
 , and select Calendar.
 -
At the top of the page, select Share, and choose the calendar you want to stop sharing.

By default, your primary calendar is called "Calendar". If you created other calendars, you can select one of them instead. You cannot remove sharing permissions from calendars owned by other people.
-
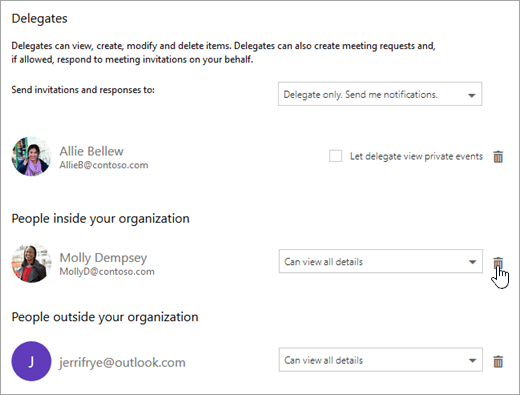
Choose the person with whom you want to stop sharing your calendar and select Remove
 .
.
The person is now removed from the list of people with access to your calendar. If the person is inside your organization, your calendar will be removed from his or her list of calendars. If the person is outside your organization, his or her copy of your calendar is not removed but will no longer sync to your calendar or receive updates.
No comments:
Post a Comment