Connect email accounts in Outlook on the web (Office 365)
Important: Microsoft will be removing the ability to add new accounts to Outlook on the web using the Connected accounts feature in September 2018.
-
You won't be able to connect new accounts after September 15, 2018.
-
Accounts that were connected before September 15th will continue to sync as usual until October 30, 2018.
-
On October 30th, all connected accounts will stop syncing email.
-
On November 15th, the Connected accounts option (Settings > Mail > Accounts) will be removed from Outlook on the web .
-
Email that has already synced will continue to appear in your inbox unless you remove it manually.
Notes: To continue seeing email from other accounts:
-
Forward email from those accounts to Outlook on the web. For more information, see Turn on or off automatic forwarding in Outlook.com, Automatically forward Gmail messages to another account, and Automatic email forwarding in Yahoo Mail.
-
Connect your other account to Outlook for Windows or Outlook for Mac (see Add an email account to Outlook).
-
Connect your other account to Mail in Windows 10 (see https://support.microsoft.com/en-us/help/17198/windows-10-set-up-email).
-
Download Outlook for iOS or Outlook for Android, which lets you sync your email, calendar, and contacts with other email accounts, easily switch between accounts, and offers a combined inbox, search, and an integrated calendar experience. For more information about how to set up Outlook mobile on your phone, see Outlook for iOS and Android Help Center.
To remove a connected account, see Remove a connected account from Outlook on the web.
Before you connect your account
Use the instructions below if you want to connect an account to your Outlook on the web (work or school) account in Office 365.
If you're using Outlook.com or Hotmail.com, see Add your other email accounts to Outlook.com for instructions.
If you're using Gmail, first follow the steps in Prepare your Gmail or G Suite account for connecting to Outlook and Office 365, then follow the steps below.
Step 1: Go to Settings
-
At the top of the screen, select Settings
 > Mail.
-
Under Options, select Accounts > Connected accounts.
Not all features are available in every region. If you don't see the Connected accounts option, this feature might not be available for your account.
Step 2: Enter your email address
-
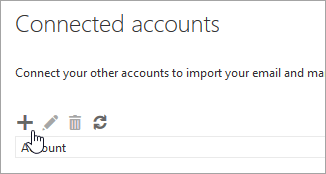
Under Connected accounts, select
 .
.
-
On the Connect your email account page, enter the full email address (for example, MollyD@contoso.com) and password of the account you want to connect to Outlook on the web and select OK.
IMPORTANT: If you get a message that Outlook couldn't connect to the server for your other account, select Back and make sure you entered the correct email address and password for your account.
If you still can't connect, it's possible that your mail provider doesn't support connecting over IMAP. Try connecting over POP. For instructions, see Connect an email account from an Internet service provider (POP account) below.
Step 3: Refresh Outlook
-
When a connection is established, you'll see that Outlook is downloading your email. Select Close.
-
Refresh your page after a few minutes to see if the download is complete.
You can close your browser and turn off your computer if you want to. Your account is connecting to Outlook in the cloud, not on your computer.
Connect an email account from an internet service provider (POP account)
Click here for instructions
-
Go to the website for your email provider and search for the name of their Incoming POP server. Usually this is something like "POP3.<name of company>.com". Write down this information because you'll need to enter it a few steps later.
-
Sign in to Outlook on the web.
-
At the top of the screen, select Settings
 > Mail.
-
Under Options, select Accounts > Connected accounts.
Not all features are available in every region. If you don't see the Connected accounts option, this feature may not be available for your account.
-
Under Connected accounts, select
 .
.
-
On the Connect your email account page, enter the full email address (for example, MollyD@contoso.com) and password of the account you want to connect to Outlook on the web and select OK.
-
When you see the Unsecured connection page, select Skip.
-
At Choose your connection type, select POP connection settings > OK.
-
On the New POP account connection page, enter the email address of the account you're connecting in the Email address box. In the User name box, enter the email address again, and then enter your email password in the Password box.
-
If you want a copy of your email to be saved in your other email service, select the Leave a copy of messages on the server check box.
-
In the Server Information section, enter the information you got from your email provider:
-
Incoming (POP) server: Enter the name of the POP server that you found on your email provider's website. It should be something like POP3.<name of company>.com.
-
Incoming server port: This usually 995.
-
Authentication: This is usually Basic. If your email provider specifically says to use SPA, choose that.
-
Encryption: This is usually SSL. Change this setting only if your email provider specifically says to use TLS.
-
-
Select OK.
IMPORTANT: If you get a message that a connection could not be made, check for typos. If you're still having issues, see Fix problems with connecting an account below.
Fix problems with connecting an account
Click here for troubleshooting instructions
If Outlook on the web can't set up a connection by using your email address and password, answer the following questions:
-
Is there a typo in the password or email name? Double-check both of these. This is a very common problem.
-
Are you trying to connect a POP email account? See the following instructions: Connect an email account from an Internet service provider (POP account).
-
Is two-step verification turned on for your email? If so, go to your email account and turn off two-step verification.
-
If you can't connect, either your email provider or Office 365 might be experiencing service issues. Try connecting again in an hour. If you can't connect even after trying at two or three different times of the day, it's not a service issue.
-
Are you trying to connect a Gmail account? Make sure you've followed the steps in Prepare your Gmail account for connecting to Outlook and Office 365. If it's a corporate Gmail account, check whether it's a POP account.
-
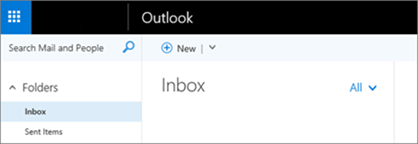
Does your Outlook look different from the steps in this article? Look at the picture below:

Now look at Outlook on your computer: If your Outlook looks different from the one above, you might not be using Outlook on the web. See What version of Outlook do I have? to find setup instructions for your version of Outlook.
Good job, the article looks great Outlook Email Address Extractor.
ReplyDeletevery nice topic and thanks to share it
ReplyDeleteoutlook not connect to the server
aol email not working on iphone
how to cancel comcast account
yahoo mail not receiving emails
how to retrieve permanently deleted Facebook messages
ReplyDeletehow to recover permanently deleted messages on Facebook messenger
how to recover permanently deleted messages on messenger
how to recover deleted messages on Messenger
deleted messages on messenger