Create a managed metadata column
A managed metadata column lets you control the information that people can enter into a column. Users select the terms or phrases that they enter in the column from a pre-defined set of managed terms.
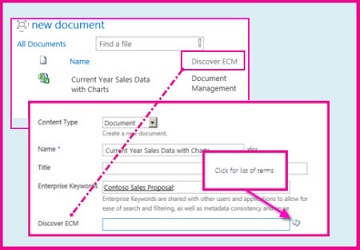
The following illustration shows how this works. The document library in the illustration has a managed metadata column called "Discover ECM". To enter values in the column, a user edits the properties for an item in the library (in this case, the item is a spreadsheet). The name of the managed metadata column, Discover ECM, is the label for a field on the properties page. To see a list of terms, users just click the tags icon.
When you set up a managed metadata column, you can use an existing term set, or you can add a term set specifically for this purpose. To learn how to add a new term set, see Set up a new term set
Create site, list, or library managed metadata columns
Important: You must be a Site Collection Administrator to create or configure site columns. You must have the Manage Lists permission level to create columns for lists or libraries. By default, site owners have Manage Lists permission.
-
You can create a column for lists and libraries, or you can create a site column. Create the column by choosing one of the following procedures:
-
Create a site column for managed metadata
-
On the Home page, select Site Contents.
-
On the Site Contents page, click
 Settings.
 -
Under Web Designer Galleries, click Site columns.
-
On the Site Column page, click Create.
-
On the New Site Column page, in the Name and Type section, type the name of the column
-
-
Create list or library column for managed metadata
-
Go to the list or library where you want to create the column.
-
On the List or Library tab of the ribbon, click List Settings or Library Settings, as appropriate.
-
In the Columns section, click Create Column.
-
On the Create Column page, in the Name and Type section, type the name of the column.
-
-
In The type of information in this column is section, choose managed metadata.
-
In the Group section, select a group for the column or create a group for it.
-
In the Additional Column Settings section, type a description and specify whether the value is required. You can also specify whether you want to enforce unique values for the column.
-
In the Multiple Value field section, specify whether you want to allow multiple values in the column.
Important: If you allow multiple values in the column, users won't be able to sort on this column.
-
In the Display format section, specify whether to display only the term label, or to display the term and its full path in the term set hierarchy.
-
In the Term Set Settings section, do one of the following:
-
To use an existing term set, select Use a managed term set, and then search or browse for the name of the term set. After you select the term set name, you can specify whether to allow users to fill-in values, and set a default value for the column.
-
To create a term set for this column, select Customize your term set, and type a description for the term set. Then, click Edit Using Term Set Manager and follow the steps in Set up a new term set.
-
Click OK.
To modify or edit a managed metadata column
To manage a metadata column, follow either of the previous steps to get to your site, library, or list column Site columns page. On that page, scroll through the defined columns and click the one you want to modify. You will then be back in the editing page where you can change or update the settings.
More benefits of managed metadata columns
Managed metadata columns give users a list of pre-defined terms that they can apply to their content. You can use this feature to help to make sure that people use the terms consistently across the site collection. In addition, updated terms automatically become available to users.
Managed metadata columns have several unique characteristics that help users select and apply terms to content. For example, they support "type-ahead," and offer disambiguation of terms, descriptions, synonyms, and multilingual values. In addition, users don't have to remember all the terms. Instead, they can select terms from a tree that shows the term set hierarchy.
-
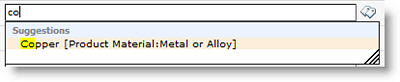
Type-ahead When a user begins to type a value, SharePoint displays a list of all the terms in the associated term set that begin with the characters the user has typed. You can set up type-ahead to show the name of the term set and the term's position in the hierarchy in addition to the term itself.
Users can move their pointer over suggested terms to see descriptive text to help them make appropriate decisions. If synonyms were specified for a term, users can enter those, and the correct terms are assigned automatically.
-
Select from the term set hierarchy When users add or change information in a managed metadata column, they have several options. If they are familiar with the term set, they can just type the new value in the column. If the type-ahead feature offers the correct value, the user can just select it.
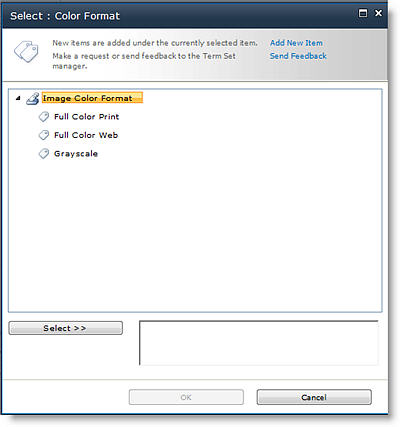
Users can also browse for the appropriate term. They can click the tags icon next to the managed metadata field, and then select a value from a tree that shows the term set hierarchy.
No comments:
Post a Comment