The main use of Publisher is to produce high-quality print publications. These may be printed on a desktop printer or sent out to a copy shop or commercial print shop. For information to help you choose between these options see Printing: Choose between desktop, copy shop, and commercial printing.
Note: The preview window may display in black and white even if your publication(s) includes color if the selected printer does not support color printing, or if the selected printer supports color and you selected Composite Grayscale setting.
Where is the print command?
In Publisher 2010 and later, the Print command is in the Backstage view. To get to the Backstage view, click the File tab in the upper left of Publisher  . In addition to printing, the Backstage view contains commands for saving, opening, and closing files, as well as information about the current publication and sharing the publication, and Publisher options.
Print settings and print preview
The Backstage view for printing looks like this.
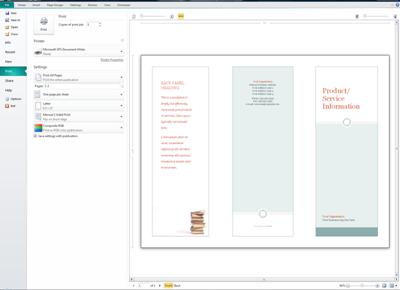
The print settings are on the left and the preview pane is on the right. The settings on the left will affect the printed publication, while the settings on the right only affect your view of the publication.
Note: Some of these controls are dependent on other settings; for example, the color control will only be available if your printer can print in color, and the front/back transparency slider will only be available if you choose print on both sides of the paper.
You can use the print settings to configure the following options.
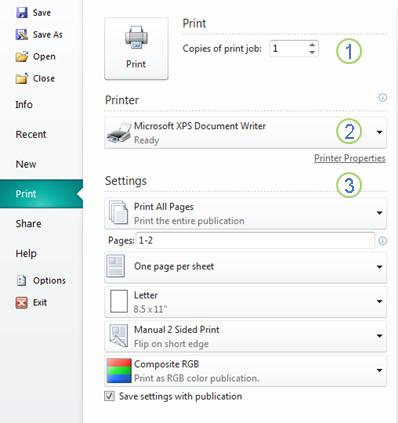
| 1 | | Enter the number of copies of the print job you want to print and press Print to send the job to your printer. |
| 2 | Printer | In addition to selecting from a list of available printers, you can also add a new printer, access the Printer Properties, and print to a file. |
| 3 | Settings | The settings section gives you control over:
|
Note: In Publisher, page size refers to a working area of your publication. Paper, or sheet, size is the size of the paper that you use for printing. A sheet of paper may contain multiple pages, and a large page may print across multiple sheets.
The preview pane changes to reflect changes made in the print settings.
It also provides the following.
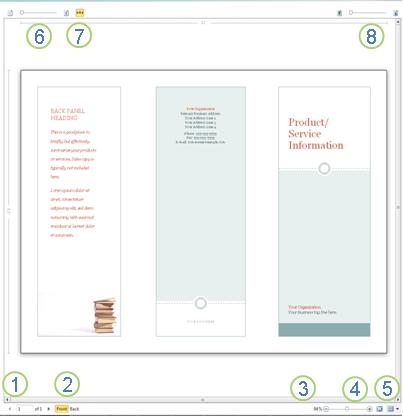
| 1 | Sheet navigation | Move through the sheets of your publication. |
| 2 | Front and Back buttons | These buttons are available when you print on both sides of the sheet of paper: click to view the front or back of the sheet. |
| 3 | Zoom slider | Slide to the left to zoom out and slide to the right to zoom in on your publication. |
| 4 | Fit to sheet | If you are viewing more than one sheet, this button will zoom to view one sheet. |
| 5 | View multiple sheets | If your publication will be printed on multiple sheets of paper, you can use this button to preview more than one sheet at a time. |
| 6 | Show/hide page numbers | This slider will show you the order of the pages being imposed on the sheet(s) of paper. This is particularly useful when you are printing a publication with more than one page on the sheet, such as a greeting card. |
| 7 | Show/hide the rulers | Shows or hides the rulers for the height and width of the currently selected sheet of paper. If you change the paper size in Settings, the rulers will change accordingly. |
| 8 | Transparent view slider | f you are printing on two sides of the sheet, this slider will allow you to see through to the other side of the sheet, like holding the printed paper over a light table. This allows you to be sure that your publication lines up correctly on both sides of the sheet of paper. |
Print your publication
-
Click File > Print.
-
In the Print section, set the number of copies to print in Copies of print job.
-
In the Printer section, make sure that the correct printer is selected.
The preview window will display in black and white, regardless of whether your publication(s) includes color, unless you have selected a color printer.
-
In the Settings section:
-
Make sure that the correct set of pages or sections is selected.
-
Select the format for imposing your pages on the sheet.
-
Set the paper size.
-
Set whether to print on one side of the sheet of paper or both, and when printing on both sides whether to flip the sheet of paper on the long or short side.
-
If your printer is capable of color printing, choose if you want to print color or grayscale.
-
-
Click the Print button to send the publication to your printer.
Print more than one copy of a publication
-
Click File > Print.
-
In the Print section, set the number of copies to print in Copies of print job.
-
Click the Print button to send the publication to your printer.
Print specific pages of a publication
-
Click File > Print.
-
In the Settings section, click in the Pages text box.
-
In the text box, type the page number of the first page that you want to print, type a hyphen, and then type the last page of the range that you want to print, for example: 2-4.
-
Click the Print button to send the publication to your printer.
Print individual pages
-
Click File > Print.
-
In the Settings section, click in the Pages text box.
-
In the text box, type the page number of the first page that you want to print, type a comma, and then type the next page that you want to print. Repeat for each page number that you want to print, for example, 2,4,6,8.
-
Click the Print button to send the publication to your printer.
Print multiple copies of each page
If you are printing labels or business cards, the default option will be Multiple copies per sheet. This will print more than one copy of each page of your publication, with each set of pages on separate sheets of paper. When you choose this option, the Layout Options button becomes available, allowing you to adjust the margin guides to increase or decrease the number of copies of your publication that can fit on a single sheet of paper. For example, if your business card publication contains two pages, each page containing a different business card, and you select Multiple copies per sheet and 10 copies, then a total of 20 copies — 10 copies of each of the two different business cards — will be printed on two sheets of paper, one sheet for each page.
-
Click File >Print.
-
In the Settings section, select Multiple copies per sheet and then select the number of copies.
-
Click the Print button to send the publication to your printer.
Notes:
-
If you click One page per sheet, your publication will be printed in the center of the sheet of paper.
-
If you want to print one page of your publication per sheet at a specific position on the sheet, click Multiple copies per sheet, click Layout Options, and then change your publication's position on the sheet by adjusting the row options, column options, and horizontal and vertical gap values under More print options. This option is available for publications with page sizes that are smaller than the paper sizes, such as advertisements, business cards, and with compliments cards.
-
Print multiple pages on each sheet
When you want to print labels, name tags, or business cards, it is usually most efficient to print a whole series on a single sheet. You can do that in Publisher from the Multiple pages per sheet option on the Print page. When you choose this option, the Layout Options button becomes available, allowing you to adjust the margin guides to increase or decrease the number of copies of your publication that can fit on a single sheet of paper. For example, if you have a set of 10 postcards with different information on each, and you select Multiple pages per sheet and one copy, then all ten pages will print on the one sheet of paper.
Note: This option is available only when the publication page size is smaller than the sheet that the publication is set to print on.
-
Click File > Print.
-
In the Settings section, select Multiple pages per sheet and then select the number of copies.
-
Click the Print button to send the publication to your printer.
Print one or more copies of a publication
-
On the File menu, click Print.
-
Under Copies, enter the number of copies that you want to print.
-
Choose any other options that you want, and then click Print.
Print specific pages of a publication
You can select Current page to print the page you are currently viewing.
Print a range of pages
-
On the File menu, click Print.
-
In the Print dialog box, click the Publications and Paper Settings tab.
-
Under Print range, click Pages.
-
In the text box, type the page number of the first page that you want to print, type a hyphen, and then type the last page of the range that you want to print, for example, 2-4.
-
Click Print.
To print only one page, type the same number in the From and To boxes.
Print individual pages
-
On the File menu, click Print.
-
In the Print dialog box, click the Publications and Paper Settings tab.
-
Under Print range, click Pages.
-
In the text box, type the page number of the first page that you want to print, type a comma, and then type the next page that you want to print. Repeat for each page number that you want to print, for example, 2,4,6,8.
-
Click Print.
Change the number of copies that are printed on a sheet of paper
If you are printing labels or business cards, the default option will be Multiple copies per sheet. With this option, you can adjust the margin guides to increase or decrease the number of copies of your publication that can fit on a single sheet of paper. For example, if your business card publication contains two pages — each page contains a different business card — and you select Multiple copies per sheet and three copies, a total of six copies — three copies of each of the two different business cards — will be printed.
-
Open the publication that you want to print, for example, a label.
-
On the File menu, click Print, and then click the Publication and Paper Settings tab.
-
Do one of the following:
-
Click One page per sheet.
-
Click Multiple copies per sheet.
Notes:
-
If you click One page per sheet, your publication will be printed in the center of the sheet of paper.
-
If you want to print one page of your publication per sheet at a specific position on the sheet, click Multiple copies per sheet, and then change your publication's position on the sheet by adjusting the row options, column options, and horizontal and vertical gap values under More print options This option is available for publications with page sizes that are smaller than the paper sizes, such as Advertisements, Business Cards, and With Compliments Cards.
-
To make it easier to align a publication to a specific manufacturer's product or print multiple copies of a publication on a single sheet of paper, turn crop marks on.
-
-
Change the margins
By adjusting the margins and the horizontal and vertical gaps, you can change the number of copies that will fit on a sheet of paper.
-
Open the publication that you want to print.
-
On the File menu, click Print, and then click the Publication and Paper Settings tab.
-
Under More print options, do one of the following:
-
To increase the number of copies that will fit, decrease the values in the Side margin and Horizontal gap boxes. You may also need to adjust the value for the vertical gap.
-
To decrease the number of copies that will fit, increase the values in the Side margin, Horizontal gap, and Vertical gap boxes.
-
When you change the margins and gaps, the Preview window displays how many copies fit on the sheet of paper.
Tip: If you want to print on a specific manufacturer's product — for example, a sheet of labels — try printing on a blank sheet of paper to make sure that your publication will be properly aligned on the product.
No comments:
Post a Comment