You can create relationships between lists by using a combination of unique columns, lookup columns, and relationship enforcement (cascade and restrict delete), all of which enhance your ability to create more sophisticated business solutions and help preserve the integrity of your data.
Overview of list relationships
The following sections provides important background information about creating relationships between source and target lists, creating unique and lookup columns, and enforcing list relationship behavior. You'll see how to add primary and secondary lookup columns, viewing, editing, and deleting items within list relationships, and managing list relationships when lists have many items.
Using unique and lookup columns to assign books to courses

-
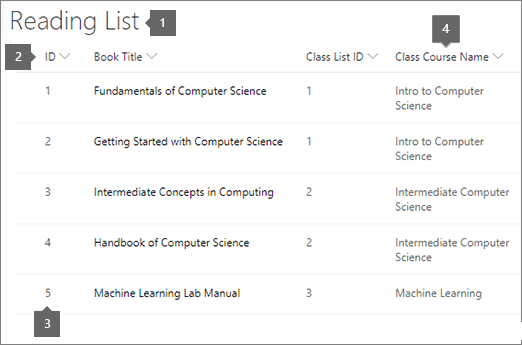
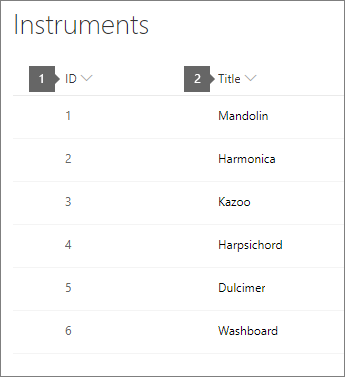
The source list is called Reading List and the target list is called Courses.
-
Each list has unique columns to ensure that the correct data is matched.
-
The primary lookup column in the source list (Reading List) "looks up" the ID column in the target list (Courses) based on a matching value.
-
A secondary lookup column in the source list automatically inserts the Course Name column from the target list.
When you create a column, you can specify that the column must contain unique values. This means that the list can't have any duplicate values in that column. You can't add a list item that contains a duplicate value, modify an existing list item that would result in creating a duplicate value, or restore an item from the Recycle Bin if it would result in a duplicate value. Furthermore, if you create a lookup column in a source list, and you define that column to be unique, the column in the target list also must not contain duplicate values.
Note: Uniqueness is not case-sensitive. For example, ORD-231 and ord-231 are considered duplicate values.
A unique column must also have an index. When you create a unique column, you may be prompted to create the index and it is automatically created when you click OK. Once a unique column has an index, you cannot remove the index from that column, unless you first redefine the column to allow duplicate values.
The following table summarizes what column types can and cannot be used to create unique columns.
| Supported Column Types | Unsupported Column Types |
|---|---|
| Single line of text | Multiple lines of text |
| Choice (single value) | Choice (multi-valued) |
| Number | Calculated |
| Currency | Hyperlink or Picture |
| Date and Time | Custom Columns |
| Lookup (single value) | Lookup (multi-valued) |
| Person (single value) | Person (multi-valued) |
| Yes/No |
To create a relationship between two lists, you create a lookup column in the source list that retrieves (or "looks up") one or more matching values from a target list. Once you create this lookup column (the primary column), you can continue to add additional columns (secondary columns) from the target list to the source list. Additional secondary columns must have a supported data type described below.
The following table summarizes the column types that can and can't be used to create lookup columns.
| Supported Column Types | Unsupported Column Types |
|---|---|
| Single line of text | Multiple lines of text |
| Number | Currency |
| Date and Time | Person or Group |
| Calculated | |
| Hyperlink or Picture | |
| Custom Columns | |
| Yes/No | |
| Choice | |
| Lookup |
There are two types of lookup columns that you can create, a lookup column with an enforced relationship and a lookup column with an unenforced relationship.
In a lookup column with an enforced relationship (also called referential integrity), you can lookup single values and maintain the integrity of your data in the target list in one of two ways:
Cascade Delete When an item in the target list is deleted, the related item or items in the source list are also deleted. In this case, you want to make sure that all related items are deleted as part of one database transaction. For example, if you delete an order in a target list, you can ensure that the corresponding order items in the source list is also deleted. You don't want to have order items without a corresponding order, because that would create "orphan" order items that might cause confusion later .
Restrict Delete When you try to delete an item in the target list, and it has one or more related items in the source list, you are prevented from deleting the item in the target list. In this case, you want to ensure that the related item in the target list is preserved. For example, if someone tries to delete an order item from a target list, a customer might still have that order pending, and you want to prevent that delete operation from occurring until the order has been processed. You don't want the customer's order to be accidentally deleted because that would affect your ability to complete the order.
-
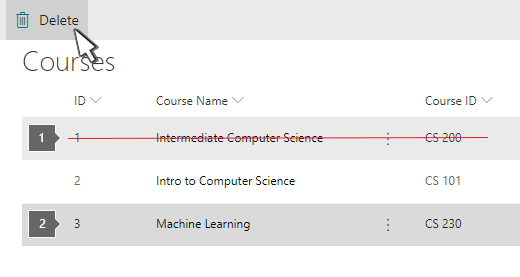
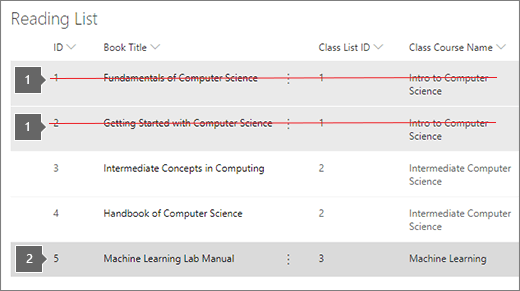
A cascade delete operation ensures all related items are deleted in one database transaction. For example, if you deleted the item in the Courses list with a list ID of 1, it would also delete items in the Reading List which referenced the deleted item.
-
A restrict delete operation prevents deleting items in the target list if related source list items exist. So, if you tried to delete the item in the Courses list with a list ID of 3, you would be prevented from doing so, because it's still referenced by at least one item in the Reading List.
Enforcing a list relationship behavior helps keep your data valid and prevent inconsistencies that might cause problems down the road.
Note: You must have Manage Lists permission on a list to create or modify an enforced relationship.
A lookup column that enforces a relationship must also have an index. When you create a lookup column that enforces a relationship, you might be prompted to create the index. When you select OK, the index is automatically created. After a lookup column that enforces a relationship has an index, you can't remove the index from that column, unless you first remove the enforced relationship.
A lookup column with an unenforced relationship
In a lookup column with an unenforced relationship, you can lookup single or multiple values from the source list in the target list. When you have permissions to delete an item in the source list, there are no additional delete restrictions or delete operations that occur in the target list.
One of the benefits of creating list relationships is that you can display and edit columns from two or more lists, on one page. When you create a lookup column in a source list, the primary column displays values from the target list column, but you can also specify that additional, secondary columns from the target list also display alongside the primary column and the other source list columns.
Note: You should specify accepting multiple values, and additional columns related to the primary column when you create the primary column. While you can rename the column from the list, you can't add in these other features. To change to multiple values, add columns, or other options after you've created a list, go to Settings>List settings.
The primary column value is a link that you can select to the display all the column values of that item in the target list. Each secondary column value from the target list displays as text in the source list column. If you create a lookup column with multiple values, each column from the target list, whether primary or secondary, display their multiple corresponding values delimited by semicolons. You can manipulate these primary and secondary columns in list view in much the same way as the columns from the source list, by, for example, adding, removing, filtering, and sorting them.
The primary column name is a name you provide when you create the lookup column. By default, each secondary column name follows a standard naming convention of <primary column name in source list>: <column name in target list>. Changing the name of the primary column, therefore, changes the names of all secondary columns. However, you can modify the default secondary column names and descriptions to make the names more meaningful to you.
-
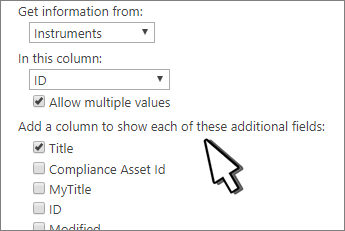
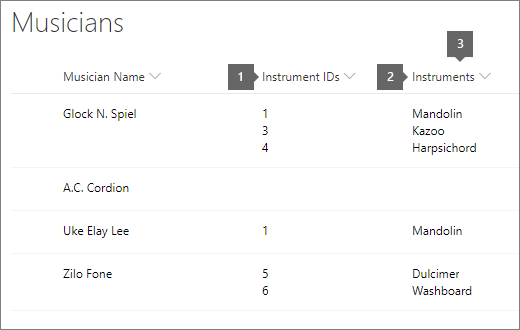
1. A primary lookup column with multiple values.
-
2. A secondary lookup column with multiple values.
-
3. The column name has been changed from the default name of Instruments: Title to Instruments.
Note: The column name ID is available by default but hidden. To use it, select View Options, and then select Edit current view. Scroll and check the Display box.
When you create list relationships by using lookup columns, unique columns, and lists with enforced relationships, you can reach a resource threshold or limit and may be blocked under the following circumstances:
-
If you make a column unique in an existing list that has more items than the List View Threshold (but note that adding one item to a list that makes the list greater than the List View Threshold is an operation that is not usually blocked).
-
If you turn on Cascade Delete or Restrict Delete for a lookup field in a list that has more items than the List View Threshold.
-
You have exceeded the List View Lookup Threshold, which by default is twelve lookup columns.
-
The number of items in a delete operation exceeds 1,000.
For more info about managing lists with many items, see Manage lists and libraries with many items.
Warning: You can't do the following things:
-
Create a unique column in a list with item-level permissions defined.
-
Break inheritance of permissions from a list to a list item if the list contains a unique column.
-
Create a unique column or modify a column to be unique in a list that contains items with unique permissions or one that has content approval enabled.
To add a new column, follow these steps:
-
Navigate to the site containing the list.
-
Select the name of the list on the site, or select Settings
 , select Site Contents, and then select the name of the list.
 -
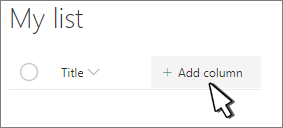
Find the column headers at the top of the list. Select +Add Column to the right of the column headers.
-
A dropdown appears with various types of columns that you can create. Choose one of the following column types:
-
Single line of text
-
Multiple lines of text
-
Location
-
Number
-
Yes/No
-
Person
-
Date
-
Choice
-
Hyperlink
-
Picture
-
Currency
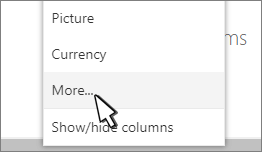
Note: If you want to create a Lookup column, select More from the dropdown. Name your column, and select the Lookup type from the column options screen. After this, you can skip steps 5 and 6.
-
-
Add your column name and information in the pane which appears on the right side of the page.
-
Toggle Enforce unique values to Yes.
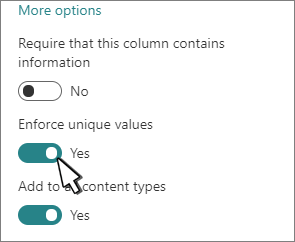
If you select an unsupported data type for a column, Enforce unique values does not appear.
-
You can't remove the index of a unique column. To remove the index, you must change the column from a unique column to one that allows duplicate values first, and then remove the index.
-
If you try to change an existing column from duplicate values to unique values, you may be prevented from doing this operation if the existing column contains duplicate values. You must remove all the duplicate values first, and then change the column from allowing duplicate values to a unique column.
-
If you want to change the data type of the unique column, do the following:
-
Change the column to allow duplicate values
-
Remove the index
-
Change the column to the other supported data type
-
Then make the column unique.
-
These steps walk you through setting up a look up column that displays the primary column, and optionally a secondary column into a list. The primary column can be indexed, but since the secondary column (or field) is controlled by the primary, it can't be unique or indexed.
-
Navigate to the site containing the list.
-
Select the name of the list on the site navigation, or select Settings
, select Site Contents, and then select the name of the list. -
Find the column headers at the top of the list. Select +Add Column to the right of the column headers.
-
From the dropdown, select More.
-
Under The type of information in this column is, select Lookup(information already on this site).
-
In the Get information from field, select a target list.
-
In the In this column field, select a primary column.
-
Under Add a column to show each of these additional fields, for each secondary column you want to add, check the checkbox next to the column name. Only columns with supported data types are listed.
-
Later on, if you want to add or remove secondary columns, modify the lookup column and make the selections you want.
Note: You can't index a secondary column or make a secondary column unique.
-
If you want the lookup columns to display in the default view, select Add to default view.
-
To create an enforced relationship, select Enforce relationship behavior and then select Restrict Delete or Cascade Delete.
-
Select OK.
No comments:
Post a Comment