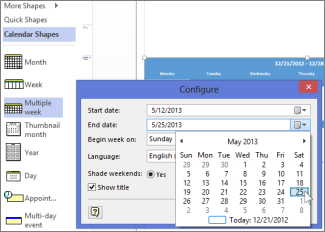
To create a calendar in Visio, start with the calendar template and use shapes to set up the time periods—for example, daily or yearly. Then drag shapes onto the calendar for events, reminders or notes, and configure them to include data about the occasions they represent.
The Calendar template is available in the Schedule category in Visio.
-
Click File > New, and then in the search box type Calendar.
-
Click the Calendar template and click Create.
-
From Calendar Shapes, drag the shape for the type of calendar you want, such as Day, Week or Month.
-
In the Configure box that appears, specify the date range you want the calendar to cover, and set the other options, and click OK. Configure automatically fills the correct dates into the calendar days.

-
Click File > New, and then in the Suggested searches list, click the Schedule category.
-
Click the Calendar template.
-
In the Calendar template description box, click Create.
-
From Calendar Shapes, drag the shape for the type of calendar you want, such as Day, Week or Month.
-
In the Configure box that appears, specify the date range you want the calendar to cover, and set the other options, and click OK. Configure automatically fills the correct dates into the calendar days.

To change the date range of the calendar, right-click the calendar and click Configure. In the Configure box, change the start or end date.
Note: The Configure box not working for you? See I click Configure for a calendar but nothing happens.
Add or change an appointment
-
From Calendar Shapes, drag the Appointment shape onto a calendar day.
-
Right-click the shape and select Configure.
-
In the Configure box, specify the start and end time, and other information about the appointment, and then click OK.
To change the date, time or other information about an appointment, right-click it and click Configure. Then change the information as needed.
Tip: When you have the Shape Data box open on your drawing, you can also see and change appointment information for any appointment you click. To open the Shape Data box, right-click an appointment and click Shape Data. It stays open on your drawing until you close it or close the drawing.
Add or change a multi-day event
-
From Calendar Shapes, drag the Multi-day event shape onto the day on which the event begins.
-
Right-click the shape and select Configure.
-
In the Configure box, specify the details, such as the ending date and place, and then click OK.
Add calendar art
From Calendar Shapes, drag a shape, such as Important, Celebration, Pushpin, or a weather shape, onto the day you want to mark.
Add text to the calendar
Double-click any shape on the calendar, including a day, appointment, event or art shape, to automatically create a text box, and add text. To edit the text later, double-click the day or shape again.
Add a thumbnail image of the previous or next month
-
From Calendar Shapes, drag the Thumbnail month shape onto your drawing page.
-
In the Shape Data box, specify the calendar options you want, and then click OK.
Create a weekly or multi-week calendar
-
From Calendar Shapes, drag the Week or Multiple week shape onto the drawing page.
-
In the Configure box that appears, specify the calendar options you want and then click OK.
Create a yearly calendar
-
From Calendar Shapes, drag the Year shape onto the day onto the drawing page.
-
In the Shape Data box that appears, specify the year that you want to display as a calendar, and other additional options and then click OK.
Create a calendar
-
Click the File tab, click New, and then click the Schedule category.
-
Double-click the Calendar template.
-
From Calendar Shapes, drag the shape for the type of calendar you want to create onto the page.
-
In the Configure dialog box that appears, specify the calendar options you want, and then click OK.
Mark important days
Add or change an appointment
-
From Calendar Shapes, drag the Appointment shape onto a calendar day.
-
In the dialog box, specify the appointment options, and then click OK.
The appointment is associated with the day and moves with the day if you reposition it. To change an appointment, right-click it, and then click Configure.
Add or change a single-day or multi-day event
-
From Calendar Shapes, drag the Multi-day event shape onto the day on which the event begins.
-
In the Configure dialog box, specify the options and then click OK.
The event is associated with the day and moves with the day if you reposition it. To change an event, right-click it, and then click Configure.
Add calendar art
-
From Calendar Shapes, drag a shape, such as Important, Celebration, or Pushpin, onto the day you want to mark.
Calendar art doesn't move if you change the date. However, if you delete the calendar, the calendar art shape is also deleted.
Add a thumbnail image of the previous or next month
-
From Calendar Shapes, drag the Thumbnail month shape onto your drawing page.
-
In the Shape Data dialog box, specify the calendar options that you want, and then click OK.
Create a weekly or multi-week calendar
-
From Calendar Shapes, drag the Week or Multiple week shape onto the drawing page.
-
In the Configure box that appears, specify the calendar options you want and then click OK.
Create a yearly calendar
-
From Calendar Shapes, drag the Year shape onto the day onto the drawing page.
-
In the Shape Data box that appears, specify the year that you want to display as a calendar, and other additional options and then click OK.
Create a weekly or multi-week calendar
Weekly and multi-week calendars offer a lot of flexibility. A weekly calendar can span from 2 to 8 days.

A multi-week calendar includes weeks from the same or adjacent months.

Note: Multi-week calendars spanning more than 35 days will not fit on the standard drawing page. You can resize the calendar shape by selecting it, and then dragging a corner selection handle  . If you want to create a multi-week calendar that spans significantly more than 35 days, create a new drawing page, and then add a new multi-week calendar to each page in your drawing.
-
On the File menu, point to New, point to Schedule, and then click Calendar.
-
For each weekly calendar that you want to create, on the Insert menu, click New Page.
-
From Calendar Shapes, drag the Week or Multiple week shape onto each drawing page.
-
In the Configure dialog box, specify the calendar options that you want, and then click OK.
-
Change the title by double-clicking it, and then typing the text that you want.
Tip: If the title isn't visible, right-click the week, and then click Configure. In the dialog box, select the Show title check box.
-
You can add appointments, events, or calendar art.
-
Add or change an appointment
-
From Calendar Shapes, drag the Appointment shape onto a calendar day.
-
In the dialog box, specify the appointment options, and then click OK.
The appointment is associated with the day and moves with the day if you reposition it.
-
To change an appointment, right-click it, and then click Configure.
Note: If you change the date of the day, the appointment is deleted.
-
-
Add or change a single-day or multi-day event
-
From Calendar Shapes, drag the Multi-day event shape onto the day on which the event begins.
Note: You can use the Multi-day event shape to create events spanning one or more days.
-
In the Configure dialog box, specify the subject, location, start date, end date, and date format, and then click OK.
The event is associated with the day and moves with the day if you reposition it.
Note: If you specified a one-day event, the Multi-day event shape snaps to the specified date. If the event spans more than one day, the shape expands across all of the specified dates.
-
To change an event, right-click it, and then click Configure.
Tip: You can also drag the ends of the Multi-day event shape to expand the date range.
-
-
Add calendar art
-
From Calendar Shapes, drag a shape, such as Important, Celebration, or Pushpin, onto the day on which you want it to appear.
You can resize calendar art by dragging a selection handle
 .
.Note: Calendar art associates with the day, not the date you place it on, so if you change the date, the calendar art shape doesn't move to the new date. However, if you delete the calendar, the calendar art shape is also deleted.
-
-
Create a yearly calendar
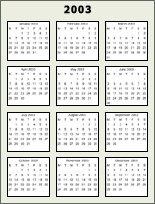
You can create a one-year calendar on one page, as in the following illustration, or a multi-year calendar with each year on a different page.

-
On the File menu, point to New, point to Schedule, and then click Calendar.
-
For each yearly calendar you want to create, on the Insert menu click New Page.
-
From Calendar Shapes, drag the Year shape onto each drawing page.
-
In the Shape Data dialog box, specify the calendar options you want, and then click OK.
Notes:
-
To highlight particular days or months in a year calendar, subselect the day or month that you want to highlight. On the Format toolbar, click the arrow next to the Fill Color
 button, and then click the color that you want. Repeat for the additional days or months that you want to highlight.
 -
To quickly change the year or the day that weeks begin on, right-click the Year shape, and then click Configure.
-
To change the color scheme for the year, right-click any empty area on the drawing page, and then click Color Schemes.
-
No comments:
Post a Comment