You can use Access macros to create custom shortcut menus that appear when you right-click forms, reports, or individual controls. You can also create custom menus that appear on the Ribbon for specific forms or reports.
To create a menu by using macros, you perform three main steps:
-
Create a macro object with submacros that contain the menu commands.
-
Create another macro object that creates the menu itself.
-
Attach the menu to a control, a form, a report, or to the database as a whole.
The following sections walk you through these steps in detail.
Note: Are you using Access 2007? If so, skip down to the section Create custom shortcut menus in Access 2007.
Tip: If you want to learn how to create custom shortcut menus in Access using Visual Basic for Applications (VBA) code, see the article Create a shortcut menu for a form, form control, or report.
Step 1: Create a macro object with submacros that contain the menu commands
In this step, you create a macro object with submacros, each submacro of which will be a separate command on your shortcut menu.
What is a submacro?
You can use a submacro within a macro object to define a set of macro actions. Submacros within a macro object can be called separately from various control and object events. The individual submacros within a macro object each have a unique name and can contain one or more macro actions.
-
On the Create tab, in the Macros & Code group, click Macro.
-
For each command that you want on your custom Shortcut Menu:
-
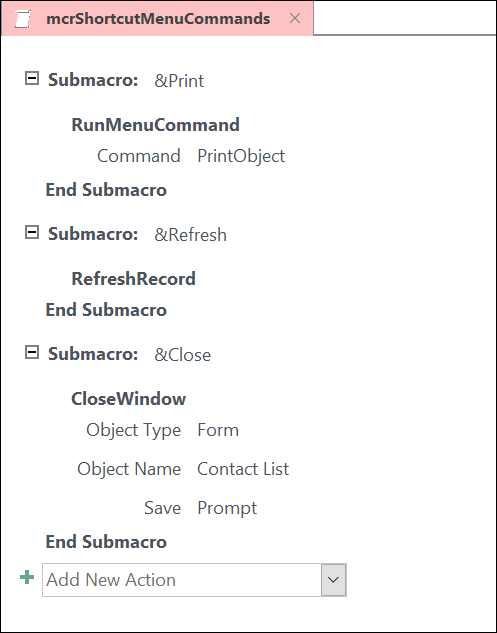
Add a Submacro Macro statement to the macro design window and name the submacro what you want to display on the shortcut menu (for example, "Print" or "Refresh").
Tip: To create an access key so that you can use the keyboard to choose the command, type an ampersand (&) before the letter that you want to be the access key in the command name (for example, "&Refresh"). This letter will be underlined on the menu.
-
Within the submacro, select the first action you would like to take place when you click the command on the shortcut menu.
-
If there are more actions that you want to take place when you select this command, add them as separate macro actions within the same submacro.
-
-
Save and name the macro object for example, mcrShortcutMenuCommands.
The following illustration shows an example macro object with three submacros for a custom menu or shortcut menu.
Step 2: Create a second macro object that creates the menu
This step might seem redundant, but to create the shortcut menu from the macro object that you created in Step 1, you must create a second macro object that contains the AddMenu macro action. This macro action is sometimes called the "menu macro".
-
On the Create tab, in the Macros & Code group, click Macro.
-
In the Add New Action combo box on the macro design window, select AddMenu.
-
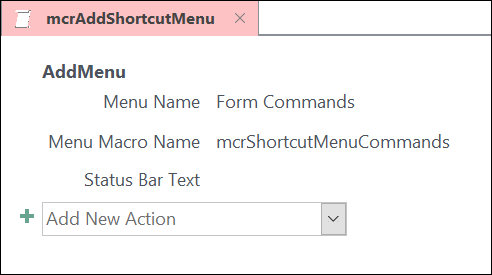
In the Menu Name argument box for the AddMenu macro action, type the name of the menu (for example, "Form Commands"). This argument is not required, but is recommended if, in Step 3, you plan to add the menu to a Ribbon tab (such as the Add-Ins tab of a form or report). If the menu is added as a shortcut menu in Step 3, the Menu Name argument is ignored.
-
In the Menu Macro Name argument box, enter the name of the macro object that you created in Step 1.
-
Save and name this second macro object, for example, mcrAddShortcutMenu.
The following illustration shows an example menu macro object that creates the menu we designed in Step 1.
Step 3: Attach the menu to a control, form, report, or database
Depending on where you want the menu to appear, use one or more of the following procedures.
Add the menu to the Add-Ins tab of a form or report
Use this procedure if you want the menu to appear on the Add-Ins tab for a specific form or report.
-
In the Navigation Pane, right-click the form or report where you want the menu to appear, and then click Design View.
-
On the Design tab, in the Tools group, click Property Sheet.
-
Select the entire object by selecting Form or Report from the list at the top of the Property Sheet task pane.
-
On the Other tab on the Property Sheet, in the Menu Bar property box, type the name of the macro object that you created in Step 2 (in this example, "mcrAddShortcutMenu").
-
Save your form or report changes.
The next time you open the form or report, the Add-Ins tab appears in the Ribbon. Click the tab to see the menu, as shown in the following illustration:

For more information about Ribbon customization techniques, such as adding custom tabs or hiding the default tabs, see the article Create a custom ribbon in Access.
Add the menu as a shortcut menu for a form, report, or control
Use this procedure if you want the menu to appear when you right-click a specific form, report, or control.
-
In the Navigation Pane, right-click the form or report where you want the shortcut menu to appear, and then click Design View.
-
On the Design tab, in the Tools group, click Property Sheet.
-
Select the control or object to which you want to attach the shortcut menu.
To select the entire object, select Form or Report from the list at the top of the Property Sheet task pane.
-
On the Other tab on the Property Sheet, in the Shortcut Menu Bar property box, type the name of the macro object that you created in Step 2 (in this example, "mcrAddShortcutMenu").
-
Make sure the Shortcut Menu property is set to Yes.
-
Save your form or report changes.
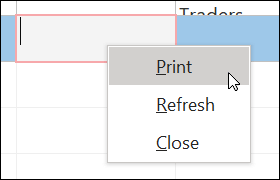
The next time you open the form or report and then right-click the form, report or control, you'll see your shortcut menu with the associated commands, as shown in the following illustration:
Add the menu as a global shortcut menu
This procedure replaces all of the default shortcut menus in the current database. Custom shortcut menus that you have attached to specific forms, reports, or controls are not affected.
-
Click File > Options.
-
In the Access Options dialog box, click Current Database.
-
Under Ribbon and Toolbar Options, in the Shortcut Menu Bar box, type the name of the macro that you created in Step 2 (in this example, "mcrAddShortcutMenu").
-
Click OK to save your changes in the Access Options dialog box.
-
Close and then reopen your database for the changes to take effect.
Custom shortcut menus replace the default shortcut menus for the objects they are attached to. If you want to retain certain Access commands to use on these menus, use the RunCommand macro action to put the commands into the macro objects for the menus you want them in.
A custom shortcut menu that is attached to a control supersedes any other custom shortcut menus that are defined in the database. A custom shortcut menu that is attached to a form or report supersedes a custom global shortcut menu.
When you specify a menu macro for a form or report or for the database, Access runs this menu macro whenever the form, report, or database is opened. If you make changes to the menu macro object or the macro object that defines its commands while the form, report, or database is open, you must close the form, report, or database and reopen it to see the changes.
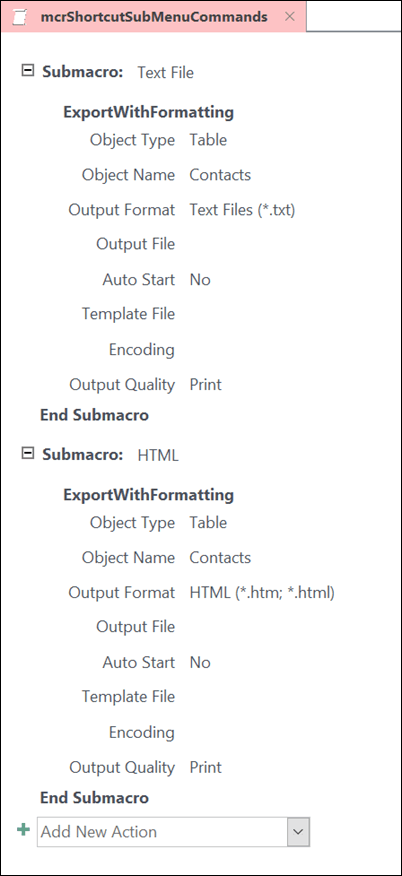
To create a submenu on a shortcut menu list of commands, follow Step 1 to create a separate macro object that contains only the submenu commands, as shown in the following illustration:
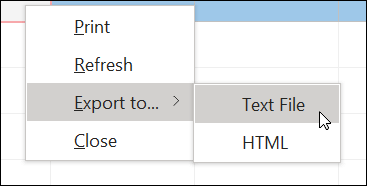
Then, follow Step 1 again to define the commands for the higher-level menu object. Add the submenu as an item in the higher-level macro object by using the AddMenu macro action. The following illustration shows the macro object for a menu that contains a submenu. The third submacro in this example macro object creates the Export to... submenu (mcrShortcutSubMenuCommands).
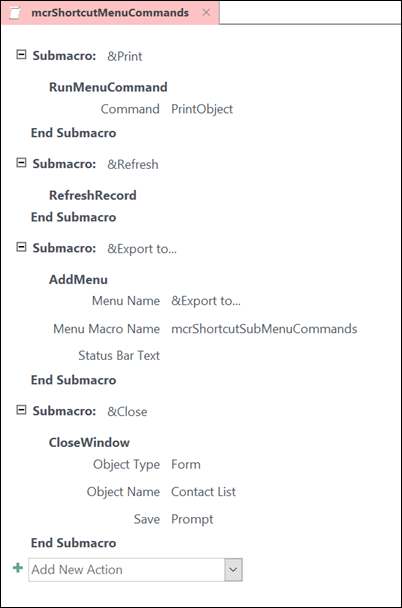
The following illustration shows the resulting completed shortcut menu with a submenu:
You can create multiple levels of submenus by using AddMenu macro actions in the macro objects for each level of menu. Make sure to supply a value for the Menu Name argument for each AddMenu action, otherwise the submenu will appear as a blank line in the higher-level menu.
Macro expression conditions using If/Then/Else blocks are supported in the top-level menu macro object only. In other words, you can use a condition expression in a menu macro object to determine if a particular menu or shortcut menu will be displayed, but only for the menus on the top level. You can't use condition expressions to display or hide commands or submenus on the menus. You can also use a condition expression to hide or show a custom shortcut menu or global shortcut menu.
Optionally, the menu macro that you create in Step 2 can be part of a macro object. For example, if you have several shortcut menus for different objects or controls, you can create a single macro object that contains all of the necessary menu macros. Make sure to have a unique name for each submacro. In Step 3, use the following notation to refer to the macro: MacroObjectName.SubmacroName. For example, mcrAddShortcutMenus.AddMenu2.
Create custom shortcut menus in Access 2007
The macro design window is different in Access 2007 compared to later versions so expand the following sections to follow along if you're using Access 2007.
Step 1 for Access 2007: Create a macro group that contains the menu commands
In this step, you create a macro group, each macro of which will be a separate command on your shortcut menu.
What is a macro group?
A macro group is a single macro object that contain two or more independent macros. The individual macros are identified by typing a name for each macro in the Macro Names column. In the following illustration, Macro3 is a macro group. NotFoundMsg and FoundMsg are individual macros within the group, each macro consisting of two macro actions.
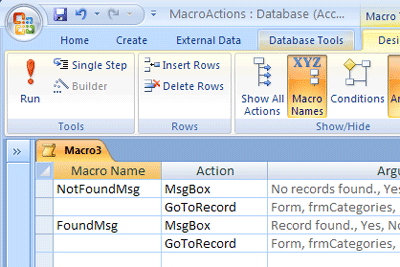
Note: The Macro Name column is hidden by default. To display the Macro Name column, on the Design tab, in the Show/Hide group, click Macro Names.
-
On the Create tab, in the Other group, click Macro. If this command is unavailable, click the arrow beneath either the Module or the Class Module button, and then click Macro.
-
On the Design tab, in the Show/Hide group, click Macro Names to display the Macro Name column.
-
For each command that you want on your custom Shortcut Menu:
-
In the Macro Name column, enter the text that you want to display on the shortcut menu (for example, "Print report" or "Save").
-
Note: To create an access key so that you can use the keyboard to choose the command, type an ampersand (&) before the letter that you want to be the access key in the command name (for example, "&Save"). This letter will be underlined on the menu.
-
-
In the Action column, select the first action you would like to take place when you click the command on the shortcut menu.
-
If there are more actions that you want to take place when you select this command, add them on the subsequent lines. For each subsequent action, leave the Macro Name cell blank.
-
Note: To create a line between two menu commands, type a hyphen (-) in the Macro Name column between the appropriate menu commands.
-
-
-
Save and name the macro, for example, mcrShortcutMenuCommands.
The following illustration shows an example macro group for a custom menu or shortcut menu.
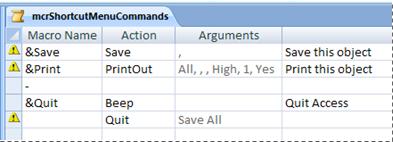
Step 2 for Access 2007: Create a macro that creates the menu
This step might seem redundant, but to create the shortcut menu from the macro group that you created in Step 1, you must create a second macro that contains the AddMenu macro action. This macro is sometimes called the "menu macro".
-
On the Create tab, in the Other group, click Macro. If this command is unavailable, click the arrow beneath either the Module or the Class Module button, and then click Macro.
-
On the first line of the macro, select AddMenu in the Action list.
-
Under Action Arguments, in the Menu Name box, type the name of the menu (for example, "Report Commands"). This argument is not required, but is recommended if, in Step 3, you plan to add the menu to a Ribbon tab (such as the Add-Ins tab of a form or report). If the menu is added as a shortcut menu in Step 3, the Menu Name argument is ignored.
-
In the Menu Macro Name box, enter the name of the macro that you created in Step 1.
-
Save and name the macro, for example, mcrAddShortcutMenu.
The following illustration shows an example menu macro that creates the menu we designed in Step 1.

Step 3 for Access 2007: Attach the menu to a control, form, report, or database
Depending on where you want the menu to appear, use one or more of the following procedures.
-
Add the menu to the Add-Ins tab of a form or report
Use this procedure if you want the menu to appear on the Add-Ins tab for a specific form or report, as shown in the following illustration:

-
In the Navigation Pane, right-click the form or report where you want the menu to appear, and then click Design View.
-
On the Design tab, in the Show/Hide group, click Property Sheet.
-
Select the entire object by selecting Form or Report from the list at the top of the Property Sheet task pane.
-
On the Other tab on the Property Sheet, in the Shortcut Menu property box, type the name of the macro that you created in Step 2 (in this example, "mcrAddShortcutMenu").
The next time you open the form or report, the Add-Ins tab appears in the Ribbon. Click the tab to see the menu.
For more information about Ribbon customization techniques, such as adding custom tabs or hiding the default tabs, see the article Create a custom ribbon in Access.
The Ribbon is a component of the Microsoft Office Fluent user interface.
-
-
Add the menu as a shortcut menu for a form, report, or control
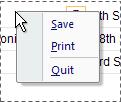
Use this procedure if you want the menu to appear when you right-click a specific form, report, or control, as shown in the following illustration:
-
In the Navigation Pane, right-click the form or report where you want the shortcut menu to appear, and then click Design View.
-
On the Design tab, in the Show/Hide group, click Property Sheet.
-
Select the control or object to which you want to attach the shortcut menu.
Note: To select the entire object, select Form or Report from the list at the top of the Property Sheet task pane.
-
On the Other tab on the Property Sheet, in the Shortcut Menu Bar property box, type the name of the macro that you created in Step 2 (in this example, "mcrAddShortcutMenu").
-
-
Add the menu as a global shortcut menu
This procedure replaces all of the default shortcut menus in the current database. Custom shortcut menus that you have attached to specific forms, reports, or controls are not affected.
-
Click the Microsoft Office Button and then click Access Options.
-
In the Access Options dialog box, click Current Database.
-
Under Ribbon and Toolbar Options, in the Shortcut Menu Bar box, type the name of the macro that you created in Step 2 (in this example, "mcrAddShortcutMenu").
-
-
Custom shortcut menus replace the default shortcut menus for the objects they are attached to. If you want to retain certain Access commands to use on these menus, use the RunCommand action to put the commands into the macro groups for the menus you want them in.
-
A custom shortcut menu that is attached to a control supersedes any other custom shortcut menus that are defined in the database. A custom shortcut menu that is attached to a form or report supersedes a custom global shortcut menu.
-
When you specify a menu macro for a form or report or for the database, Access runs this menu macro whenever the form, report, or database is opened. If you make changes to the menu macro or the macro group that defines its commands while the form, report, or database is open, you must close the form, report, or database and reopen it to see the changes.
-
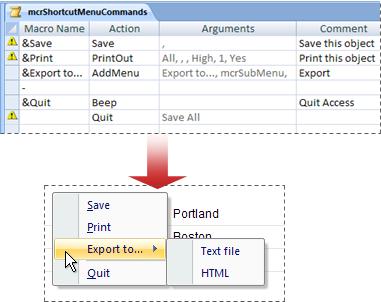
To create a submenu, follow Step 1 to create a separate macro group that contains only the submenu commands. Then, follow Step 1 again to define the commands for the higher-level menu. Add the submenu as an item in the higher-level macro group by using the AddMenu macro action. The following illustration shows the macro group for a menu that contains a submenu, and then shows the resulting shortcut menu. The third line in the macro group creates the Export To... submenu (mcrSubMenu).
You can create multiple levels of submenus by using AddMenu actions in the macro groups for each level of menu. Make sure to supply a value for the Menu Name argument for each AddMenu action, otherwise the submenu will appear as a blank line in the higher-level menu.
-
Macro conditions are supported in the top-level menu macro only. In other words, you can use a condition in a menu macro to determine if a particular menu or shortcut menu will be displayed, but only for the menus on the top level. You can't use conditions to display or hide commands or submenus on the menus. You can also use a condition to hide or show a custom shortcut menu or global shortcut menu.
-
Optionally, the menu macro that you create in Step 2 can be part of a macro group. For example, if you have several shortcut menus for different objects or controls, you can create a single macro object that contains all of the necessary menu macros. Make sure to display the Macro Name column and type a unique name for each macro. In Step 3, use the following notation to refer to the macro: macrogroupname.macroname. For example, mcrAddShortcutMenus.AddMenu2.
No comments:
Post a Comment