This article will help you get answers to the most common mail merge issues when using Publisher: Making changes to a data source or address list during the mail merge process, adding spaces to a merge field so that it looks the way you want it to, saving the merged publication, and printing different merged pages on a sheet (for example, different labels on a sheet of labels).
Edit an existing address list
If you're working on your merge publication and you want to make changes to your data source or address list, do the following:
-
Under Create recipient list, click Use an existing list, and then click Next: Create or connect to a recipient list.
By default, Microsoft Publisher stores data sources in the My Data Sources folder. You may need to browse to locate your data source.
-
In the Select Data Source dialog box, click the data source that you want.
-
Click Open.
Depending on the type of data source that you select, other dialog boxes may appear requesting specific information.
For example, if your data source is a Microsoft Office Excel workbook that has information on multiple worksheets, you need to select the worksheet that contains the information that you want, and then click OK.
-
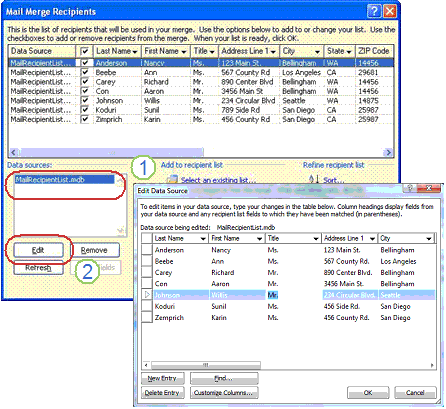
In the Mail Merge Recipients dialog box, click the name of the data source and then click Edit.

-
In the Edit Data Source box you can edit or delete existing addresses, or add new entrys.
-
When you are done editing the address list, click OK and then Yes to update the address list.
Note: For more information about creating a data source or an address list, see Create a data source for a mail merge.
Insert spaces in merge fields
The most common issue with inserting merge fields in a document is getting the correct spacing between the merge fields, particularly with merge fields that are not always present, such as middle initials. You can add spaces directly on the page between the merge fields, but this will result in extra spaces if some of the addresses do not use all the merge fields. To ensure that all your fields get the space they need, insert spaces in the address list itself.
For example, to ensure that the reciprient's names will appear correctly whether or not an item in your address list contains a middle initial, do the following:
-
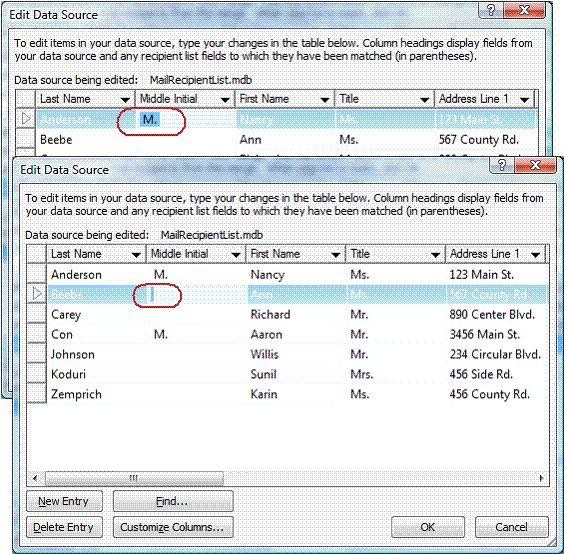
In the Middle Initial entry for each recipient that contains a Middile Initial, add a space, by pressing the space bar, before and after the initial.
-
In the Middle Initial entry for each recipient that does not contain an initial, add a space.

Save the merged publication
A mail merge contains both the information that is the same in each copy and some placeholders for the information that is unique to each copy. An example of this is a personalized newsletter in which the body of the newsletter is the same for all recipients, but the mailing address and introduction are different.
The most common issue with creating the merged publication is not saving both the publication with the merge fields and the merged pages publication.
Create merged publication is step three in the Mail Merge wizard. In this step, you have three choices:
-
Print This option prints the merged publication.
-
Merge to a new publication This option opens a new publication with a page for each set of merge data.
-
Add to an existing publication This option prompts you to choose a publication, and then it adds, the merged pages to the end of that publication.
To save both the merged publication and the publication that contains the merged fields, click the Merge to a new publication option. A new publication window opens and displays the merged pages publication. The merge field publication is hidden behind the merged pages publication. Be sure to save both publications.
Then you can print the merged pages publication.
Print multiple labels, name tags, or postcards on a sheet
The most common issue with printing the publication is printing one of each of the merged pages on a sheet of paper—for example, one of each different mailing labels on a sheet of mailing label paper.
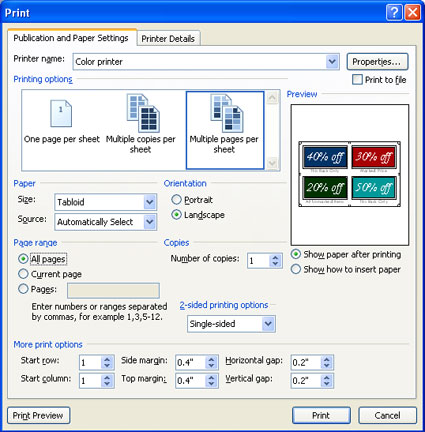
This happens because if you choose the Print option, the Print dialog box defaults to the Multiple copies per sheet option and prints out an entire sheet of labels for each address rather than printing one address per label on the sheet.
To print different sets of merge data — for example, different names and addresses — on each sheet of paper, click Multiple pages per sheet in the Printing options section.

No comments:
Post a Comment