Set up text columns by using layout guides
Setting up text columns using layout guides is useful if you are working with a publication that doesn't have predesigned text columns (for example, if you're creating a newsletter from scratch, rather than from a predesigned template).
In this article
What are layout guides?
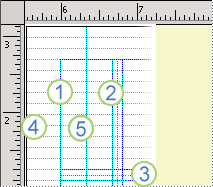
Layout guides include margin, column, row, and baseline guides. Publisher also provides ruler guides.

1. Margin guides
2. Column guides
3. Row guides
4. Baseline guides
5. Ruler guides
You can use the column and row layout guides to organize text, pictures, and other objects into columns and rows so that your publication has an ordered, consistent look.
When you use layout guides to set up a grid on a master page, the grid appears on every page in your publication where that master page is used. The grid does not show when you print your publication.
Create columns and rows with layout guides
-
Click Page Design > Guides > Grid and Baseline Guides.
-
Click the Grid Guides tab.
-
Under Column Guides, enter the number of columns that you want in the Columns box, and then enter the amount of space that you want between the columns in the Spacing box.
-
Under Row Guides, enter the number of rows that you want in the Rows box, and then enter the amount of space that you want between the rows in the Spacing box.
-
If you are printing your publication on facing pages, click the Margin Guides tab, and then select the Two-page master check box under Master Pages.
-
Click OK.
-
Create text boxes for the columns by clicking Insert >Draw Text Box
 and then dragging inside the columns that are defined by the layout guides.
No comments:
Post a Comment