Save or convert to PDF or XPS
You can use the Office programs to save or convert your files to PDFs so that you can share them or print them using commercial printers. And you won't need any other software or add-ins.
Use PDF format when you want a file that:
-
Looks the same on most computers.
-
Has a smaller file size.
-
Complies with an industry format.
Examples include resumes, legal documents, newsletters, files that are intended to be read only (not edited) and printed, and files that are intended for professional printing.
To export or save as PDF, in your Office file, on the File menu, click Export or Save As. To see step-by-step instructions, select an Office program from the drop-down list.
-
Open the table or report you want to publish as a PDF.
-
On the External Data tab, in the Export group, click PDF or XPS

-
In the File Name field, type or select a name for the document.
-
In the Save as type list, click PDF (*.pdf).
-
If the document requires high print quality, click Standard (publishing online and printing).
-
If file size is more important than print quality, click Minimum size (publishing online).
-
-
Click Options to set the page to be printed, to choose whether markup should be printed, and to select output options. Click OK.
-
Click Publish.
This information also applies to Microsoft Excel Starter 2010.
Note: You can't save Power View sheets as PDF files.
-
Click the File tab.
-
Click Save As.
To see the Save As dialog box in Excel 2013 or Excel 2016, you have to choose a location and folder. -
In the File Name box, enter a name for the file, if you haven't already.
-
In the Save as type list, click PDF (*.pdf).
-
If you want the file to open in the selected format after saving, select the Open file after publishing check box.
-
If the document requires high print quality, click Standard (publishing online and printing).
-
If file size is more important than print quality, click Minimum size (publishing online).
-
-
Click Options to set the page to be printed, to choose whether markup should be printed, and to select output options. Click OK when finished.
-
Click Save.
OneNote 2013 and OneNote 2016
-
Click the File tab.
-
Click Export.
-
Under Export Current, click what part of the notebook you want to save as PDF.
-
Under Select Format, click PDF (*.pdf), and then click Export.
-
In the Save As dialog box, in the File Name field, enter a name for the notebook.
-
Click Save.
OneNote 2010
-
Click the File tab.
-
Click Save As, and then click the option that represents the portion of the notebook that you want to save as PDF.
-
Under Save Section As, click PDF (*.pdf), and then click Save As.
-
In the File Name field, enter a name for the notebook.
-
Click Save.
-
Click the File tab.
-
Click Save As.
To see the Save As dialog box in PowerPoint 2013 and PowerPoint 2016, you have to choose a location and folder. -
In the File Name box, enter a name for the file, if you haven't already.
-
In the Save as type list, click PDF (*.pdf).
-
If you want the file to open in the selected format after saving, select the Open file after publishing check box.
-
If the document requires high print quality, click Standard (publishing online and printing).
-
If the file size is more important than print quality, click Minimum size (publishing online).
-
-
Click Options to set the page to be printed, to choose whether markup should be printed, and to select output options. Click OK when finished.
-
Click Save.
-
On the File tab, choose Save As.
To see the Save As dialog box in Project 2013 or Project 2016, you have to choose a location and folder. -
In the File Name box, enter a name for the file, if you haven't already.
-
In the Save as type list, select PDF Files (*.pdf) or XPS Files (*.xps), and then choose Save.
-
In the Document Export Options dialog box, select a Publish Range, whether to Include Non-printing Information, and ISO 19500-1 compliance (PDF only).
Formatting tips
Project doesn't support every PDF or XPS formatting feature, but you can still use some print options to change the look of the final doc.
Choose File > Print, and then change any of these options:
-
Dates
-
Orientation
-
Paper Size
-
Page Setup
In the Page Setup dialog box, you can change options on these tabs:
-
Margins
-
Legend
-
View
-
Click the File tab.
-
Click Save As.
To see the Save As dialog box in Publisher 2013 or Publisher 2016, you have to choose a location and folder. -
In the File Name box, enter a name for the file, if you haven't already.
-
In the Save as type list, click PDF (*.pdf).
-
If you want to change how the document is optimized, click Change. (Click Options in Publisher 2013 or Publisher 2016.)
-
Make any changes you want to the picture resolution and non-printing information.
-
Click Print Options to make changes to the printing options for the document.
-
Click OK when finished.
-
-
If you want the file to open in the selected format after saving, select the Open file after publishing check box.
-
Click Save.
-
Click the File tab.
-
Click Save As.
To see the Save As dialog box in Visio 2013 or Visio 2016, you have to choose a location and folder. -
In the File Name box, enter a name for the file, if you haven't already.
-
In the Save as type list, click PDF (*.pdf).
-
If you want the file to open in the selected format after saving, select the Automatically view file after saving check box.
-
If the document requires high print quality, click Standard (publishing online and printing).
-
If file size is more important than print quality, click Minimum size (publishing online).
-
-
Click Options to set the page to be printed, to choose whether markup should be printed, and to select output options. Click OK.
-
Click Save.
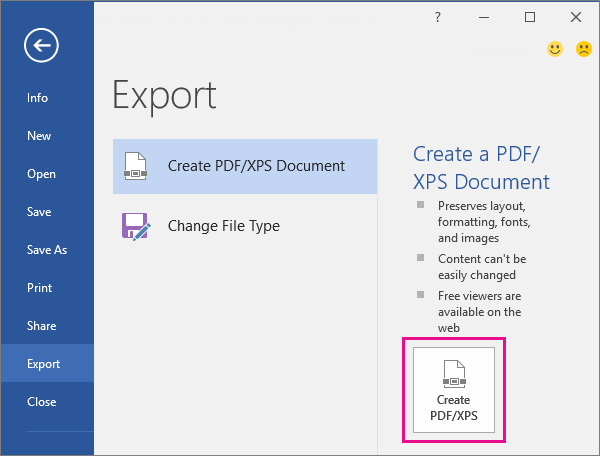
Word 2013 and Word 2016
-
Choose File > Export > Create PDF/XPS.
-
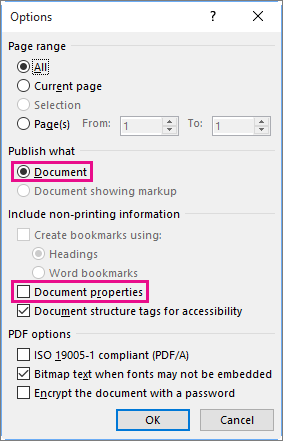
If the properties of your Word document contains information that you do not want included in the PDF, in the Publish as PDF or XPS window, choose Options. Then select Document and clear Document properties. Set any other options you want and choose OK.
For more information about document properties, see View or change the properties for an Office 2016 file.
-
In Publish as PDF or XPS, navigate to where you want to save the file. Also, modify the file name if you want a different name.
-
Click Publish.
More about PDF options
-
To make a PDF file from only some of the pages in your document, choose an option under Page range.
-
To include tracked changes in the PDF, under Publish what, select Document showing markup. Otherwise, make sure Document is selected.
-
To create a set of bookmarks in the PDF file, select Create bookmarks using. Then, choose Headings or, if you added bookmarks to your document, Word Bookmarks.
-
If you want to include document properties in the PDF, make sure Document properties is selected.
-
To make the document easier for screen-reading software to read, select Document structure tags for accessibility.
-
ISO 19005-1 compliant (PDF/A) This option outputs the PDF document as version 1.7 PDF, which is an archiving standard. PDF/A helps to insure that a document will look the same when it's opened later on a different computer.
-
Bitmap text when fonts may not be embedded If fonts can't be embedded into the document, the PDF uses bitmap images of the text so that the PDF looks the same as the original document. If this option isn't selected and the file uses a font that can't be embedded, then the PDF reader might substitute another font.
-
Encrypt the document with a password To restrict access so only people with the password can open the PDF, select this option. When you click OK, Word opens the Encrypt PDF Document box, where you can type and re-enter a password.
Open and copy content from a PDF with Word
You can copy any content you want from a PDF by opening it in Word.
Go to File > Open and browse to the PDF file. Word opens the PDF content in a new file. You can copy any content you want from it, including images and diagrams.
Word 2010
This information also applies to Microsoft Word Starter 2010.
-
Click the File tab.
-
Click Save As.
To see the Save As dialog box in Word 2013 and Word 2016, you have to choose a location and folder. -
In the File Name box, enter a name for the file, if you haven't already.
-
In the Save as type list, click PDF (*.pdf).
-
If you want the file to open in the selected format after saving, select the Open file after publishing check box.
-
If the document requires high print quality, click Standard (publishing online and printing).
-
If the file size is more important than print quality, click Minimum size (publishing online).
-
-
Click Options to set the page to be printed, to choose whether markup should be printed, and to select output options. Click OK when finished.
-
Click Save.
To save your file as a PDF in Office for Mac follow these easy steps:
-
Click File
-
Click Save As
-
Click File Format towards the bottom of the window

-
Select PDF from the list of available file formats
-
Give your file a name, if it doesn't already have one, then click Export
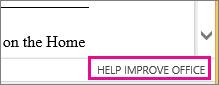
You can use Word Online to convert your doc into a PDF by using the Print command. This will generate a basic PDF that preserves the layout and format of your original document.
If you need more control over the options for your PDF, such as adding bookmarks, use the Word desktop app to convert your doc to a PDF. Click Open in Word to start using the desktop app.

If you don't own the Word desktop app, you can try or buy the latest version of Office now.
Tips:
-
Tell us how you would use this feature in Word Online. At the bottom of the Word Online window click Help Improve Office.
-
Select your Office program from the drop-down list.
-
Open the table or report that you want to publish as PDF.
-
Click the Microsoft Office Button
 , point to the arrow next to Save As, and then click PDF or XPS.
 -
In the File Name list, type or select a name for the file.
-
In the Save as type list, click PDF.
-
If you want to open the file immediately after saving it, select the Open file after publishing check box. This check box is available only if you have a PDF reader installed on your computer.
-
Next to Optimize for, do one of the following, depending on whether file size or print quality is more important to you:
-
If the table or report requires high print quality, click Standard (publishing online and printing).
-
If the print quality is less important than file size, click Minimum size (publishing online).
-
-
To specify various options for the file, click Options. (Find links to more information on these options in the See Also section.) Click OK.
-
In the Publish as PDF or XPS dialog box, click Publish.
If you want to make changes to the PDF after saving it, return to your original 2007 Microsoft Office system file in which you created it and save the file as PDF again.
-
Click the Microsoft Office Button
, point to the arrow next to Save As, and then click PDF or XPS. -
In the File Name list, type or select a name for the workbook.
-
In the Save as type list, click PDF.
-
If you want to open the file immediately after saving it, select the Open file after publishing check box. This check box is available only if you have a PDF reader installed on your computer.
-
Next to Optimize for, do one of the following, depending on whether file size or print quality is more important to you:
-
If the workbook requires high print quality, click Standard (publishing online and printing).
-
If the print quality is less important than file size, click Minimum size (publishing online).
-
-
To specify various options for the file, click Options. (Find links to more information on these options in the See Also section.) Click OK.
-
Click Publish.
If you want to make changes to the PDF after saving it, return to your original 2007 Microsoft Office system file in which you created it and save the file as PDF again.
-
On the File menu, point to Export To, and then click PDF or XPS.
-
In the File Name list, type or select a name for the form.
-
In the Save as type list, click PDF.
-
If you want to open the file immediately after saving it, select the Open file after publishing check box. This check box is available only if you have a PDF reader installed on your computer.
-
Next to Optimize for, do one of the following, depending on whether file size or print quality is more important to you:
-
If the form requires high print quality, click Standard (publishing online and printing).
-
If the print quality is less important than file size, click Minimum size (publishing online).
-
-
Click Publish.
If you want to make changes to the PDF after saving it, return to your original 2007 Microsoft Office system file in which you created it and save the file as PDF again.
-
On the File menu, click Publish as PDF or XPS.
-
In the File Name list, type or select a name for the file.
-
In the Save as type list, click PDF.
-
Next to Page range, click the option that represents the portion of the notebook that you want to save as PDF.
-
Click Publish.
If you want to make changes to the PDF after saving it, return to your original 2007 Microsoft Office system file in which you created it and save the file as a PDF again.
-
Click the Microsoft Office Button
, point to the arrow next to Save As, and then click PDF or XPS. -
In the File name list, type or select a name for the presentation.
-
In the Save as type list, click PDF.
-
If you want to open the file immediately after saving it, select the Open file after publishing check box. This check box is available only if you have a PDF reader installed on your computer.
-
Next to Optimize for, do one of the following, depending on whether file size or print quality is more important to you:
-
If the presentation requires high print quality, click Standard (publishing online and printing).
-
If the print quality is less important than file size, click Minimum size (publishing online).
-
-
To specify various options for the file, click Options. (Find links to more information on these options in the See Also section.) Click OK.
-
Click Publish.
If you want to make changes to the PDF after saving it, return to your original 2007 Microsoft Office system file in which you created it and save the file as PDF again.
You can print your project plan to the PDF format only if you have Adobe Acrobat installed on your computer. You must have the full version of Acrobat, not just the free Adobe Reader.
Note: The Save as PDF or XPS add-in for the 2007 Microsoft Office system does not provide this functionality to Project 2007.
-
On the View menu, select the view that you want to print.
-
On the File menu, choose Print.
-
In the Name list, select Adobe PDF.
Note: This option only appears if you have Adobe Acrobat installed on your computer.
-
Choose OK.
-
In the Save PDF File As dialog box, select a name and location for the PDF file, and then choose Save.
Note: After you print a plan to PDF, you cannot use Project to make changes directly to the PDF document. You must make changes to the original plan by using Project and then save the file as PDF again.
Save as PDF for sharing or Web distribution
If you want to share the publication in a fixed format over the Web or a network, do the following:
-
On the File menu, click Publish as PDF or XPS.
-
In the File name list, type or select a name for the publication.
-
In the Save as type list, click PDF.
-
Next to Optimize for, click Change.
-
In the Publish Options dialog box, click the optimization in the Specify how this publication will be printed or distributed list that matches the needs of the publication. For example, if the publication will be distributed online and print quality is less important than a small file size, click Minimum size. If the quality of the printing is more important than file size, click High quality printing.
-
Click Advanced to display the entire dialog box, and select the settings that you need. (Find links to more information on these options in the See Also section.)
-
Click OK.
-
In the Save As dialog box, if you want to open the file immediately after saving it, select the Open file after publishing check box. This check box is available only if you have a PDF reader installed on your computer, and if the Commercial Press option is not selected in the Publish Options dialog box.
-
Click Save.
Save as PDF for commercial printing
If the publication is being sent to a commercial printer, do the following:
-
On the File menu, point to Pack and Go, and then click Take to a Commercial Printing service.
-
In the pane at left, in the How will this publication be printed? list, click the option that you want. If you will be using an offset printing service, click Commercial Press. If you will be using a high-end copy shop, click High quality printing.
-
Click Printing Options.
-
In the Print Options dialog box, select the options that you need. (Find links to more information on these options in the See Also section.) Click OK.
-
Under Select an item to fix, repair any problems that Publisher has identified.
-
Under Export, select the Create a PDF check box.
-
Click Save.
-
In the Pack and Go Wizard, select the location to which you want to export the file, and click Next.
If you want to make changes to the PDF after saving it, return to your original 2007 Microsoft Office system file in which you created it and save the file as PDF again.
-
On the File menu, click Publish as PDF or XPS.
-
In the File Name list, type or select a name for the drawing.
-
In the Save as type list, click PDF.
-
If you want to open the file immediately after saving it, select the Open file after publishing check box. This check box is available only if you have a PDF reader installed on your computer.
-
Next to Optimize for, do one of the following, depending on whether file size or print quality is more important to you:
-
If the drawing requires high print quality, click Standard (publishing online and printing).
-
If the print quality is less important than file size, click Minimum size (publishing online).
-
-
To print only a selection of pages, or to specify other publishing options, click Options, and select the settings that you need. (Find links to more information on these options in the See Also section.) Click OK.
-
Click Publish.
If you want to make changes to the PDF after saving it, return to your original 2007 Microsoft Office system file in which you created it and save the file as PDF again.
-
Click the Microsoft Office Button
, point to the arrow next to Save As, and then click PDF or XPS. -
In the File Name list, type or select a name for the document.
-
In the Save as type list, click PDF.
-
If you want to open the file immediately after saving it, select the Open file after publishing check box. This check box is available only if you have a PDF reader installed on your computer.
-
Next to Optimize for, do one of the following, depending on whether file size or print quality is more important to you:
-
If the document requires high print quality, click Standard (publishing online and printing).
-
If the print quality is less important than file size, click Minimum size (publishing online).
-
-
Click Options to set the page range to be printed, to choose whether markup should be printed, and to select the output options. (Find links to more information on these options in the See Also section.) Click OK.
-
Click Publish.
If you want to make changes to the PDF after saving it, return to your original 2007 Microsoft Office system file in which you created it and save the file as PDF again.
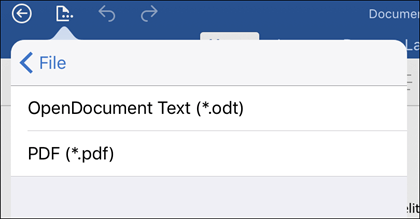
To export your Word document or Excel workbook to PDF format on iOS tap the File button at the top left, choose Export and then PDF.
Portable Document Format (PDF) preserves document formatting and enables file sharing. When the PDF format file is viewed online or printed, it retains the format that you intended. The PDF format is also useful for documents that will be reproduced using commercial printing methods. PDF is accepted as a valid format by many agencies and organizations, and viewers are available on a wider variety of platforms than XPS.
XML Paper Specification (XPS) is an electronic file format that preserves document formatting and enables file sharing. The XPS format ensures that when the file is viewed online or printed, it retains exactly the format that you intended, and that data in the file cannot be easily changed.
Important: To view a PDF file, you must have a PDF reader installed on your computer such as the Acrobat Reader, available from Adobe Systems.
I like your all post. You have done really good work. Thank you for the information you provide, it helped me a lot. wahabtech.net I hope to have many more entries or so from you.
ReplyDeleteVery interesting blog.
IsoBuster Pro Crack
Amazing and Creative blogs that you see.. Its latest version indormation......'
ReplyDeleteKalicrack org
MakeMusic Finale Crack
iSkysoft PDF Editor Crack
Save2pc Ultimate Pro Crack
Abelssoft EverDoc PLATINUM Crack
iSkysoft PDF Editor Crack
Polaris Office Crack
Tenorshare UltData Windows Crack
GBTimelapse Pro EOS Crack
Mailbird Pro Crack
ReplyDeleteWow, amazing block structure! How long
Have you written a blog before? Working on a blog seems easy.
The overview of your website is pretty good, not to mention what it does.
Advanced XLS Converter crack
Thanks for this info wikivela
ReplyDeleteMicrosoft Office Tutorials: Save Or Convert To Pdf Or Xps >>>>> Download Now
ReplyDelete>>>>> Download Full
Microsoft Office Tutorials: Save Or Convert To Pdf Or Xps >>>>> Download LINK
>>>>> Download Now
Microsoft Office Tutorials: Save Or Convert To Pdf Or Xps >>>>> Download Full
>>>>> Download LINK Le
Microsoft Office Tutorials: Save Or Convert To Pdf Or Xps >>>>> Download Now
ReplyDelete>>>>> Download Full
Microsoft Office Tutorials: Save Or Convert To Pdf Or Xps >>>>> Download LINK
>>>>> Download Now
Microsoft Office Tutorials: Save Or Convert To Pdf Or Xps >>>>> Download Full
>>>>> Download LINK ov