Create a data source for a mail merge
Word can pull data from a variety of data sources to perform mail merge. As Word is a part of the Microsoft Office suite, Word easily accepts data from Outlook, Excel and Access. It can accept data from other sources including web pages, open document text files and delimited data files stored as plain text. Also if you do not have a an existing data source, you can easily create a new data source from within Word.
Data sources for mail merge
Here are few examples of data sources you can use for mail merge in Word.
-
Excel spreadsheet
An Excel spreadsheet works well as a data source for mail merge if all data is on one sheet and the data is formatted well, so that it can be read well with Word. For more information, see Prepare your Excel data source for mail merge
-
Outlook Contact List
You can retrieve contact information directly from your Outlook Contact List on to Word, See Export Outlook items .
-
Apple Contacts List
You can export Apple contacts into an Excel spreadsheet and use it as your mailing list for mail merge.
-
Text files
You can use any text file that has data fields separated (or delimited) by tab characters or commas and data records separated by paragraph marks.
Create a mailing list in Word
A mailing list can be created within Word for sending bulk mail during mail merge process.
-
On the View menu, choosePrint Layout.
-
On the Standard toolbar, chooseNew
 .
.You use this blank document to create a data source.
-
On the Tools menu, chooseMail Merge Manager.
-
Under 1. Select Document Type, choose Create New, and then select Form Letters.
-
Under 2. Select Recipients List, choose Get List, and then select New Data Source.
-
In the Field names in header row box, click any field names that you don't want to include in your data source, chooseRemove Field Name, and then selectOK.
-
Type a name and choose a location for your data source, and then choose Save.
Remember where you save the data source. You will need to know the location later.
-
In the Data Form dialog box, type the data for one data record (for example, a recipient's first name in FirstName, last name in LastName, street address in Address1, and so on).
Note: Do not enter spaces in boxes that you want to leave blank.
-
After you finish filling in the boxes for one record, choose Add New.
-
Repeat steps 8 and 9 for each record that you want to enter.
-
After you add all the records that you want, choose OK.
Tip: To return to the Data Form dialog box later, in the Mail Merge Manager, under 2. Select Recipients List, select Edit Data Source
 .
. -
On the File menu, choose Close.
-
To save the data source, chooseSave.
-
To discard the blank open document, choose Don't Save.
Create a mailing list in Excel
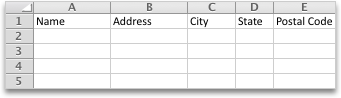
Each column in your Excel sheet contains a category of information, or data field — for example, name, street address, city, state, and postal code. The first row of cells, called the header record, contains the data field names. Each subsequent row contains one record, such as the name and address of a person.
Note: Later, as you create the labels, you use the fields in the header record to specify what data goes where.
-
Open Excel.
-
In the first row of the sheet, type a header record for your addresses.
For example, in the first column of the first row, type Name; in the second column, type Address; in the third column, type City; in the forth column, type State; and then in the fifth column, type Postal Code, so that your Excel sheet looks something like this:
-
In the second row, type the name and address information for one recipient.
Add as many additional rows of addresses as you want. Your Excel sheet should now look something like this:

-
Choose Save
 .
. -
Type a name for the workbook — for example, addresses.
Remember where you save the sheet. You will need to know the location later.
-
Close the Excel workbook that contains your recipient list.
If you do not close the Excel workbook that contains your list, or if you reopen it before you finish the mail merge, you cannot complete the merge.
No comments:
Post a Comment