Change the line spacing in Word for Mac
You can control the vertical space between the lines of text in your document by setting the line spacing. Or, you can change the vertical space between paragraphs in your document by setting the spacing before or spacing after paragraphs. You can also choose to keep lines of text together or keep paragraphs together on a page.
Change the line spacing in an entire document
-
Click Design > Paragraph Spacing.

-
Click the option you want. If you want to single space your document, choose No Paragraph Space.
This overrides the settings of the style you're currently using. If you decide later to return to the original settings, click Design > Paragraph Spacing and choose the option under Style Set. The option might be Default, as shown above, or it will show the name of style you're currently using.
Change the line spacing in a portion of the document
To change the line spacing for only part of a document:
-
Select the paragraphs you want to change.
-
On the Home tab, click the Line and Paragraph Spacing button.

-
Choose the number of line spaces you want or click Line Spacing Options at the bottom of the menu, and then select the options you want in the Paragraph dialog box under Spacing.
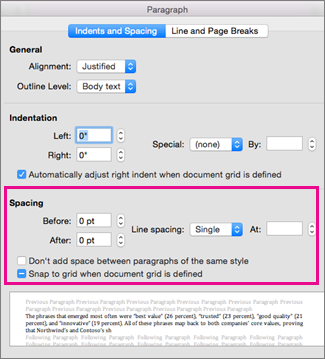
If you want to change the spacing before or after each of the paragraphs in the text you selected, click the arrow next to Before or After and enter the amount of space that you want.
 Line spacing
 Spacing between paragraphs
Change the spacing between lines
-
Select the text in which you want to change line spacing.
-
On the Home tab, under Paragraph, click Line Spacing
 , and then click the line spacing that you want.
Change the spacing between paragraphs
-
Select the paragraphs for which you want to change paragraph spacing.
Note: Select the bulleted list that you want to format.
-
On the Home tab, under Paragraph, click Line Spacing
, and then click Line Spacing Options. -
Under Spacing, in the Before or After boxes, enter the paragraph spacing that you want.
Change the spacing between lines or paragraphs for all new documents
When you create a new document, Word uses the Normal template to determine the settings, such as the spacing between lines and between paragraphs. If you change the settings in this template, all new documents that you create will use the new settings.
-
On the File menu, click Open, and then double-click /Users/ username/Library/Application Support/Microsoft/Office/User Templates/Normal.dotm.
Tip: If you are using Mac OS X 10.7 (Lion), the Library folder is hidden by default. To browse to the Library folder from the Open dialog box, press COMMAND + SHIFT + G , and in the Go to folder box, type ~/Library.
-
Double-click Normal.dotm.
The Normal template opens.
-
On the Home tab, under Paragraph, click Line Spacing
, and then do any of the following:To
Do this
Change the spacing between lines
Click the line spacing that you want.
Change the spacing between paragraphs
Click Line Spacing Options, and then under Spacing, in the Before or After boxes, enter the paragraph spacing that you want.
-
Save and close the Normal template.
More line spacing tasks
Keep all lines in a paragraph together
-
Click in the paragraph whose lines you want to keep together.
-
On the Format menu, click Paragraph, and then click the Line and Page Breaks tab.
-
Select the Keep lines together check box.
Keep paragraphs together
-
Click in the first of the two paragraphs that you want to keep together on a page.
Tip: If you want to keep more than two paragraphs together, select all but the last paragraph.
-
On the Format menu, click Paragraph, and then click the Line and Page Breaks tab.
-
Select the Keep with next check box.
No comments:
Post a Comment