Add or change label information in an Office document
If you are working with a Word document, Excel workbook, or PowerPoint presentation that is saved in a library on a SharePoint site where a policy requiring the insertion of a label is in effect as part of an information management policy, you may need to add or change the label information in your document.
The label policy feature is not available in SharePoint 2013 and later
Important: The ability to add or change label information is available only in Microsoft Office Professional Plus, Microsoft Office Enterprise, Microsoft Office Ultimate, and in the stand-alone versions of Word, Excel, and PowerPoint.
Overview
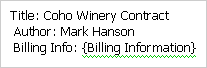
When you insert a label into a Microsoft Office document, workbook, or presentation, the label is updated automatically with information from the document's properties. This information resides in the columns for that item in the library. If label information is not yet stored in the document's properties, you must enter the information manually. Label information that you need to enter appears on the label in curly brackets and with a green underline, as shown in the following illustration.
You can also update or change the label information if the correct information changes. For example, the company name or billing information may change, so the label then also needs to be changed.
Note: Although you can insert a label in more than one place in your document, you only need to add or change label information once because those changes will appear in all instances of the label in your document.
Add or change label information
A library on a SharePoint site may have a label policy in effect. If the label is missing information, you must fill in the label before you save the file.
-
If the library is not already open, click its name on the Quick Launch.
If the name of your library does not appear on the Quick Launch, click View All Site Content, and then click the name of your library.
-
Point to the document, click the arrow that appears, and then click Edit in Microsoft Office program name. For example, type Edit in Microsoft Office Word.
-
In the document, workbook, or presentation, right-click the label, and then click Fill in Label on the shortcut menu.
Notes:
-
If the label appears in the document header, you must first right-click the label, and then click Edit Header on the shortcut menu.
-
If the label is locked, you are prompted to unlock it before you can fill in the label.
-
-
Enter or edit the information in the Document Information Panel.

-
If you are using SharePoint 2010, click File > Save to save your changes.
If you are using SharePoint 2007, click the Microsoft Office Button
 , and then click Save to save your changes.
When you save the file, the label information is updated in both the label and in the columns for that item in the document library.
No comments:
Post a Comment