Show or hide formatting marks
Formatting marks like dots (…) for spaces or arrows (→) for tab characters are used in Word to show the text layouts of documents. You might find these formatting marks useful when you're designing content with a specific look in mind.
Note: Publisher uses some formatting marks.
What are formatting marks?
Formatting marks are a set of symbols that provide a visual representation of specific formatting in a document.
Tab characters
Display tab characters as arrows.
Spaces
Display spaces between words as dots.
Paragraph marks
Display the ends of paragraphs with the paragraph symbol.
Hidden text
Display a dotted line under text that is formatted as hidden.
Optional hyphens
Display hyphens that indicate where to divide a word at the end of a line. Optional hyphens are not printed unless a word actually breaks at the end of a line. When a word breaks at the end of the line, the optional hyphen is printed as a regular hyphen.
Object anchors
Display object anchors, which indicate that an object is attached to a specific paragraph.
Optional breaks
Control where a word or phrase breaks if it falls at the end of a line. If you use Word with an East Asian language, this option prevents the incorrect breaking of text. This option is available only if an East Asian language is enabled for editing text.
Show (turn on) or hide (turn off) formatting marks in a document
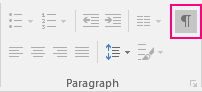
The Show/Hide button is like a switch that lets you turn on or turn off a view.
-
On the Home tab, in the Paragraph group, choose Show/Hide.
Note: The background of the Show/Hide button is shaded when it's turned on.
Turn on the display of formatting marks
You can choose which formatting marks always are displayed on the screen, regardless if the Show/Hide button is turned on or turned off. For example, you can display paragraphs and spaces at all times, but can hide tab characters and hidden text when Show/Hide is turned off.
Note: The background of the Show/Hide button is shaded when it's turned on.
-
On the File tab, choose Options > Display.
-
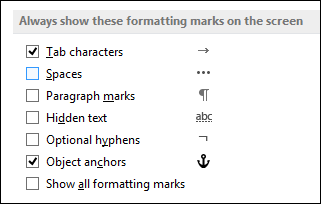
Under Always show these formatting marks on the screen, select the check box for each formatting mark that you always want to display, regardless if the Show/Hide button is turned on or turned off.
-
On the File tab, under Help, click Options > Display.
-
Under Always show these formatting marks on the screen, select the check box for each formatting mark that you always want to display, regardless if the Show/Hide button is turned on or turned off.
-
Click the Microsoft Office Button
 , and then click Word Options.
 -
Click Display.
-
Under Always show these formatting marks on the screen, select the check box for each formatting mark that you always want to display, regardless if the Show/Hide button is turned on or turned off.
Turn off the display of formatting marks
You can clear any formatting mark you select to display on the screen at all times. Once you clear a check box for a formatting mark, that mark no longer displays on the screen at all times, regardless if the Show/Hide button is turned on or turned off
-
On the File tab, choose Options > Display.
-
Under Always show these formatting marks on the screen, clear the check box for each formatting mark that you don't always want to be displayed on the screen.
-
On the File tab, under Help, click Options > Display .
-
Under Always show these formatting marks on the screen, clear the check box for each formatting mark that you don't always want to be displayed on the screen .
-
Click the Microsoft Office Button
, and then click Word Options. -
Click Display.
-
Under Always show these formatting marks on the screen, select the check box for each the formatting mark each formatting mark that you don't always want to be displayed on the screen .
Turn off squiggly lines in Word
The red squiggly lines in Word indicate potential spelling or grammar errors. The blue squiggly lines indicate words that might be incorrect in their context—a "pear" of shoes versus a "pair" of shoes, or "there" report versus "their" report.
-
On the File tab, click Options > Proofing.
-
Under When correcting spelling and grammar in Word, clear the check box next to an item you want to turn off.
-
Click the Microsoft Office Button
, and then click Word Options. -
Click Proofing.
-
Under When correcting spelling and grammar in Word, clear the check box next to an item you want to turn off.
-
On the File tab, click Options > Proofing.
-
Under When correcting spelling and grammar in Word, clear the check box next to each item you want to turn off.
Turn off squiggly lines in Publisher
The red squiggly lines in Publisher indicate potential spelling errors. .
- Which version of Publisher are you using?
- 2016, 2013, 2010
- 2007
-
On the File tab, click Options > Proofing.
-
Under When correcting spelling in Publisher, clear the Check spelling as you type check box
-
On the Tools tab, click Spelling > Spelling Options.
-
Under When correcting spelling in Publisher, clear the Check spelling as you type check box.
Microsoft Office Tutorials: Show Or Hide Formatting Marks >>>>> Download Now
ReplyDelete>>>>> Download Full
Microsoft Office Tutorials: Show Or Hide Formatting Marks >>>>> Download LINK
>>>>> Download Now
Microsoft Office Tutorials: Show Or Hide Formatting Marks >>>>> Download Full
>>>>> Download LINK tv