Customize styles in Word for Mac
You can use styles to format your document so you can quickly and easily apply a set of formatting choices consistently throughout your document. If you want formatting choices that are not available from the built-in styles and themes available in Word, you can modify existing styles, create new styles, and save these changes to your document and template. You can also add them to the Quick Styles list for easy access.
Apply a set of styles
Select a location or text in your document and do one of the following:
-
On the Home tab, in the Styles group, click the style you want.
-
To apply a custom style or Quick Style set, on the Home tab, in the Styles group, click the Styles Pane button, and then choose a style in the Apply a style list.
Modify an existing style
-
On the Format menu, click Style.
-
In the Style dialog box, click Modify.

-
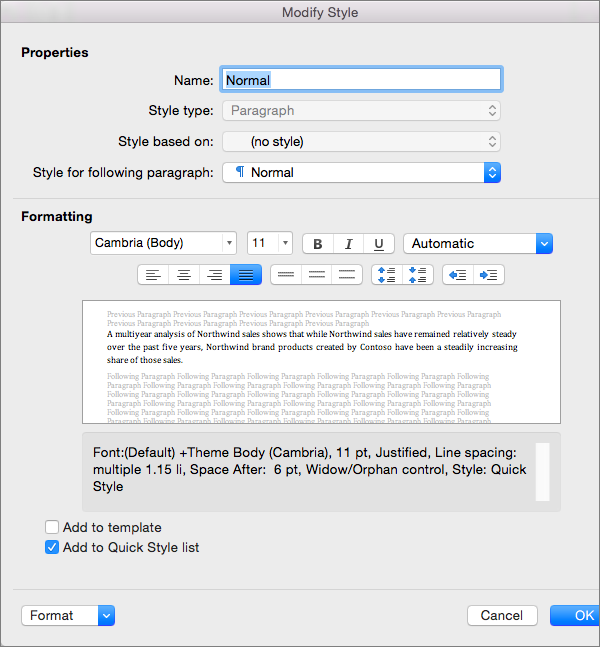
Change the settings that you want to modify, such as the font, in the Modify Style dialog box.

-
You can specify that your new or modified style be added to the template that the current document is based on by selecting Add to template.
-
For easy access to a style while using Word, select Add to the Quick Style list.
The Quick Style list displays styles on the Home tab.

-
Click OK.
Add a new custom style
You can create a new style and add it to the Quick Style list.
-
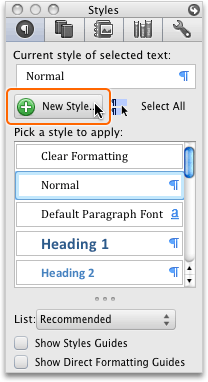
On the Home tab, in the Styles group, click the Styles Pane button.
 .
. -
Click New Style.
-
In the Name box, type a name for the new style.
-
Select any additional options you want under Properties.
-
Select the formatting options that you want under Format.
-
Select the Add to Quick Style list check box, and then click OK.
-
Your new style is applied is added to the Styles group on the Home tab.
Delete a custom style
You can delete a custom from the Quick Style Gallery when you no longer need it.
-
On the Home tab, in the Styles group, Control+click or right-click the style you want to delete, and then click Remove from Quick Style Gallery.
See also
See where styles are applied in a document
Apply a style
You can apply formatting to text quickly and easily by using style in Word. Four kinds of styles are available: paragraph, character, table, and list styles.
| Icon in the Style dialog box | Style type |
| | Paragraph styles determine the look of text in a document at the paragraph level. When you apply a paragraph style to text, the paragraph style is applied to the whole paragraph. Paragraph styles are typically used to control the overall formatting of large sections of text, for example, the body of a newsletter or flyer. A paragraph style can include all the formatting definitions that a character style contains. However, it also controls all aspects of a paragraph's appearance, such as text alignment, tab stops, line spacing, and borders. By default, the Normal paragraph style is applied to all text in a blank, new document. Similarly, the List Paragraph style is applied to items in a list — for example, when you use the Bullets command to create a bulleted list. |
| | Character styles also determine the look of the text in a document, but at the character level. Character styles usually control the formatting of smaller sections of text, for example, to make one word in a paragraph stand out. Character styles contain formatting characteristics such as font name, size, color, bold, italic, underline, borders, and shading. Character styles do not include formatting that affects paragraph characteristics, such as line spacing, text alignment, indentation, and tab stops. Several built-in character styles are available, such as Emphasis, Subtle Emphasis, and Intense Emphasis. Each of these built-in styles combines formatting, such as bold, italic, and accent color, to provide a coordinated set of typographic designs. For example, applying the Emphasis character style formats text as bold, italic, in an accent color. |
| | Table styles determine the look of tables. This includes characteristics such as the text formatting of the header row, gridlines, and accent colors for rows and columns. You can use table styles to quickly apply complex formatting with one click. |
| | List styles determine the look of lists. This includes characteristics such as bullet style or number scheme, indentation, and any label text. |
-
Select the words, paragraph, list, or table that you want to apply a style to.
-
On the Home tab, under Styles, click the style that you want.

To see more styles, point to a style, and then click
 .
.Notes:
-
After you apply styles to paragraphs, headings, and other elements, you can quickly apply a set of coordinated styles to your document. On the Home tab, under Styles, click Change Quick Styles settings
 , and then click the style set that you want.
 -
If you are applying a style to a list, make sure to select one of the list styles. If you don't, the bullets or numbering in the list might be removed.
-
Change a style
Changing a style makes it easier to change the formatting of all text in your document that has that style applied. For example, if you applied the Heading 1 style to your chapter headings in a document, you can quickly change the formatting of all chapter headings at the same time by changing the style formatting definition.
-
On the Home tab, under Styles, click Manage the styles that are used in the document
 .
. -
Under Pick a style to apply, point to the style that you want to change, click
 next to the style, and then click Modify Style.
 -
Make the changes that you want.
Notes:
-
If you change a style that other styles are based on, the other styles change, too. For example, most styles are based on the Normal style. Making changes to the Normal style will also change any other style that is based on Normal.
-
To use the modified style in other documents that are based on the same template, select the Add to template check box. Word adds the modified style to the template that is attached to the active document.
-
Create a style
You can create a style by defining all the settings yourself, or you can save time by modifying an existing style to create a new style.
-
On the Home tab, under Styles, click Manage the styles that are used in the document
 .
. -
Click New Style.

-
In the Name box, type a name for the new style.
-
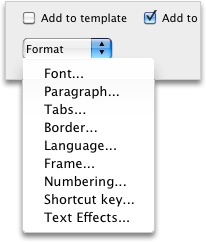
Select the options that you want, or click the Format pop-up menu to see additional options.

Tip: To use formatted text as the basis of a new style, select the text before you click New Style
 . The New Style dialog box will open with all the attributes of the selected text already specified, and you only need to type a new name for the style.
Delete a style
In Word, you can delete any style that you create, but you can't delete any of the built-in styles included with Word. When you delete a style, Word applies the Normal style to all paragraphs that were formatted with the deleted style and removes the deleted style's definition from the styles list.
-
On the Home tab, under Styles, click Manage the styles that are used in the document
 .
. -
Under Pick a style to apply, point to the style that you want to delete, click
 next to the style, and then click Delete.
Work with Quick Styles
After you have applied styles to paragraphs, headings, and other elements in your document, you can apply a set of coordinated Quick Styles. Quick Style sets (such as Distinctive) are a collection of styles that are designed to work together to create an attractive and professional-looking document. For example, one set of Quick Styles may include styles for several heading levels, body text, a quotation, and a title. Although a Quick Style set likely contains all of the styles that you need, you may want to add a new style or change a few of the styles in a Quick Style set to reflect your document style preferences. After you add or change styles, you can save the new style combination as a custom Quick Style set by using a different name.
What you like to do?
Apply a Quick Style set
When you apply a Quick Style set to your document, all of the styles in your document automatically change to match what's defined in the Quick Style set. If you don't like the Quick Style set that you've applied, you can easily select another. Word automatically updates the look of your document based on the new Quick Style you've selected.
-
On the Home tab, under Styles, click Change Quick Styles settings
 , and then click the style set that you want.
Change an existing style and create a custom Quick Style set
You can change the attributes of an existing style, such as a heading or list style and then save it as part of a custom Quick Style set.
-
On the Home tab, under Styles, press and hold CONTROL , click the style that you want to modify, and then click Modify.
-
In the Modify Style dialog box, make any changes to the style that you want, select the Add to Quick Style list check box, and then click OK.
-
On the Home tab, under Styles, click Change Quick Styles settings
 , and then click Save as Quick Style Set.
 -
In the Save As box, type a name for the Quick Style set, and then click OK.
Add a new style and create a custom Quick Style set
You can add a new style to a Quick Style set.
-
On the Home tab, under Styles, click Manage the styles that are used in the document
 .
. -
Click New Style.

-
In the Name box, type a name for the new style.
-
Select the options that you want, or click the Format pop-up menu to see additional options.

-
Select the Add to Quick Style list check box, and then click OK.
-
On the Home tab, under Styles, click Change Quick Styles settings
 , and then click Save as Quick Style Set.
 -
In the Save As box, type a name for the Quick Style set, and then click OK.
Delete a custom Quick Style set
You can delete a custom Quick Style set when you no longer need it.
-
In the Finder, open /Users/ username/Library/Application Support/Microsoft/Office/Style Sets folder.
-
Drag the custom Quick Style set that you want to delete to the Trash.
See also
See where styles are applied in a document
Copy styles and AutoText between documents or templates


No comments:
Post a Comment