Crop a picture to an AutoShape
You can use the features in Microsoft Publisher to edit your pictures in many ways: resize, set a transparent region, crop (to a rectangular shape), rotate, add fill color, add borders, recolor, and more.

To create the effects in this example, you can apply an AutoShape to a picture . Here's how you do it.
In this article
Tips for best results before you start
Choose your shape
Consider the choice of shape that will work with your picture. If your picture is square, a circular shape might work well. If your picture is rectangular, an oval shape may be interesting and aesthetically pleasing. If you want to focus on the center of your picture, a star shape may help direct the viewer's attention.
Step 1: Insert a picture
-
Open or create the publication that you want to add the picture to.
-
From either the Home or the Insert tab, select Picture.
-
In the Insert Picture dialog dialog box, locate the folder that contains the picture that you want to insert, select the picture file, and then click Insert.
Step 2:
-
Select the picture.
-
On the Picture Tools tab, point to Picture Shape and select the shape to apply to your picture.
Step 3: Change the size and placement of your picture
Crop the picture
-
Select the picture, this will bring up the Picture Tools tab, click Crop .
-
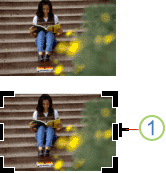
Position the cropping handle over a point.

1. Cropping handle
-
Do one of the following:
-
To crop one side, drag the center handle on that side.
-
To crop evenly on two sides at once, hold down CTRL as you drag a handle.
-
To crop all four sides at once while maintaining the proportions of your picture, hold down CTRL+SHIFT as you drag a corner handle.
-
-
Click Crop again, and then right-click the picture, and then click Save as Picture on the shortcut menu.
-
In the Save As dialog box, type a name for the file, and then select a format, or use the default format.
-
Click Save.
note You can crop your picture even after you have applied the shape.
Pan the picture inside the shape
You can also move the picture within the shape so that different part of the picture appears in the shape.
-
Select the picture, this will bring up the Picture Tools tab, click Crop .
-
Click and drag the picture to position it inside the shape.
Resize the picture
To change the size of your picture, select the shape, position the pointer over one of the points, and then click and drag the size handle.

Top of Page
No comments:
Post a Comment