Create a macro
You can create a macro to perform a specific series of actions, and you can create a macro group to perform related series of actions.
In Microsoft Office Access 2007, macros can be contained in macro objects (sometimes called standalone macros), or they can be embedded into the event properties of forms, reports, or controls. Embedded macros become part of the object or control in which they are embedded. Macro objects are visible in the Navigation Pane, under Macros; embedded macros are not.
What do you want to do?
Learn about the Macro Builder
You use the Macro Builder to create and modify macros. To open the Macro Builder:
-
On the Create tab, in the Other group, click Macro. If this command is unavailable, click the arrow beneath either the Module or the Class Module button, and then click Macro.

The Macro Builder is displayed.
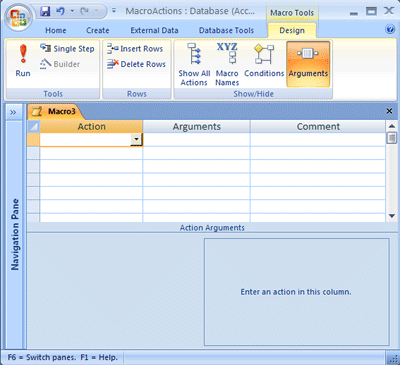
In the Macro Builder window, you build the list of actions that you want to carry out when the macro runs. When you first open the Macro Builder, the Action column, the Arguments column, and the Comment column are displayed.
Under Action Arguments, you enter and edit arguments on the left side for each macro action, if any are required. A description box that gives you a short description of each action or argument is displayed on the right side. Click an action or action argument to read the description in the box.
You can use the commands on the Design tab of the Macro Builder to create, test, and run a macro.
The following table describes the commands that are available on the Design tab.
| Group | Command | Description |
| Tools | Run | Performs the actions listed in the macro. |
| Single Step | Enables single-step mode. When you run the macro in this mode, each action is performed one at a time. After each action is complete, the Macro Single Step dialog box is displayed. Click Step in the dialog box to advance to the next action. Click Stop All Macros to stop this and any other running macros. Click Continue to exit single-step mode and to perform the remaining actions without stopping. | |
| Builder | When you enter an action argument that can contain an expression, this button is enabled. Click Builder to open the Expression Builder dialog box, which you can use to build the expression. | |
| Rows | Insert Rows | Inserts one or more blank action rows above the selected row or rows. |
| Delete Rows | Deletes the selected action row or rows. | |
| Show/Hide | Show All Actions | Displays more or fewer macro actions in the Action drop-down list.
|
| Macro Names | Shows or hides the Macro Name column. Macro names are required in macro groups to distinguish the individual macros from each other, but otherwise, macro names are optional. For more information, see the section Create a macro group. | |
| Conditions | Shows or hides the Condition column. You use this column to enter expressions that control when an action is performed. | |
| Arguments | Shows or hides the Arguments column. This column displays the arguments for each macro action and makes it easier to read through your macro. If the Arguments column is not displayed, you have to click each action and read the arguments under Action Arguments. You cannot enter arguments in the Arguments column. |
Tip: The Macro Builder has been redesigned in Access 2010 to make it even easier to create, modify, and share Access Macros.
Create a standalone macro
-
On the Create tab, in the Other group, click Macro. If this command is unavailable, click the arrow beneath either the Module or the Class Module button, and then click Macro.

The Macro Builder is displayed.
-
Add an action to the macro:
-
In the Macro Builder, click the first empty cell in the Action column.
-
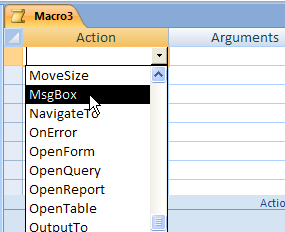
Type the action that you want to use, or click the arrow to display the list of available actions, and then select the action that you want to use.
-
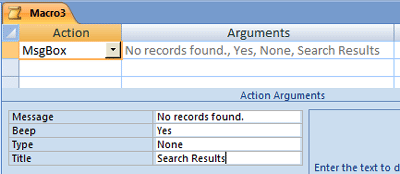
Under Action Arguments (in the lower part of the Macro Builder), specify arguments for the action, if any are required.
Note:
-
As you type arguments in the Action Arguments pane, they are displayed in the Arguments column in the action list. However, the Arguments column is for display only; you cannot enter arguments in that column.
-
To see a short description of each argument, in the Action Arguments pane, click in the argument box, and then read the description in the adjacent box.
Tips
-
For an action argument whose setting is a database object name, you can set the argument by dragging the object from the Navigation Pane to the action's Object Name argument box.
-
You can also create an action by dragging a database object from the Navigation Pane to an empty row in the Macro Builder. If you drag a table, query, form, report, or module to the Macro Builder, Access adds an action that opens the table, query, form, or report. If you drag a macro to the Macro Builder, Access adds an action that runs the macro.
-
-
-
Optionally, type a comment for the action in the Comment column.
-
-
To add more actions to the macro, move to another action row, and then repeat step 2.
When you run the macro, Access carries out the actions in the order in which you list them.
Create a macro group
If you want to group several related macros in one macro object, you can create a macro group.
-
On the Create tab, in the Other group, click Macro. If this command is unavailable, click the arrow beneath either the Module or the Class Module button, and then click Macro.

The Macro Builder is displayed.
-
On the Design tab, in the Show/Hide group, click Macro Names
 if it isn't already selected.
The Macro Name column is displayed in the Macro Builder.
Note: In macro groups, macro names are necessary to distinguish the individual macros from each other. The macro name appears on the same line as the macro's first action. The macro name column is left blank for any subsequent actions in the macro. The macro ends when the next macro name is encountered.
-
In the Macro Name column, type a name for the first macro in the macro group.
-
Add the actions that you want the first macro to carry out:
-
In the Action column, click the arrow to display the action list.
-
Click the action that you want to use.
-
Under Action Arguments, specify arguments for the action, if any are required.
To see a short description of each argument, click in the argument box, and then read the description on the right side of the argument.
Tips
-
For an action argument whose setting is a database object name, you can set the argument by dragging the object from the Navigation Pane to the action's Object Name argument box.
-
You can also create an action by dragging a database object from the Navigation Pane to an empty row in the Macro Builder. If you drag a table, query, form, report, or module to the Macro Builder, Access adds an action that opens the table, query, form, or report. If you drag a macro to the Macro Builder, Access adds an action that runs the macro.
-
-
Optionally, type a comment for the action.
-
-
Move to the next empty row, and then type a name for the next macro in the Macro Name column.
-
Add the actions that you want the macro to carry out.
-
Repeat steps 5 and 6 for each macro in the macro group.
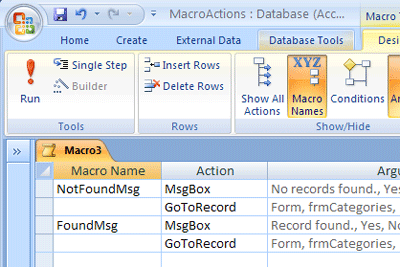
The following illustration shows a small macro group. The macro group contains two macros, the names of which are displayed in the Macro Name column. Each macro contains two actions.
Note:
-
When you save the macro group, the name that you specify is the name of the group of macros. In the preceding example, the name of the macro group is Macro3. This name is displayed under Macros in the Navigation Pane. To refer to an individual macro in a macro group, use this syntax:
macrogroupname.macroname
For example, in the preceding illustration, Macro3.FoundMsg refers to the second macro in the macro group.
-
If you run a macro group either by double-clicking it in the Navigation Pane or by clicking Run
 in the Tools group on the Design tab, Access executes only the first macro in the group, stopping when it reaches the second macro name.
Create an embedded macro
Embedded macros differ from standalone macros in that they are stored in the event properties of forms, reports, or controls. They are not displayed as objects under Macros in the Navigation Pane. This can make your database easier to manage, because you don't have to keep track of separate macro objects containing macros for a form or report. Also, embedded macros are included with the form or report whenever you copy, import, or export it.
For example, if you want to prevent a report from displaying when there is no data, you can embed a macro into the report's On No Data event property. You might use the MsgBox action to display a message, and then use the CancelEvent action to cancel the report instead of displaying a blank page.
-
In the Navigation Pane, right-click the form or report that will contain the macro, and then click Design View
 or Layout View
  .
. -
If the property sheet is not already displayed, press F4 to display it.
-
Click the control or section that contains the event property in which you want to embed the macro. You can also select the control or section (or the entire form or report) by using the drop-down list under Selection Type at the top of the property sheet.
-
On the property sheet, click the Event tab.
-
Click the event property in which you want to embed the macro, and then click
 .
. -
In the Choose Builder dialog box, click Macro Builder, and then click OK.
-
In the Macro Builder, click in the first row of the Action column.
-
In the Action drop-down list, click the action that you want.
-
Enter any required arguments under Action Arguments.
-
If you want to add another action, click in the next row of the Action column and repeat steps 8 and 9.
-
When your macro is complete, click Save, and then click Close.
The macro runs each time that the event property is triggered.
Note: Access allows you to build a macro group as an embedded macro. However, only the first macro in the group runs when the event is triggered. Subsequent macros in the group are ignored.
Edit a macro
-
To insert an action row Right-click the action row above which you want to insert the new action row, and then click Insert Rows
 .
. -
To delete an action row Right-click the action row that you want to delete, and then click Delete Rows
 .
. -
To move an action row Select the action row by clicking the row header to the left of the action, and then drag it to a new position.
You can insert, delete, or move multiple rows by first selecting the group of rows, and then performing the operation you want. To select a group of rows, click the row header for the first row you want to select, hold down the SHIFT key, and then click the row header for the last row you want to select. (The row header is the shaded box to the left of each action row.)
An alternative method of selecting multiple rows is to position the pointer over the row header of the first row you want to select, and then click and drag up or down to select the other rows.
Note: When selecting rows by clicking and dragging, the first row you select must not already be selected. If it is already selected, Access will assume you are trying to drag the row to a new location.
Use conditions to control macro actions
You can use any expression that evaluates to True/False or Yes/No in a condition. The macro action will be executed if the condition evaluates to True (or Yes).
To enter a condition for a macro action, you must first display the Condition column in the Macro Builder:
-
On the Design tab, in the Show/Hide group, click Conditions
 .
.
Type an expression in the Condition column. Do not precede the expression with an equal sign (=). To make a condition apply to several actions at once, type ... in each subsequent row. For example:
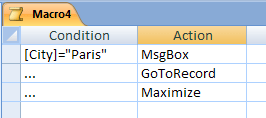
Tip: To cause Access to temporarily ignore an action, enter False as a condition. Temporarily ignoring an action can be helpful when you are trying to find problems in a macro.
Examples of macro conditions
| Use this expression | To carry out the action if |
| [City]="Paris" | Paris is the City value in the field on the form from which the macro was run. |
| DCount("[OrderID]", "Orders")>35 | There are more than 35 entries in the OrderID field of the Orders table. |
| DCount("*", "Order Details", "[OrderID]=Forms![Orders]![OrderID]")>3 | There are more than three entries in the Order Details table for which the OrderID field of the table matches the OrderID field on the Orders form. |
| [ShippedDate] Between #2-Feb-2007# And #2-Mar-2007# | The value of the ShippedDate field on the form from which the macro is run is no earlier than 2-Feb-2007 and no later than 2-Mar-2007. |
| Forms![Products]![UnitsInStock]<5 | The value of the UnitsInStock field on the Products form is less than 5. |
| IsNull([FirstName]) | The FirstName value on the form from which the macro is run is Null (has no value). This expression is equivalent to [FirstName] Is Null. |
| [Country]="UK" And Forms![SalesTotals]![TotalOrds]>100 | The value in the Country field on the form from which the macro is run is UK, and the value of the TotalOrds field on the SalesTotals form is greater than 100. |
| [Country] In ("France", "Italy", "Spain") And Len([PostalCode])<>5 | The value in the Country field on the form from which the macro is run is France, Italy, or Spain, and the postal code is not 5 characters in length. |
| MsgBox("Confirm changes?",1)=1 | You click OK in a dialog box in which the MsgBox function displays Confirm changes?. If you click Cancel in the dialog box, Access ignores the action. |
| [TempVars]![MyVar]=43 | The value of the temporary variable MyVar (created by using the SetTempVar macro action) equals 43. |
| [MacroError]<>0 | The value of the MacroError object's Number property is not equal to 0, meaning an error has occurred in the macro. This condition can be used in conjunction with the ClearMacroError and OnError macro actions to control what happens when an error occurs. |
For more information about expressions, see the article Build an expression.
Learn more about macro actions
While you are working in the Macro Builder, you can learn more about an action or argument by clicking it and reading its description in the box in the lower-right corner of the Macro Builder window. Also, each macro action has a Help topic associated with it. To learn more about an action, choose the action from the action list, and then press F1.
No comments:
Post a Comment