Insert pictures in Office for Mac
Pictures can be inserted (or copied) into Office documents from your Mac. You can also replace pictures in Office documents.
What do you want to do?
Insert a picture in Word, PowerPoint, or Excel
-
Click the location in your document where you want to insert a picture.
-
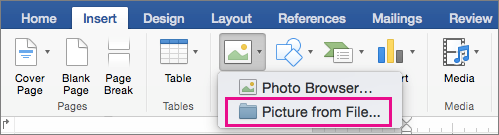
On the Insert tab, click Pictures.
-
Select the option you want to use for inserting pictures.
The Photo Browser option helps you browse through existing photo sets on your computer, such as photos in iPhoto or Photo Booth. Picture from File lets you browse through your computer's file structure to look for photos.
-
When you find the picture you want, drag it from the Photo Browser into your document, or click Insert in the file browser.
Tip: The picture is embedded in your document. If your picture has a large file size and makes your document too large, you can reduce the size of your document by linking to the picture instead of embedding it. In the Choose a Picture dialog box, select the Link to File box.
Insert a picture in Outlook
You can insert a picture or photo into the body of an email message, instead of attaching the file. Inserting a picture requires that your message uses HTML formatting. To set HTML formatting, select Options > HTML.
-
In the body of your message, click where you want to add a picture.
-
On the Message tab, click Pictures.
-
Select the option you want to use for inserting pictures.
The Photo Browser option helps you browse through existing photo sets on your computer, such as photos in iPhoto or Photo Booth. Picture from File lets you browse through your computer's file structure to look for photos.
-
When you find the picture you want, drag it from the Photo Browser into your document, or click Open in the file browser.
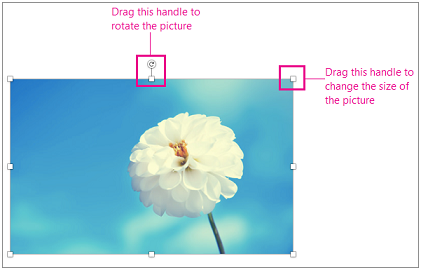
Resize the picture if necessary by clicking one of the handles that surround the picture and dragging it. Click the handle at the top of the picture to rotate it.
Replace a picture in Word, PowerPoint, or Excel
-
Hold down CONTROL and click the picture, and then click Change Picture.
-
Locate a new picture on your computer, and then click Insert.
See also
Crop pictures in Office for Mac
Move, rotate, or group a picture, text box, or other object in Office for Mac
Change the size of a picture, shape, WordArt, or other object in Word 2016 for Mac
What do you want to do?
Insert a picture in Word or PowerPoint
-
Click the location in your document where you want to insert a picture.
-
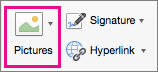
On the Home tab, under Insert, click Picture, and then click Photo Browser or Picture from File.
The Photo Browser option helps you browse through existing photo sets on your computer, such as photos in iPhoto or Photo Booth. Picture from File lets you browse through your computer's file structure to look for photos.
-
When you find the picture you want, drag it from the Photo Browser into your document or click Insert in the file browser.
Insert a picture in Excel
From the photo browser:
The Photo Browser helps you browse through existing photo sets on your computer, such as photos that you have in iPhoto or Photo Booth.
-
On the Standard toolbar, click Show or hide the Media Browser
 .
. -
Click the Photos tab
 , and then drag the picture that you want into your document.
From other locations:
-
On the Insert menu, point to Photo, and then click Picture from File.
-
Locate the picture that you want, and then click Insert.
Insert a picture in Outlook
You can insert a picture into a message so that the picture is part of the message, not an attachment.
-
In the body of your message, click where you want to add a picture.
-
On the Message tab, click Picture.
-
Select the option you want to use for inserting pictures.
The Photo Browser option helps you browse through existing photo sets on your computer, such as photos in iPhoto or Photo Booth. Picture from File lets you browse through your computer's file structure to look for photos.
-
When you find the picture you want, drag it from the Photo Browser into your document, or click Open in the file browser.
Insert clip art or online pictures
Note: When you search for clip art and pictures online, you'll be directed to Bing, where you can save the image on your computer, and then insert it in your document. When using pictures or clip art from Bing, you're responsible for respecting copyright, and the license filter in Bing can help you choose which images to use.
In Word and Excel:
-
On the Standard toolbar, click Show or hide the Media Browser
. -
Click the Clip Art tab
 , and then drag the picture that you want into your document.
In PowerPoint:
-
On the Home tab, under Insert, click Picture, and then click Clip Art Browser.
-
Drag the picture that you want into your document.
Replace a picture in Word, PowerPoint, or Excel
-
Hold down CONTROL and click the picture, and then click Change Picture.
-
Locate a new picture, and then click Insert.
See also
Crop pictures in Office for Mac
Microsoft Office Tutorials: Insert Pictures In Office For Mac >>>>> Download Now
ReplyDelete>>>>> Download Full
Microsoft Office Tutorials: Insert Pictures In Office For Mac >>>>> Download LINK
>>>>> Download Now
Microsoft Office Tutorials: Insert Pictures In Office For Mac >>>>> Download Full
>>>>> Download LINK az
Love your post . It's really nice Holographic Photo Booth
ReplyDelete