Automate applications with macros in Access 2007
Microsoft Office Access 2007 Inside Out
By John Viescas and Jeff Conrad
John Viescas is the author of numerous books including Microsoft Office Access 2003 Inside Out and Building Microsoft Access Applications. He is also the coauthor of SQL Queries for Mere Mortals. John has written numerous articles for technical publications and has lectured at conferences and user group meetings around the world. He has been recognized as a Most Valuable Professional every year since 1993 by Microsoft Product Support Services for his assistance on public support forums.
Jeff Conrad has written and assisted with technical articles on Access and created several Access add-ins given freely to the Access community. Jeff maintains a Web site with a wealth of information and resource links for those needing guidance with Access. He has been awarded Microsoft's Most Valuable Professional award for his continual involvement with the online Access community. He is very active in the Microsoft-sponsored Access public newsgroups and several other online forums where he is best known as the Access Junkie. In addition to his full time work, Jeff also creates Access database solutions for small businesses.
To learn more about other books on the 2007 Microsoft Office system, visit Microsoft Press.
In this article
In Microsoft Office Access 2007, you can define a macro to execute just about any task you would otherwise initiate with the keyboard or the mouse. This article introduces you to the unique power of macros in Office Access 2007 — their ability to automate responses to many types of events without forcing you to learn a programming language. The event might be a change in the data, the opening or closing of a form or a report, or even a change of focus from one control to another.
Uses of macros
Macros are particularly useful for building small, personal applications or for prototyping larger ones. Office Access 2007 provides various types of macro actions that you can use to automate your application. With macros, you can:
-
Open any table, query, form, or report in any available view or close any open table, query, form, or report.
-
Open a report in Print Preview or Report view or send a report directly to the printer.
-
Send the output data from a report to a Rich Text Format (.rtf) file, a Windows Notepad (.txt) file, or a Snapshot (.snp) format file. You can then open the file in Microsoft Word or Notepad.
-
Execute a select query or an action query. You can base the parameters of a query on the values of controls in any open form.
-
Include conditions that test values in a database, a form, or a report and use the results of a test to determine what action runs next.
-
Execute other macros or execute Visual Basic functions. You can halt the current macro or all macros, cancel the event that triggered the macro, or quit the application.
-
Trap errors caused during execution of macro actions, evaluate the error, and execute alternate actions.
-
Set the value of any form or report control or set selected properties of forms and form controls.
-
Emulate keyboard actions and supply input to system dialog boxes.
-
Refresh the values in forms, list box controls, and combo box controls.
-
Apply a filter to, go to any record in, or search for data in a form's underlying table or query.
-
Execute any of the commands on any of the Access Ribbons.
-
Move and size, minimize, maximize, or restore any window within the Access workspace when you work in multiple-document interface mode.
-
Change the focus to a window or to any control within a window or select a page of a report to display in Print Preview.
-
Display informative messages and sound a beep to draw attention to your messages. You can also disable certain warning messages when executing action queries.
-
Rename any object in your database, make another copy of a selected object in your database, or copy an object to another Access database.
-
Delete objects in your database or save an open object.
-
Import, export, or attach other database tables or import or export spreadsheet or text files.
-
Start an application and exchange data with the application using Dynamic Data Exchange (DDE) or the Clipboard. You can send data from a table, query, form, or report to an output file and then open that file in the appropriate application. You can also send keystrokes to the target application.
Consider some of the other possibilities for macros. For example, you can make moving from one task to another easier by using command buttons that open and position forms and set values. You can create very complex editing routines that validate data entered in forms, including checking data in other tables. You can even check something like the customer name entered in an order form and open another form so that the user can enter detailed data if no record exists for that customer.
Working with the Macro design window
When creating a macro, begin by opening the database with which you are working.
On the Create tab, in the Other group, click the arrow on the New Object button, and click Macro from the list of three options. (The top half of the New Object button displays the last type of new object created —Macro, Module, or Class Module. If you see the Macro icon in the top half of the New Object button, you can also click that button to begin creating a new macro.) Access opens a new Macro window similar to the one shown in Figure 1. In the upper part of the Macro window, you define your new macro; and in the lower part, you enter settings, called arguments, for the actions you've selected for your macro. The upper part shows at least two columns, Action and Comment. You can view all five columns shown in Figure 1 by clicking the Macro Names, Conditions, and Arguments buttons in the Show/Hide group on the Design tab.
Tip: You can cause the Macro Name and Condition columns to appear automatically for any new macro by selecting the Names Column and Conditions Column check boxes under Show In Macro Design in the Display section of the Advanced category in the Access Options dialog box.
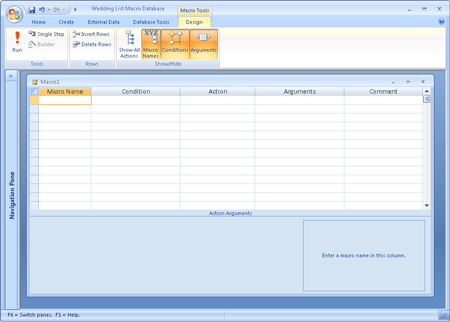
Notice that the area at the lower right displays a brief help message. The message changes depending on where the insertion point is located in the upper part of the window.
Tip: You can always press F1 to open a context-sensitive Help topic.
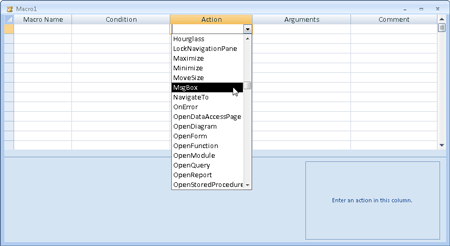
In the Action column, you can specify any one of the 70 macro actions provided by Office Access 2007. If you click any box in the Action column, an arrow appears at the right side of the box. Click this arrow to open a list of the macro actions, as shown in Figure 2.
Tip: The Macro Builder has been redesigned in Access 2010 to make it even easier to create, modify, and share Access Macros.
Saving your macro
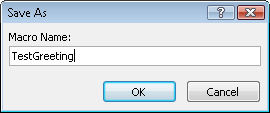
You must save a macro before you can run it. Click the Save button on the Quick Access Toolbar, or click the Microsoft Office Button and then click Save. When you do so, Access opens the dialog box shown in Figure 3. Enter the name for this macro, and click OK to save it.
Testing your macro
You can run some macros directly from the Navigation Pane or from the Macro window because they don't depend on controls on an open form or report. If your macro does depend on a form or a report, you must link the macro to the appropriate event and run it that way. However you run your macro, Access provides a way to test it by allowing you to single step through the macro actions.
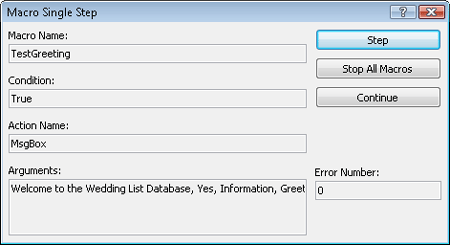
To activate single stepping, right-click the macro you want to test in the Navigation Pane, and then click Design View on the shortcut menu. This opens the macro in the Macro window. Click the Single Step button in the Tools group on the Design tab. Now when you run your macro, Access opens the Macro Single Step dialog box before executing each action in your macro. In this dialog box, you'll see the macro name, the action, and the action arguments.
Try this procedure with the macro you just created. Open the Macro window, click the Single Step button, and then click the Run button in the Tools group on the Design tab. The Macro Single Step dialog box opens, as shown in Figure 4. The Macro Single Step dialog box also shows you the result of testing your condition.
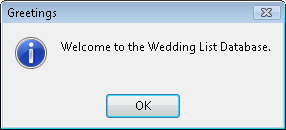
If you click the Step button in the dialog box, the action you see in the dialog box will run, and you'll see the dialog box opened by your MsgBox action with the message you created, as shown in Figure 5. Click the OK button in the message box to dismiss it. If your macro had more than one action defined, you would have returned to the Macro Single Step dialog box, which would have shown you the next action. In this case, your macro has only one action, so Access returns you to the Macro window.
If Access encounters an error in any macro during the normal execution of your application, Access first displays a dialog box explaining the error it found. You then see an Action Failed dialog box, which is similar to the Macro Single Step dialog box, containing information about the action that caused the problem. At this point, you can click only the Stop All Macros button. You can then edit your macro to fix the problem.
Before going further, you might want to return to the Macro window and click the Single Step button again so it's no longer selected. Otherwise you'll continue to single step through every macro you run until you exit and restart Access or click Continue in one of the Single Step dialog boxes.
As you dig deeper into macros you'll find out how to include multiple actions and define condition checking so that different actions are performed depending on the values in your forms or reports.

No comments:
Post a Comment