Show uncompleted tasks using a Query String (URL) Filter Web Part
Note: This article has done its job, and will be retiring soon. To prevent "Page not found" woes, we're removing links we know about. If you've created links to this page, please remove them, and together we'll keep the web connected.
To keep track of tasks that must be completed by other people, you can create a task list to show the uncompleted tasks for everyone or an individual. You can add a Query String (URL) Filter Web Part and a List View Web Part to the Web Part Page to show the uncompleted tasks for an individual.
As a manager, you are responsible for making sure that tasks assigned to your group are completed on time. You have to keep track of many tasks assigned to several people. Each task has a priority, a due date, and a status to tell you if the task has been completed.
To help make sure that these tasks are completed on time, you can create a task list in a site collection on a server that is running Microsoft Office SharePoint Server 2007. The task list will be the central location for all your tasks.
Here is an example of a task list.
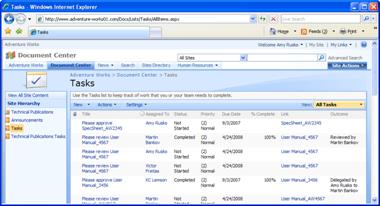
You can create a Web Part Page with a Query String (URL) Filter Web Part and a List View Web Part to show all the uncompleted tasks for everyone or an individual. Further, you can use the Query String (URL) Filter Web Part to create a link that you can use or send to show the uncompleted tasks of an individual. For example, you can see the uncompleted tasks assigned to Amy Rusko by using this URL: http://www.adventure-works01.com/Docs/Documents/DueTasks.aspx?AssignedTo=Amy Rusko.
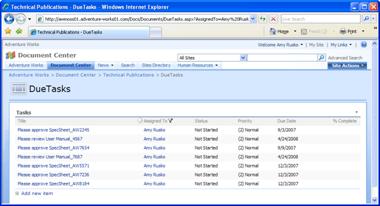
You can also create a link to this Web Part Page that you can use or send to a person to show their uncompleted tasks.
To complete this scenario, you will need permissions to contribute to a site collection on a server that is running Office SharePoint Server 2007. The administrator of the site collection can configure the permissions.
You will do the following:
-
Create the Task List — you will create a task list that will store all tasks. You can then create Web Part Pages that will show the tasks in this list in different ways. If you already have tasks in an existing task list, you can skip this step, the next step, and go to Modify an existing view.
-
Add Tasks to the List — you will put all tasks in this new list. If you already have tasks in an an existing task list, you can skip this step and go to the next step.
-
Modify an Existing View — your new list will contain the most frequently used views for a list. You will configure one of these views to show only the uncompleted tasks.
-
Create the Web Part Page — you will create a Web Part Page that anyone can visit to see their uncompleted tasks.
-
Add the Web Parts — you will add a Query String (URL) Filter Web part and a List View Web Part to the Web Part Page to show the uncompleted tasks.
-
Configure the Web Parts — you will configure the List View Web Part to use the modified view of the task list. You will also connect the Query String (URL) Filter Web Part to the List View Web Part.
-
Use the Web Part Page — you will learn how to use your new Web Part Page.
Step 1: Create the Task List
-
Click View All Site Content, and then click Create on the All Site Content page.
Tip: In most cases, you can use the Site Actions menu
 instead to complete this step.
-
Under Tracking, click Tasks.
-
In the Name box in the Name and Description section of the New page, type Tasks. The name in this box appears as the title of the list.
-
In the Description box, type a description for this list. The description is optional.
-
Click Create.
The new task list will open in a browser.
Step 2: Add Tasks to the List
-
On the New menu
 of the task list, click New Item.
 -
In the Title section, type a name for the task.
-
In the Priority section, click High, Normal, or Low to indicate the relative importance of this task compared with other tasks in your task list.
-
In the Task Status section, click the status of the task.
-
In the % Complete section, type a number as a percentage value that indicates the extent to which the task is completed.
-
In the Assigned To section, type the name of the person who will complete the task. Only one person can be assigned to a task.
Click Check Names
 to determine if the person's name is found in the membership provider service that is used for authentication. See your server administrator if the name is not found in the membership provider service.
 Tip: To find people whom you want to work on the task, click Browse to use the membership provider service.
-
In the Description section, type a description of the task.
-
In the Start Date and Due Date sections, enter the start date and finish date for the work that is performed on the task. Use the date picker
 to quickly enter a date.
 -
To attach a file to the task, click Attach File. Click Browse to locate the file, and then click OK.
-
Click OK to add the task to your task list.
Repeat the steps in this section to add other tasks to the task list.
Step 3: Modify an Existing View
-
On the View menu of the task list, click By Assigned To.
-
On the View menu, click Modify this View.
-
In the Filter section, do the following:
-
Click Show items only when the following is true.
-
In the Show the items when column list, click Status, click is equal to, and then type Not Started.

-
-
Click OK.
Step 4: Create the Web Part Page
-
Click View All Site Content, and then click Create on the All Site Content page.
Tip: In most cases, you can use the Site Actions menu
 instead to complete this step.
-
Under Web Pages on the Create page, click Web Part Page.
-
In the View Name box, type DueTasks. The name appears in the title bar and the URL of the new page.
-
In the Choose a Layout Template in the Layout section, click Full Page, Vertical.
-
In the Document Library list in the Save Location section, click Shared Documents.
-
Click Create.
Step 5: Add the Web Parts
-
In the Web Part page, click Add a Web Part.
-
Under the List and Libraries section in the Add Web Parts -- Webpage Dialog page, select the DueTasks check box.
-
Under the Filters section, select the Query String (URL) Filter check box.
-
Click Add.
Step 6: Configure the Web Parts
-
On the List View Web Part, click the Edit button
 , and then click Modify Shared Web Part.
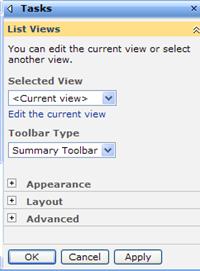
The tool pane for the List View Web Part opens so that you can configure the view of this Web Part.
-
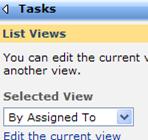
In the Selected View list, click By Assigned To.
-
In the message box about the results of switching the view, click OK.
-
In the tool pane for the List View Web Part, click OK.
-
On the Query String (URL) Filter Web Part, click the Edit button
 , and then click Modify Shared Web Part.
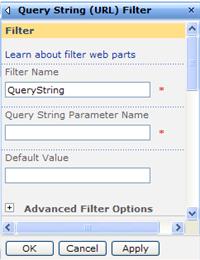
The tool pane for the Query String (URL) Filter Web Part opens so that you can configure the parameter to show the uncompleted tasks of an individual in the Web Part page.
-
In the Query String Parameter Name box, type AssignedTo. This is the name of the parameter that will show the tasks by the name of person assigned to the task.

-
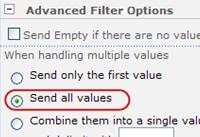
Open Advanced Filter Options.
-
Click Send all values and then click OK.
-
To connect the Query String (URL) Filter Web Part to the List View Web Part, click the Edit button
 on the Query String (URL) Filter Web Part, point to Connections, point to Send Filter Values To, and then click Tasks List.
 -
In the Consumer Field Name list, click AssignedTo, and then click Finish.
-
Click Exit Edit Mode.
Step 6: Use the Web Part Page
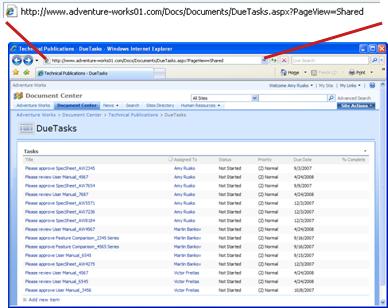
When you visit this page, you will all tasks with a status of Not Started.
To see the uncompleted tasks of an individual, do the following:
-
If the URL to the task list contains characters after the file name extension, delete those characters. For example, the URL to the task list is http://www.adventure-works01.com/Docs/Documents/DueTasks.aspx?PageView=Shared. Remove ?PageView=Shared so that the URL is http://www.adventure-works01.com/Docs/Documents/DueTasks.aspx.
-
Add the parameter and the person's name to the end of the URL. For example, to see the tasks assigned to Amy Rusko, add ?AssignedTo=Amy Rusko to the end of the URL. The URL will be http://www.adventure-works01.com/Docs/Documents/DueTasks.aspx?AssignedTo=Amy Rusko.
-
Press ENTER.
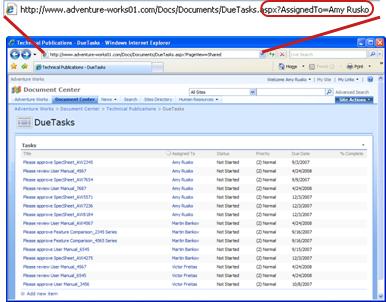
If you want to remind a person of their uncompleted tasks, you can add this link to an e-mail message so that the person can see their task by clicking the link. If you have to send a similar message to other people, you can change the parameter value to their name so that the recipient can see only their tasks.
No comments:
Post a Comment