Customize a view in an Access app by creating a user interface macro
With user interface (UI) macros in Access web apps you can perform actions such as opening another view, applying a filter, or creating a new record. There are two kinds: "embedded" UI macros, which attach directly to user interface objects such as command buttons, combo boxes, or the Action Bar button object, and "standalone" UI macros, contained in macro objects.
To avoid duplicating macro logic, reuse standalone UI macros by calling them from other macros. You can see the standalone UI macros in the Navigation Pane, under Macros, but you can't run them directly from there. Use the RunMacro action to run a standalone UI macro from an embedded UI macro.
Note: This article doesn't apply to Access desktop databases.
Create an embedded UI macro in an Access web app
Embedded UI macros in Access web apps run when specific events occur in a view, such as clicking a button, selecting an item in a combo box, or loading a view. The macros become part of the view or control they're embedded in.
Here are the events you can attach a UI macro to in a control or view in an Access web app:
| Event Type | When it occurs |
| After Update | Occurs after you type data into a control or select an item in a list control. |
| On Click | Occurs when a control is selected. |
| On Current | Occurs when the user moves to a different record in the view. |
| On Load | Occurs when a view is opened. |
And here are the events each control supports on List views and Blank views:
| Control or object type | Supported events |
| Action Bar Button | On Click |
| AutoComplete | After Update, On Click |
| Button | On Click |
| Check Box | After Update |
| Combo Box | After Update |
| Hyperlink | After Update, On Click |
| Image | On Click |
| Label | On Click |
| Multiline Textbox | After Update, On Click |
| Text Box | After Update, On Click |
| View | On Current, On Load |
Note:
-
Summary views in Access web apps don't support the ability to add custom controls which means you can't add any user interface macros to any controls on this view type.
-
Datasheet views do not support the After Update control events. You can only define macro logic in the After Update event of controls placed on List and Blank views.
-
Web browser controls, subview controls, and related items controls don't support any events on any view type.
Here's how to create an embedded UI macro in an Access web app:
-
Select the control you want to embed the macro in.
-
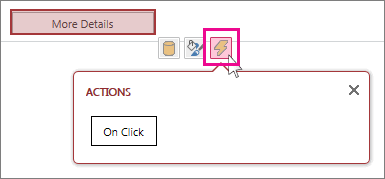
Click the Actions button. Access opens the Actions dialog box for the custom action.

-
Click the event you want to attach the macro to. Access displays a blank macro in macro Design View, and you can start adding actions.
Create a standalone UI macro in an Access web app
-
Click Home > Advanced > Macro.
Access displays a blank macro in macro Design View, and you can start adding actions.
-
Click Save. Enter the macro name in the Macro Name box and then click OK.
Tips for creating a UI macro in an Access web app
These tips should help the process go more smoothly.
-
To refer to a field in a macro, use the format [TableName].[FieldName]. For example, use [Tasks].[Due Date] to refer to the Due Date field and [Tasks].[Status] to refer to the Status field. If your view is based on a query, provide the name of the saved query object. For example, if your view's record source is a query named MyQuery, use [MyQuery].[Due Date] to refer to the Due Date field in the query.
-
Before creating an embedded UI macro, write down the names of the tables, fields and controls you plan to use, because you won't be able to switch to other tabs while you're working on it.
-
Some macro action arguments support expressions. If you want to use an expression for a macro action argument, enter an = sign at the first position in the argument box. If the argument supports expressions, Access displays an Expression Builder button on the right side of the argument box.
-
Save often.
No comments:
Post a Comment