Change the appearance of a control by using conditional formatting
Conditional formatting allows you to selectively highlight certain data on your form or report so that it is easier to understand. For example, you might want to format negative numbers in a red font to make it clear that those records need further attention.
You can set conditional formatting for a text box or a combo box control. You can change the formatting based on the control's own value, or you can use an expression to change the formatting based on the values contained in other fields or controls. On a form, you can use conditional formatting to disable a control, and you can cause the formatting of a control to change when the cursor is positioned in that control.
What do you want to do?
Apply conditional formatting to a control based on its own value
You can apply conditional formatting to a control on a form or report if its value meets specific criteria. For example, suppose that you own a tabular report that displays order information for a list of products. For each line on the report, you want the extended price to appear with a yellow background if the value is between 100 and 1000. The following illustration shows a report with this type of conditional formatting applied.
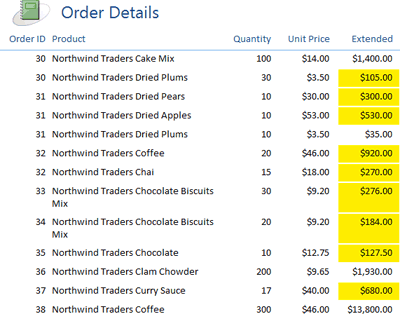
Tip: Improved options in Access 2010 make it easier to manage conditional formatting rules from a single intuitive view.
The following procedure shows you how to apply this conditional formatting.
-
Right-click the form or report in the Navigation Pane, and then click Layout View on the shortcut menu.
-
Click the control that you want to apply the conditional formatting to. If there are other controls that contain similar data and you want to apply the same conditional formatting rules to them, hold down the SHIFT key and then click the controls to select
Note: Any additional controls that you select will be formatted according to their own values, not according to the value of the first control that you selected.
them, too.
-
On the Format tab, in the Font group, click Conditional
 .
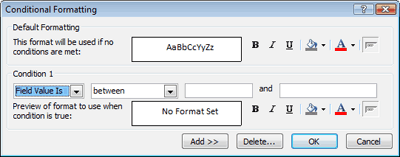
.The Conditional Formatting dialog box appears.
-
Under Default Formatting, if you use specific formatting that you want to be applied when none of the conditions are met, select the formatting options that you want. The sample text in the preview box changes to show you how the default formatting will look. The default settings for this section correspond to the current font settings of the control.
-
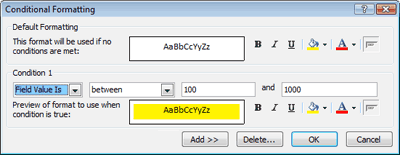
Under Condition 1, enter the criteria that determine when the conditional formatting should be applied, and then select the formatting options that you want. To disable the control when the criteria are met, click Enabled
 . The sample text in the preview box changes to show you how the conditional formatting will look.
-
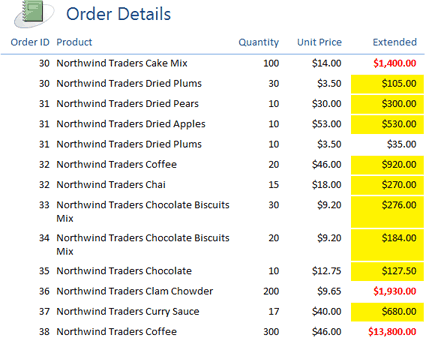
To add another conditional format for the control, click Add, and then follow the same procedure that you used for Condition 1. You can set up to three conditional formats for one control. For example, you might set Condition 1 to change the control's background to yellow if the value is between 100 and 1000, and then you might set Condition 2 to display the control's value in a bold red font if the value is greater than 1000. The following illustration shows the settings that you use in the Conditional Formatting dialog box to accomplish this.
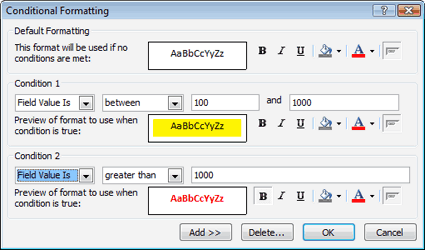
The following illustration shows the results of these settings.
Note:
-
When you apply conditional formatting to a lookup field, the condition must be based on the lookup ID, not the value returned by the lookup field.
-
Conditions are evaluated according to the following rules.
-
If Condition 1 is true, only the formatting for Condition 1 is applied.
-
Condition 2 is verified only if Condition 1 is not true. If Condition 2 is true, only the formatting for Condition 2 is applied.
-
Condition 3 is verified only if Conditions 1 and 2 are not true. If Condition 3 is true, only the formatting for Condition 3 is applied.
-
If none of the conditions are true, the default formatting for the control is applied.
-
Use an expression to apply conditional formatting to one or more controls
You must use an expression instead of a field value to apply conditional formatting if any of these conditions are true.
-
You want to apply conditional formatting to a single control based on the value of another control.
-
You want to apply conditional formatting to a single control based on the results of a calculation or on the value of a field other than the control's record source.
-
You want to apply conditional formatting to several controls at once, whether the formatting is based on the value of one field or control, or on the results of a calculation. For example, you might want to highlight an entire line in your report if one field contains a certain value or range of values.
-
You want to apply conditional formatting to an unbound control.
Before you begin
When you use an expression to apply conditional formatting, you should make sure that the controls being formatted do not use the same names as any of the fields in the form's or report's underlying record source. If you refer to a field in an expression and there is a control by the same name on the form or report, Access is unable to determine whether you are referring to the control or to the field. Because of this, Access cannot evaluate the expression. As a result, the conditional formatting is not applied, and the control appears with its default formatting. Whenever you add expressions to a form or report, it is very important that you rename any controls whose names conflict with field names that are used in the expressions. The following procedure shows how to rename controls in such a situation.
Note: If you rename controls on a form or report that already contains controls whose Control Source properties are expressions, Access changes those expressions so that they refer to the new control names. In many cases this causes the expressions to fail, and the report will display the Enter Parameter Value dialog box when you print it or open it in Layout view or Report view. If you use the following procedure for renaming controls, you need to edit any pre-existing Control Source expressions so that they refer to the fields in the underlying record source instead of the controls on the form or report.
Rename controls on a form or report
-
Right-click the form or report in the Navigation Pane, and then click Design View on the shortcut menu.
-
If the property sheet is not already displayed, press F4 to display it.
-
Click a control to select it.
-
On the All tab of the property sheet, if the first two properties (Name and Control Source) are identical, or if the Name property matches another field name in the form's or report's underlying record source, edit the Name property so that it is unique. A common practice is to add a short prefix to the name. For example, if the control is a text box, you might add the prefix "txt" to its Name property, as in "txtQuantity."
-
Repeat steps 3 and 4 for all the controls on your form or report whose names match field names in the underlying record source.
-
On the Quick Access Toolbar, click Save, or press CTRL+S.
-
If the form or report contains any controls whose Control Source properties are expressions, double-check the expressions and edit them as necessary, to make sure that they still refer to the fields in the record source instead of the newly-renamed controls.
Add conditional formatting by using an expression
-
Right-click the form or report in the Navigation Pane, and then click Layout View on the shortcut menu.
-
Click the first control that you want to apply the conditional formatting to. To select more controls, hold down SHIFT and then click the controls until all the controls that you want to format are selected.
-
On the Format tab, in the Font group, click Conditional
 .
.The Conditional Formatting dialog box appears.

-
Under Default Formatting, if you use specific formatting that you want to be applied when none of the conditions are met, select the formatting options that you want. The sample text in the preview box changes to show you how the default formatting will look. The default settings for this section correspond to the current font settings of the control.
-
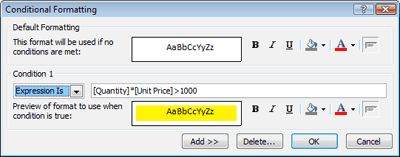
Under Condition 1, select Expression Is from the first list.
-
Type an expression in the box to the right of the list. Do not precede the expression with an equal sign (=). For example:
[Quantity] * [Unit Price] > 1000
Find a link to more information about expressions in the See Also section.
-
Select the formatting options that you want. To disable the control when the criteria are met, click Enabled
 . The sample text in the preview box changes to show you how the conditional formatting will look.
-
To add another conditional format for the control, click Add, and then follow the same procedure that you used for Condition 1. You can set up to three conditional formats for one control.
-
When you are finished, click OK.
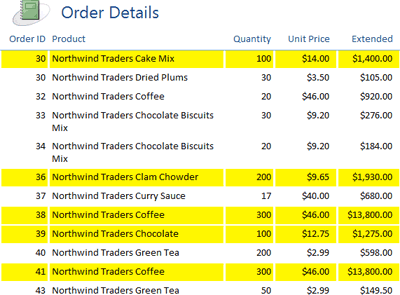
The following illustration shows the results of applying this conditional formatting to all five of the controls in the Detail section of a tabular report.
Tip: To use the Structured Query Language (SQL) operators Between or In in an expression, use the Eval function, as shown in the following two examples.
Eval([Quantity] Between 10 And 20)
- or -
Eval([Country/Region] In ("USA", "Canada", "Spain"))
Change the formatting of a control that has the focus
When you position the cursor in a control on a form, either by clicking the control or by advancing to it by using the TAB key, that control is said to have the focus. You can use conditional formatting to change the appearance of a control when it has the focus. If you apply this type of conditional formatting to all of the text boxes and combo boxes on a form, it makes it easier to see which control has the focus at any given moment. Use the following procedure to apply conditional formatting to the control that has the focus.
-
Right-click the form in the Navigation Pane, and then click Layout View on the shortcut menu.
-
Click the control that you want to apply the conditional formatting to. If you want to apply the same conditional formatting to additional controls, hold down SHIFT and then click those controls to select them, too.
-
On the Format tab, in the Font group, click Conditional
 .
. -
In the Conditional Formatting dialog box, under Default Formatting, if you use specific formatting that you want to be applied when none of the conditions are met, select the formatting options that you want. The sample text in the preview box changes to show you how the default formatting will look. The default settings for this section correspond to the current font settings of the control.
-
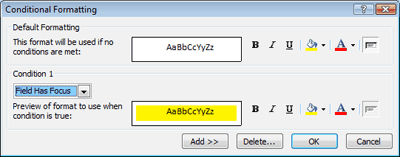
Under Condition 1, in the first list, select Field Has Focus.
Note: Field Has Focus is only available under Condition 1.
-
To the right of the preview box, select the formatting options that you want Access to apply when the control has the focus. The sample text in the preview box changes to show you how the conditional formatting will look.
-
If you want to add another conditional format for this control or group of controls, click Add, and then follow the same procedure that you used for Condition 1.
-
When you are finished adding conditions, click OK to close the Conditional Formatting dialog box.
Remove conditional formatting from one or more controls
-
Right-click the form or report in the Navigation Pane, and then click Layout View on the shortcut menu.
-
Click the control that you want to remove the conditional formatting from.
-
On the Format tab, in the Font group, click Conditional
 .
. -
In the Conditional Formatting dialog box, click Delete.
-
In the Delete Conditional Format dialog box, select the check box for each condition that you want to delete, and then click OK.
-
Click OK in the Conditional Formatting dialog box.
Create alternating row colors on a report
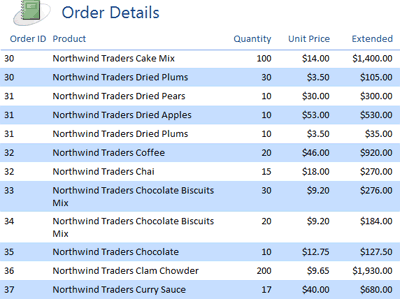
By default, Access formats each row of a report's Detail section with the same background color. When printing a report, shading every other line of the detail section can make it much easier to read. Rather than using the Conditional Formatting feature to do this, you can use the Alternate Back Color property for the Detail section to specify a color to be displayed or printed on every other line when viewing or printing a report. The following procedure shows how to do this.
-
Right-click the report in the Navigation Pane, and then click Design View on the shortcut menu.
-
If the property sheet is not already displayed, press F4 to display it.
-
Click the Detail section header of the report.
-
On the property sheet, click the Format tab.
-
Click in the Alternate Back Color property box, and then select a color theme from the list. Alternatively, you can click
 , and then click the color that you want applied for each alternating row.
 -
On the Quick Access Toolbar, click Save, or press CTRL+S.
-
Switch to Report view and check your results. The following illustration shows an example of a tabular report with the Alternate Back Color property set to Background Light Header.
No comments:
Post a Comment