Add or remove protection in your document, workbook, or presentation
In Office, you can use a password to help prevent other people from opening or modifying your documents, workbooks, and presentations. Then you can easily remove passwords to unprotect a document or workbook if read only is no longer required. Also, you can use document protection to restrict the types of changes that reviewers can make.
Your IT administrators set password policy for the apps for Office that include basic rules.
Warning: It's important to know that if you don't remember your password Microsoft can't retrieve your forgotten passwords.
Add protection in your Word document
-
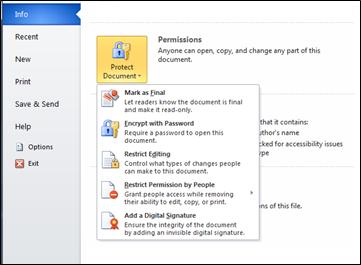
In an open document, click File > Info > Protect Document.
You see the following options.

-
Mark as Final: Make the document read-only.
When a document is marked as final, typing, editing, commands, and proofing marks are disabled or turned off and the document becomes read-only. The Mark as Final command helps you communicate that you're sharing a completed version of a document. It also helps prevent reviewers or readers from making inadvertent changes to the document.
When you mark a document as final, Word asks you to save the file. The next time you open it, you will see a yellow MARKED AS FINAL message at the top of the document. If you click Edit Anyway, the document will no longer be marked as final.
-
Encrypt with Password: Set a password for the document.
Important: Keep your password in a safe place. If you lose or forget the password, it cannot be recovered.
When you select Encrypt with Password, the Encrypt Document dialog box appears. In the Password box, type a password, and then type it again when prompted. Important: Microsoft cannot retrieve lost or forgotten passwords, so keep a list of your passwords and corresponding file names in a safe place.
-
-
Restrict Editing: Control what types of changes can be made to the document.
When you select Restrict Editing, you see these options:
-
Formatting restrictions This reduces formatting options, preserving a look and feel. Click Settings to select which styles are allowed.
-
Editing restrictions You control how the file can be edited or you can disable editing. Click Exceptions or More users to control those who can edit.
-
Start enforcement Click Yes, Start Enforcing Protection to select password protection or user authentication. You can also click Restrict permission to add or remove editors who'll have restricted permissions.
-
Restrict Permission by People: Use Windows Live ID to restrict permissions.
Use a Windows Live ID or a Microsoft Windows account to restrict permissions. You can apply permissions via a template that is used by your organization, or you can add permissions by clicking Restrict Access. To learn more about Information Rights Management see Information Rights Management in Office.
-
-
Add a Digital Signature Add a visible or invisible digital signature.
Digital signatures authenticate digital information such as documents, email messages, and macros by using computer cryptology. Digital signatures are created by typing a signature or by using an image of a signature to establish authenticity, integrity, and non-repudiation. See the link at the end of this topic to learn more about digital signatures.
To learn about digital signatures, see Digital signatures and certificates.
Remove protection in your Word document
-
In an open document, click File > Info > Protect Document.
You see the following options.

-
Remove Mark as Final: When you mark a document as final, Words asks you to save the file. The next time you open it, you will see a yellow MARKED AS FINAL message at the top of the document. If you click Edit Anyway, the document will no longer be marked as final.
-
Remove password encryption To remove password encryption from the document, open the document and enter the password in the Password box. Then click File > Info > Protect Document > Encrypt with Password. Delete the contents of the Password box, click OK, and then save the document again.
-
Remove editing restrictions: To remove editing restrictions, click Stop Protection at the bottom of the Restrict Editing pane.
-
Remove or change restricted access: To remove or change restricted access, open the file, and then click Change Permission in the yellow bar at the top of the document.
-
Remove digital signature: To remove a digital signature, open the file, right-click the signature line, and click Remove Signature. Or, click the arrow next to the signature in the Signatures pane, and then click Remove Signature.
-
Add protection in your Excel spreadsheet
-
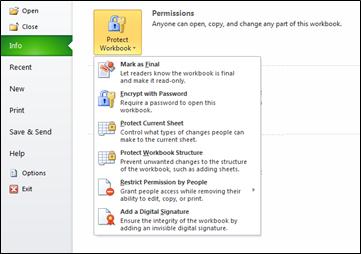
In an open worksheet, click File > Info > Protect Workbook
You see the following options.

-
Mark as Final: Make the workbook read-only.
When a workbook is marked as final, typing, editing, commands, and proofing marks are disabled or turned off and the document becomes read-only. The Mark Comment as Final command helps you communicate that you are sharing a completed version of a workbook. It also helps prevent reviewers or readers from accidently changing the workbook.
When you mark a workbook as final, Excel asks you to save the file. The next time you open it, you'll see a yellow MARKED AS FINAL message at the top of the workbook. If you click Edit Anyway, the workbook will no longer be marked as final.
-
Encrypt with Password: Set a password for the workbook.
Note: Keep your password in a safe place. If you lose or forget the password, it cannot be recovered.
When you select Encrypt with Password, the Encrypt Document dialog box appears. In the Password box, type a password, and then type it again when prompted. Important: Microsoft cannot retrieve lost or forgotten passwords, so keep a list of your passwords and corresponding file names in a safe place.
-
Protect Current Sheet: Protect the worksheet and locked cells.
By using the Protect Current Sheet feature, you can select password protection and allow or disallow other users to select, format, insert, delete, sort, or edit areas of the worksheet.
-
Protect Workbook Structure: By using the Protect Workbook Structure feature, you can select password protection and select options to prevent users from changing, moving, or deleting important data.
-
Restrict Permission by People: Install Windows Rights Management to restrict permissions.
Use a Windows Live ID or a Microsoft Windows account to restrict permissions. You can apply permissions via a template that is used by your organization, or you can add permissions by clicking Restrict Access. To learn more about information Rights Management, see Information Rights Management in Office
-
Add a Digital Signature: Add a visible or invisible digital signature.
Digital signatures authenticate digital information such as documents, email messages, and macros by using computer cryptology. Digital signatures are created by typing a signature or by using an image of a signature to establish authenticity, integrity, and non-repudiation.
To learn about digital signatures, see Digital signatures and certificates.
-
Remove protection in your Excel worksheet
-
In an open worksheet, click File > Info > Protect Workbook.
You see the following options.

-
Remove Mark as Final: When you mark a workbook as final, Excel asks you to save the file. The next time you open it, you'll see a yellow MARKED AS FINAL message at the top of the workbook. If you click Edit Anyway, the workbook will no longer be marked as final.
-
Remove password encryption: To remove password encryption from the file, open the workbook and enter the password in the Password box. Then click File > Info > Protect Workbook > Encrypt with Password. Delete the contents of the Password box, click OK, and then save the file again.
-
Remove password protection from the sheet: To remove password protection from the sheet, click File > Protect Current Sheet, and then type the password in the Unprotect Workbook dialog box.
-
Remove password protection from workbook structure: To remove password protection from the workbook structure, click File > Protect Workbook Structure, and then type the password in the Unprotect Workbook dialog box
-
Remove change restricted access: To remove or change restricted access, open the file, and then click Change Permission in the yellow bar at the top of the document.
-
Remove embedded signature: To remove a digital signature, open the file, right-click the signature line, and click Remove Signature. Or, click the arrow next to the signature in the Signatures pane, and then click Remove Signature.
-
Add protection in your PowerPoint presentation
-
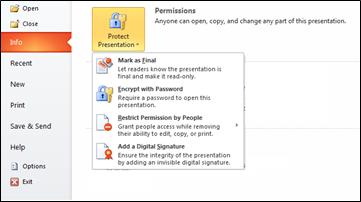
In an open document, click File > Info > Protect Presentation.
You see the following options.

-
Mark as Final: Make the presentation read-only.
When a presentation is marked as final, typing, editing, commands, and proofing marks are disabled or turned off and the presentation becomes read-only. The Mark as Final command helps you communicate that you are sharing a completed version of a presentation. It also helps prevent reviewers or readers from making inadvertent changes to the presentation.
When you mark a presentation as final, PowerPoint asks you to save the file. The next time you open it, you will see a yellow MARKED AS FINAL message at the top of the file. If you click Edit Anyway, the presentation will no longer be marked as final.
-
Encrypt with Password: Set a password for the presentation.
Caution: Keep your password in a safe place. If you lose or forget the password it cannot be recovered.
When you select Encrypt with Password, the Encrypt Document dialog box appears. In the Password box, type a password, and then type it again when prompted. Important: Microsoft can't retrieve lost or forgotten passwords so keep a list of your passwords and corresponding file names in a safe place.
-
Restrict Permission by People: Install Windows Rights Management to restrict permissions.
Use a Windows Live ID or a Microsoft Windows account to restrict permissions. You can apply permissions via a template that is used by your organization, or you can add permissions by clicking Restrict Access. To learn more about Information Rights Management, see Information Rights Management in Office.
-
Add a Digital Signature: Add a visible or invisible digital signature.
Digital signatures authenticate digital information such as documents, email messages, and macros by using computer cryptology. Digital signatures are created by typing a signature or by using an image of a signature to establish authenticity, integrity, and non-repudiation.
To learn about digital signatures, see Digital signatures and certificates.
-
Remove protection in your PowerPoint presentation
-
In an open presentation, click File > Info > Protect Presentation.
You see the following options.

-
Remove Mark as Final: When you mark a presentation as final, PowerPoint asks you to save the file. The next time you open it, you'll see a yellow MARKED AS FINAL message at the top of the file. If you click Edit Anyway, the presentation will no longer be marked as final.
-
Remove password encryption: To remove password encryption from the presentation, open the file and enter the password in the Password box. Then click File > Info > Protect Presentation > Encrypt with Password. Delete the contents of the Password box, click OK, and then save the presentation.
-
Remove change restricted access: To remove or change restricted access, open the file, and then click Change Permission in the yellow bar at the top of the presentation.
-
Remove digital signature: To remove a digital signature, open the file, right-click the signature line, and click Remove Signature. Or, click the arrow next to the signature in the Signatures pane, and then click Remove Signature.
-
Let reviewers insert comments and tracked changes
-
On the Review tab, in the Protect group, click Protect Document, and then click Restrict Formatting and Editing.

-
In the Protect Document task pane, under Formatting restrictions, select the Limit formatting to a selection of styles check box, and then click Settings to specify which styles a reviewer can apply or change.
-
Under Editing restrictions, select the Allow only this type of editing in the document check box.
-
In the list of editing restrictions, click Tracked changes. (This includes comments as well as insertions, deletions, and moved text.)
Note: For a different set of protection features use Active Directory directory service, click Restrict Permission to use Information Rights Management.
-
Under Start enforcement, click Yes, Start Enforcing Protection.
-
To assign a password to the document so that only reviewers who know the password can remove the protection, type a password in the Enter new password (optional) box, and then confirm the password.
Important: If you choose not to use a password, all reviewers can change your editing restrictions.
Let reviewers insert comments only
-
On the Review tab, in the Protect group, click Protect Document, and then click Restrict Formatting and Editing.

-
In the Protect Document task pane, under Editing restrictions, select the Allow only this type of editing in the document check box.
-
In the list of editing restrictions, click Comments.
-
If you want to give some people editing options for specific pieces of the document, you can select areas in the document, and then choose which users (a group or individuals) can edit the selected areas of the document. Click the drop-down arrow next to the group or individual name to find the next region or all regions that the group or individual can edit, or to remove permissions for the group or individual.
Note: For a different set of protection features use Active Directory directory service, click Restrict Permission to use Information Rights Management.
-
Under Start enforcement, click Yes, Start Enforcing Protection.
-
To assign a password to the document so that only reviewers who know the password can remove the protection, type a password in the Enter new password (optional) box, and then confirm the password.
Important: If you choose not to use a password, all reviewers can change your editing restrictions.
Stop protection for comments and changes
-
On the Review tab, in the Protect group, click Protect Document, and then click Restrict Formatting and Editing.

-
In the Protect Document task pane, click Stop Protection.
Note: If you use a password to add protection to the document, you need to type the password before you can stop the protection.
How are Password Policy rules enforced?
IT administrators enforce strong password policies by configuring Group Policy settings that match their organization's security needs. To learn more about how to deploy password policy rules in an organization, search for the TechNet article, Plan password complexity settings for Office 2013.
There are two common error messages that appear when you try to protect a file that has a password that does not comply with password-policy rules.
-
The password does not meet the minimum length A warning message appears that indicates you need more characters. Solution: Use a password that meets or exceeds the minimum-length stated on the message.
-
The password does not meet the minimum complexity rules A warning message appears that indicates you need more types of characters. Solution: Use a password that meets or exceeds the minimum requirements stated on the message.
Microsoft Office Tutorials: Add Or Remove Protection In Your Document, Workbook, Or Presentation >>>>> Download Now
ReplyDelete>>>>> Download Full
Microsoft Office Tutorials: Add Or Remove Protection In Your Document, Workbook, Or Presentation >>>>> Download LINK
>>>>> Download Now
Microsoft Office Tutorials: Add Or Remove Protection In Your Document, Workbook, Or Presentation >>>>> Download Full
>>>>> Download LINK vE