Set text direction and position in a shape or text box
Text boxes and most shapes (except for lines and connectors) can include text that attaches to the shape or text box. The text can be positioned horizontally or vertically, and it can either wrap or appear only on one line. You can also change the margins of text boxes and shapes for optimal spacing, resize shapes for a better text fit, or change the direction of the text.
What do you want to do?
Position text horizontally in a shape or text box
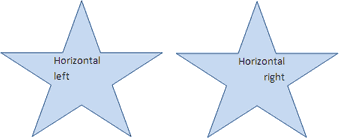
To change the horizontal alignment of a single paragraph or line:
-
Click in the paragraph or line of text that you want to modify.
-
On the Home tab (or the Message tab in Outlook), click the horizontal alignment option that you want.

To change the horizontal alignment of all text in a shape or text box:
-
Click the border of the shape or text box to select it.
-
On the Home tab, (or the Message tab in Outlook), click the horizontal alignment option that you want.

Position text vertically in a shape or text box

-
Right-click the border of the shape or text box.
-
On the shortcut menu, click Format Shape.
-
In the Format Shape pane, click Layout & Properties
 , and then click Text Box.
 -
Select the option that you want in the Vertical alignment list.
Wrap text in a shape or text box
When you wrap text, the text automatically starts a new line as you reach the right border of the shape or text box,
-
Right-click the border of the shape or text box that contains the text you want to wrap.
-
On the shortcut menu, click Format Shape.
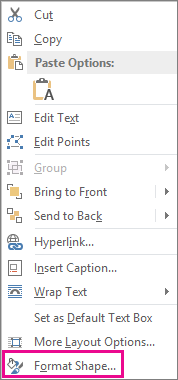
-
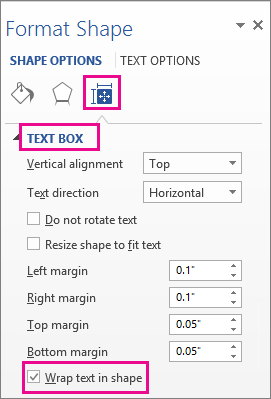
In the Format Shape pane, click Layout & Properties
 , click Text Box, and then select Wrap text in shape.
Change the margins between text and the edge of a shape or text box
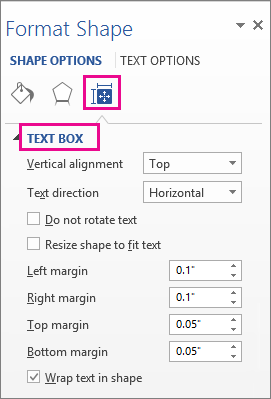
The internal margin is the changeable distance between text and the outer border of a shape or text box.
-
Right-click the border of the shape or text box.
-
On the shortcut menu, click Format Shape.

-
In the Format Shape pane, click Layout & Properties
 , and then click Text Box.
-
Do one or more of the following:
-
To specify the distance between the left border of a shape and the text, enter the new margin number in the Left margin box.
-
To specify the distance between the right border of a shape and the text, enter the new margin number in the Right margin box.
-
To specify the distance between the top border of a shape and the text, enter the new margin number in the Top margin box.
-
To specify the distance between the bottom border of a shape and the text, enter the new margin number in the Bottom margin box.
-
Resize a shape to fit text
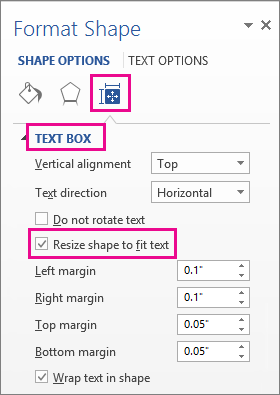
You can automatically increase the size of a shape or text box vertically so that the text fits inside it.
-
Right-click the border of the shape or text box.
-
On the shortcut menu, click Format Shape.

-
In the Format Shape pane, click Layout & Properties
 , click Text Box, and then select Resize shape to fit text.
Tip: You can reduce the size of the text to fit it in the shape or text box by clicking Shrink text on overflow.
Specify text direction in a shape or text box
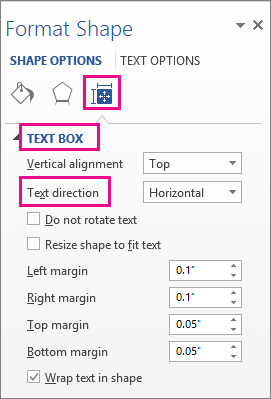
You can change direction of text in a shape or text box. For example, you can rotate text 90 or 270 degrees so that it appears sideways.
-
Right-click the border of the shape or text box.
-
On the shortcut menu, click Format Shape.

-
In the Format Shape pane, click Layout & Properties
 , and then click Text Box.
 -
Select the option that you want in the Text direction list.
What do you want to do?
Position text horizontally in a shape or text box

To change the horizontal alignment of a single paragraph or line:
-
Click in the paragraph or line of text that you want to modify.
-
On the Home tab (or the Message tab in Outlook), click the horizontal alignment option that you want.

To change the horizontal alignment of all text in a shape or text box:
-
Click the border of the shape or text box to select it.
-
On the Home tab, (or the Message tab in Outlook), click the horizontal alignment option that you want.

Position text vertically in a shape or text box

-
Right-click the border of the shape or text box.
-
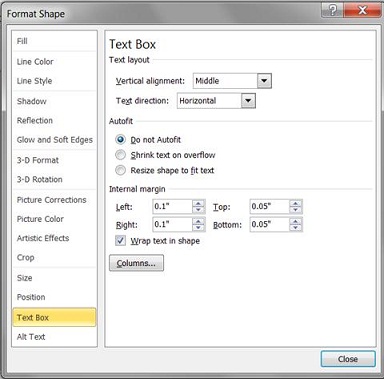
On the shortcut menu, click Format Shape, and then click Text Box in the left pane.

-
Under Text layout, select the option that you want in the Vertical alignment list.
Wrap text in a shape or text box
When you wrap text, the text automatically starts a new line as you reach the right border of the shape or text box,
-
Right-click the border of the shape or text box that contains the text that you want to wrap.
-
On the shortcut menu, click Format Shape, and then click Text Box in the left pane.

-
Under Internal margin, select the Wrap text in shape check box.
Change the margins between text and the edge of a shape or text box
The internal margin is the changeable distance between text and the outer border of a shape or text box.
-
Right-click the border of the shape or text box.
-
On the shortcut menu, click Format Shape, and then click Text Box in the left pane.

-
Under Internal Margin, do one or more of the following:
-
To specify the distance between the left border of a shape and the text, enter the new margin number in the Left box.
-
To specify the distance between the right border of a shape and the text, enter the new margin number in the Right box.
-
To specify the distance between the top border of a shape and the text, enter the new margin number in the Top box.
-
To specify the distance between the bottom border of a shape and the text, enter the new margin number in the Bottom box.
-
Resize a shape to fit text
You can automatically increase the size of a shape or text box vertically so that the text fits inside it.
-
Right-click the border of the shape or text box that you want to resize.
-
On the shortcut menu, click Format Shape, and then click Text box in the left pane.

-
Under Autofit, click Resize shape to fit text.
Tip: You can reduce the size of the text to fit it in the shape or text box by clicking Shrink text on overflow.
Specify text direction in a shape or text box
-
Right-click the border of the shape or text box that contains the text.
-
On the shortcut menu, click Format Shape, and then click Text Box in the left pane.

-
Under Text layout, select the option that you want in the Text direction list.
Notes:
-
For additional information about the options in the Text Box pane of the Format Shape dialog box, click Help
 at the top of the dialog box.
-
What do you want to do?
Position text horizontally in a shape or text box

To change the horizontal alignment of a single paragraph or line:
-
Click in the paragraph or line of text that you want to modify.
-
On the Home tab (or the Message tab in Outlook), click the horizontal alignment option that you want.

To change the horizontal alignment of all text in a shape or text box:
-
Click the border of the shape or text box to select it.
-
On the Home tab, (or the Message tab in Outlook), click the horizontal alignment option that you want.

Position text vertically in a shape or text box

-
Right-click the border of the shape or text box.
-
For a shape, on the shortcut menu, click Format AutoShape, and then click the Text Box tab.
For a text box, on the shortcut menu, click Format Text Box, and then click the Text Box tab.

-
Under Vertical alignment, clik the option tat you want.
Wrap text in a shape or text box
When you wrap text, the text automatically starts a new line as you reach the right border of the shape or text box,
-
Right-click the border of the shape or text box that contains the text that you want to wrap.
-
On the shortcut menu, do one of the following:
-
For a shape, click Format AutoShape, and then click the Text Box tab.
Note: The Text Box tab is unavailable in a shape unless the shape contains text.
-
For a text box, click Format Text Box, and then click the Text Box tab.
-
-
Under Options, select the Word wrap text in AutoShape check box.
Change the margins between text and the edge of a shape or text box
The internal margin is the changeable distance between text and the outer border of a shape or text box.
-
Right-click the border of the shape or text box that contains the margin that you want to adjust.
-
On the shortcut menu, do one of the following:
-
For a shape, click Format AutoShape, and then click the Text Box tab.
Note: The Text Box tab is unavailable in a shape unless the shape contains text.
-
For a text box, click Format Text Box, and then click the Text Box tab.
-
-
Under Internal margin, do one or more of the following:
-
To specify the distance between the left border of a shape and the text, enter the new margin number in the Left box.
-
To specify the distance between the right border of a shape and the text, enter the new margin number in the Right box.
-
To specify the distance between the top border of a shape and the text, enter the new margin number in the Top box.
-
To specify the distance between the bottom border of a shape and the text, enter the new margin number in the Bottom box.
-
Resize a shape to fit text
You can automatically increase the size of a shape or text box vertically so that the text fits inside it.
-
Right-click the border of the shape or text box that you want to resize.
-
On the shortcut menu, do one of the following:
-
For a shape, click Format AutoShape, and then click the Text Box tab.
Note: The Text Box tab is unavailable in a shape unless the shape contains text.
-
For a text box, click Format Text Box, and then click the Text Box tab.
-
-
Under Options, select the Resize AutoShape to fit text check box.
Tip: You can reduce the size of the text to fit it in the shape or text box by clicking Shrink text on overflow.
Specify text direction in a shape or text box
You can change the direction of text in a shape or a text box between horizontal (left to right) and vertical (from the top to the bottom or from the bottom to the top).
-
Double-click the shape or text box to select it and open the Format tab.
-
On the Format tab, in the Text group, click Text Direction
 . You can click Text Direction multiple times to cycle through the three options.
No comments:
Post a Comment