Insert a horizontal repeating table
When you want users to be able to add extra columns to a table, you can use a horizontal repeating table in your Microsoft Office InfoPath form template.
In this article
When to use a horizontal repeating table
Use a horizontal repeating table when you want data to be entered or displayed in a structured, tabular format, and when you want users to be able to add additional columns of data, if necessary. For example, you can use a horizontal repeating table to collect sales data for each quarter. If your form template is linked to a database, you can also use a horizontal repeating table to display or work with records from that database.
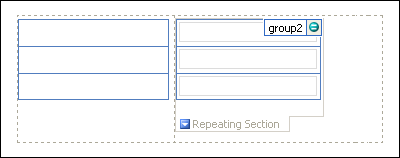
A horizontal repeating table consists of a repeating section inside a layout table. The repeating section has a Repeat horizontally setting enabled, which simulates a column in a table.
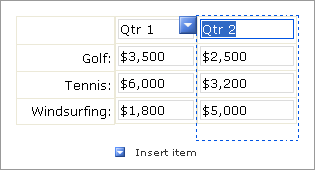
In the following example, users can add additional columns to the table if they want to record sales data for different quarters.

A horizontal repeating table consists of two parts:
-
Header column When you insert a horizontal repeating table on a new, blank form template, the header column appears by default. You typically use this column to enter labels that appear down the left side of the table. If you don't need these labels, right-click inside the column, point to Delete on the shortcut menu, and then click Columns.
-
Data column The data column is the column that can "repeat" on the form as many times as necessary. As the form template designer, you typically see just a single column in design mode when you insert a horizontal repeating table. The person filling out a form that is based on your form template, however, can add multiple columns on the form by pressing CTRL+ENTER, by clicking commands on a shortcut menu, or by clicking the Insert item instructional text on the form, which you can customize.
Related controls
InfoPath includes other controls that are similar to horizontal repeating tables but that serve different purposes. To decide which of these controls works best on your form template, refer to the following list:
Repeating table If you want users to be able to add multiple rows to a table instead of multiple columns, use a repeating table instead of a horizontal repeating table.
Repeating section To create a section that users can insert on a form multiple times (such as a record in a database), use a repeating section or another repeating control. When users insert a repeating section on a form, the individual sections are inserted vertically, or one after the other, down the length of the form. This behavior differs from that of the repeating section in a horizontal repeating table, where individual sections are inserted horizontally, or side by side, on the form.
The user experience
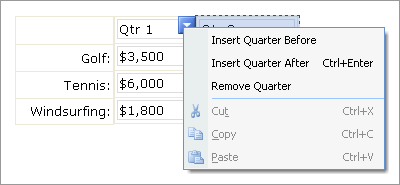
A shortcut menu button appears whenever users move the pointer over a column in a horizontal repeating table. Users click the button to see a shortcut menu of commands for inserting or removing a column.

Users can also insert a new column by clicking the Insert item text that appears below the horizontal repeating table on the form. You can customize or remove this text when you design your form template. Any columns that exceed the width of the layout table that contains the repeating section control will wrap to the next line.
Compatibility considerations
When you design a form template in InfoPath, you can choose to design a browser-compatible form template. When you design a browser-compatible form template, horizontal repeating table controls are unavailable in the Controls task pane, because they cannot be displayed in a Web browser.
Insert a horizontal repeating table
The procedure for inserting a horizontal repeating table differs slightly depending on whether you are designing a new, blank form template or basing the design of your form template on a database or other external data source.
The following illustration shows how a horizontal repeating table looks when you move your pointer over it in design mode.

Controls can be bound or unbound. When a control is bound, it is connected to a field or group in the data source so that data entered into the control is saved in the underlying form (.xml) file. When a control is unbound, it is not connected to a field or group, and data entered into the control is not saved. When you select or move your pointer over a control, text and a binding icon appear in the upper-right corner of the control. The text indicates the group or field to which the control is bound in the data source. The icon indicates whether the control is correctly bound to that group or field. When the binding is correct, a green icon appears. If there's something wrong with the binding, you'll see a blue or red icon instead.
The data source for the form template consists of fields and groups that appear in a hierarchical view in the Data Source task pane. Horizontal repeating tables are usually bound to repeating groups in the form template's data source, although they can also be bound to repeating fields.
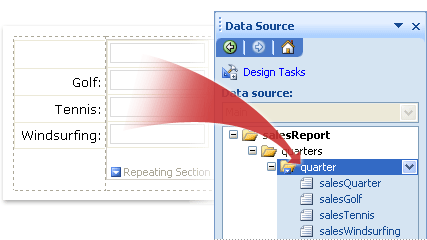
In the following example, the table on the form template is bound to the quarter repeating group in the Data Source task pane. The text box controls within the table — Golf, Tennis, and Windsurfing — are bound to fields that are part of the quarter repeating group.

Insert a horizontal repeating table on a new, blank form template
When you design a new, blank form template, the Automatically create data source check box in the Controls task pane is selected by default. This enables InfoPath to automatically create fields and groups in the data source as you add controls to the form template. These fields and groups are represented by folder and file icons in the Data Source task pane.
-
On the form template, place the cursor where you want to insert the control.
-
If the Controls task pane is not visible, click More Controls on the Insert menu, or press ALT+I, C.
-
Under Insert controls, click Horizontal Repeating Table.
-
In the Number of rows box, enter the number of rows that you want the table to have by default.
-
The horizontal repeating table is created with a text box in each row in the data column. To convert a text box to a different type of control, right-click the text box that you want to convert, point to Change To on the shortcut menu, and then click the control that you want.
Insert a horizontal repeating table on a form template that is based on an existing data source
If you base the design of your form template on an existing Extensible Markup Language (XML) file, database, or Web service, InfoPath derives the fields and groups in the Data Source task pane from that existing data source. In this scenario, you can insert a horizontal repeating table by dragging a repeating group from the Data Source task pane onto the form template, or by inserting a horizontal repeating table from the Controls task pane instead, as described in the following procedure:
-
On the form template, place the cursor where you want to insert the control.
-
If the Controls task pane is not visible, click More Controls on the Insert menu, or press ALT+I, C.
-
Under Insert controls, click Horizontal Repeating Table.
-
On the first page of the Repeating Table Binding Wizard, click the data source that you want to use in the Data source list, and then click the repeating group
 that you want to bind the table rows to.
Tip: To create a new repeating group, right-click the group to which you want to add the repeating group, click Add on the shortcut menu, and then in the Add Field or Group dialog box, specify the properties for the repeating group.
-
Click Next.
-
On the second page of the Repeating Table Binding Wizard, double-click the fields in the Data binding list that you want to add as columns to the table.
Tip: To create a new field, in the Data binding list, right-click the group to which the horizontal repeating table is bound, click Add on the shortcut menu, and then in the Add Field or Group dialog box, specify the properties for the field.
-
To reorder the columns, select a column in the Rows in table list, and then click Move Before or Move After.
Layout tips
Use the following tips to help you refine the appearance, size, and other aspects of a horizontal repeating table and the controls within it:
-
Recall that a horizontal repeating table consists of a repeating section inside a layout table. The right border of the layout table defines the point at which the columns in the table wrap to the next line when users insert additional columns. To control the column wrapping, you can drag the right border of the layout table cell that encloses the repeating section control to the right or left.
-
A horizontal repeating table can be useful for printing purposes. Columns in the control wrap to the next line on the form template, so that all of the information in the table is printed. However, if your form template is intended mainly for onscreen viewing, consider placing the horizontal repeating table inside a scrolling region on your form template. That way, if users enter a large amount of data in the horizontal repeating table, they can scroll to view it instead of seeing it all on the form.
-
To change the size of several text boxes at once, select the text boxes whose size you want to change, press ALT+ENTER, click the Size tab, and then make the necessary adjustments.
-
Resize the text boxes on your form template to accommodate the length of the text that you expect users to type in them.
-
To change the border or color of several text boxes at once, select the text boxes that you want to change, on the Format menu, click Borders and Shading, click the Borders tab, and then make the necessary adjustments.
-
To customize the text that appears in a text box, use the Font and Font Size boxes on the Formatting toolbar. To change the font and font size for all of the text boxes on your form template at once, select the text box that contains the formatting that you want, and then click Apply Font to All Text Box Controls on the Format menu.
-
To see what your text boxes will look like with actual text in them, click Sample Data on the View menu. This helps you get a sense of what a form based on your form template will look like when users fill it out.
No comments:
Post a Comment