Sunday, June 25, 2017

Quick start: Activate and use an add-in in Excel 2016 for Windows

Quick start: Activate and use an add-in in Excel 2016 for Windows

Important:  This feature isn't available in Office on a Windows RT PC. Want to see what version of Office you're using?

Add-ins provide additional features and commands for Microsoft Excel. To use them, you install and activate them. This article shows you how by with two examples, the Analysis TookPak and Solver, which help you perform what-if analyses.

How?

These steps apply to any add-in.

Icon image

Install and activate the Analysis ToolPak and Solver    

  1. Click the File tab, click Options, and then click the Add-Ins category.

  2. In the Manage box, click Excel Add-ins, and then click Go.

    The Add-Ins dialog box appears.

  3. In the Add-Ins available box, select the Analysis ToolPak and Solver Add-in check boxes, and then click OK.

  4. If Excel displays a message that states it can't run this add-in and prompts you to install it, click Yes to install the add-ins. Excel prompts you to install an add-in twice; once for the Analysis ToolPak and once for Solver.

The commands for using the Data Analysis and Solver add-ins appear on the Data tab, in the Analysis group.

Data Analysis and Solver

Icon image

Get started using the Analysis ToolPak    

  1. Click any cell in your worksheet.

  2. On the Data tab, in the Analysis group, click Data Analysis.

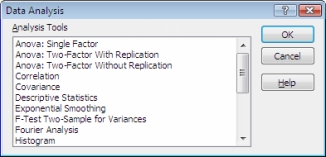
  3. In the Data Analysis dialog box, click the tool that you want to use, and then click OK.

    Data Analysis dialog box

  4. In the dialog box that appears for the tool you chose, enter the parameters and select any options as needed.

Icon image

Get started using Solver    

  1. On a worksheet, enter a formula and then make sure the cell that contains that formula remains selected.

  2. On the Data tab, in the Analysis group, click Solver.

  3. In the Solver Parameters dialog box, choose between Max, Min, and Value Of. If you select Value Of, enter a value in the box.

  4. In the By Changing Variable Cells box, enter a cell or a range for the cells for which you want to solve.

  5. Click Add to add a constraint for a cell, and then enter the condition for that cell.

  6. Click Add again to add more cell constraints (you can have multiple constraints for a single cell), click OK, and then click Solve.

    The Solver Results dialog box appears, with a success or failure message.

Next steps

Top of Page

Install and activate the Analysis ToolPak and Solver    

  1. Click the File tab, click Options, and then click the Add-Ins category.

  2. In the Manage box, click Excel Add-ins, and then click Go.

    The Add-Ins dialog box appears.

  3. Select the Analysis ToolPak and Solver Add-in check boxes, and then click OK.

  4. If Excel displays a message that states it can't run this add-in and prompts you to install it, click Yes to install the add-ins. Excel prompts you to install an add-in twice; once for the Analysis ToolPak and once for Solver.

The commands for using the Data Analysis and Solver add-ins appear on the Data tab, in the Analysis group.

Data Analysis and Solver

No comments:

Post a Comment