Connect two Data Views
In Microsoft Office SharePoint Designer 2007, you are probably used to building applications that make extensive use of data sources and Data Views. By connecting Data Views that have been inserted as either views or forms, you can create connections between them so that when you perform an action in one Data View, it changes the contents of another Data View. Connecting Data Views is a quick yet powerful way to add interactivity to your site or application.
Note: Data Views are a type of Web Part, so the concepts and procedures in this article apply equally well to any two Web Parts that can be connected.
This article shows you how to create two Data Views and how to connect them by using the Web Part Connections Wizard.
To learn more about Data Views, see Create a Data View.
In this article
Why connect Web Parts?
By connecting two Web Parts, you can pass data between them and synchronize their behavior. For example, you can connect a List View Web Part that displays a list of employees to an Image Web Part. After the two Web parts are linked, each time that you click an employee's name in the List View Web Part, the picture of the selected employee is displayed in the Image Web Part.
You can establish a simple Web Part connection by working in the browser. For example, you can connect one Web Part to another Web Part that resides the same Web Part Page. However, you can extend the functionality of the connection by using Office SharePoint Designer 2007. For example, you can use the Form Web Part to filter the data in another Web Part, or you can establish connections between Web Parts on two separate Web Part Pages in the same top-level Web site. Both of these actions require Office SharePoint Designer 2007 and cannot be done in the browser.
Create the first Data View by using Products.xml
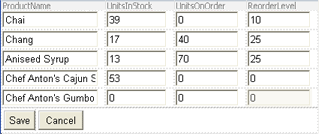
Northwind Traders, a gourmet food distribution company, tracks their inventory in an .xml file named Products.xml and displays the data from that file in a Data View. This Data View was inserted as a form so that the team can update the inventory through the browser by saving changes to Products.xml. When inventory is low, a team member calls the supplier of that product, places an order, and then updates the inventory by using the Data View. But each time that a team member places an order, they must also look up the supplier contact information.
You suggest inserting a second Data View that displays the suppliers' contact information, and then creating a connection between the two Web Parts. That way, when a team member is ready to place an order, they can view both the inventory data and the supplier's contact information for each product by clicking a single hyperlink.
The following procedures require using two .xml files as data sources, and creating a Data View from each of those data sources. To follow the example, create the first Data View from Products.xml by following the procedures in the article Insert a Data View as a form. Then return to this article to create the second Data View from Suppliers.xml.
Create an XML file as a sample data source
Northwind Traders stores the contact information for their supplies in an .xml file named Suppliers.xml.
Create Suppliers.xml
-
On the File menu, click Open Site.
-
In the Open Site dialog box, browse to and select your site, and then click Open.
-
If prompted, in the Connect to dialog box, type your user name and password, and then click OK.
-
On the File menu, click New.
-
In the New dialog box, double-click Text File.
A new text file opens in your site.
-
Copy the following lines of code by selecting them and then pressing CTRL+C.
              <?xml version="1.0" encoding="utf-8"?>
<SuppliersRoot>
 <Suppliers>
 <SupplierID>1</SupplierID>
 <CompanyName>Exotic Liquids</CompanyName>
 <ContactName>Charlotte Cooper</ContactName>
 <ContactTitle>Purchasing Manager</ContactTitle>
 <Address>49 Gilbert St.</Address>
 <City>London</City>
 <PostalCode>EC1 4SD</PostalCode>
 <Country>UK</Country>
 <Phone>(171) 555-2222</Phone>
 </Suppliers>
 <Suppliers>
 <SupplierID>2</SupplierID>
 <CompanyName>New Orleans Cajun Delights</CompanyName>
 <ContactName>Shelley Burke</ContactName>
 <ContactTitle>Order Administrator</ContactTitle>
 <Address>P.O. Box 78934</Address>
 <City>New Orleans</City>
 <Region>LA</Region>
 <PostalCode>70117</PostalCode>
 <Country>USA</Country>
 <Phone>(100) 555-4822</Phone>
 <HomePage>#CAJUN.HTM#</HomePage>
 </Suppliers>
</SuppliersRoot> -
In Office SharePoint Designer 2007, position the insertion point at the top of the page, and then press CTRL+V to paste the code that you just copied into the page.
-
On the File menu, click Save As.
-
In the Save As dialog box, in the File name box, type suppliers.xml.
-
In the Save as type list, click XML, and then click Save.
Create a Data View by using Suppliers.xml
-
Open the page that contains the first Data View, which you created in the article Insert a Data View as a form.
Although it is not necessary that both Data Views reside on the same page, in this case you want your team to be able to view at a glance the supplier's contact information when they click a product.
-
Select the first Data View, and then press the RIGHT ARROW key twice to position the cursor below the Data View.
-
On the Data View menu, click Insert Data View.
An empty Data View is now displayed below the first Data View, and the Data Source Library task pane opens.

-
In the Data Source Library task pane, locate your data source, click it, and then click Show Data.
For this example, under XML Files, click Suppliers.xml, and then click Show Data. If the XML Files heading is collapsed, click the plus sign (+) to expand it.
-
In the Data Source Details task pane, click the fields that you want to insert in the Data View.
Tip: To select multiple fields, hold down CTRL while you click them.
For this example, in the SuppliersRoot folder, under Suppliers, click CompanyName. Press and hold down CTRL while you click ContactName, Country, and Phone.
-
Click Insert Selected Fields as, and then click Single Item View to insert the selected data into the Data View.
You choose to display only one item in the Data View because you want display the contact info for only one supplier at a time.
The selected fields in the Data Source Details task pane now appear in a second Data View below the first Data View.
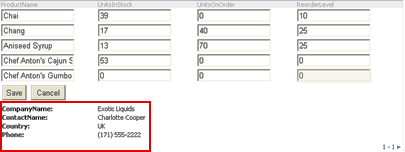 A Data View of Suppliers.xml (outlined in red) appears below the Data View of Products.xml.
Connect the Web Parts
Suppliers.xml and Products.xml are related by a common field called SupplierID. By using the Web Part Connection Wizard, you connect the Web Parts by linking the SupplierID field in Products.xml to the SupplierID field in Suppliers.xml.
Now that you have created the two Data Views, you will add text next to each product in the Data View of Products.xml that will be hyperlinked to the Data View of Suppliers.xml. When you click a hyperlink for a product in the first Data View, the contact information for the supplier of that product will appear in the second Data View.
The Data View of Products.xml is the source Web Part, and the Data View of Suppliers.xml is the target Web Part. Because you are working with a Data View inserted as a form, you need to create the text hyperlink outside of the form field. After you type the text, you select the text and then use the Web Part Connections Wizard to create the hyperlink in Products.xml that is linked to the Data View of Suppliers.xml.
-
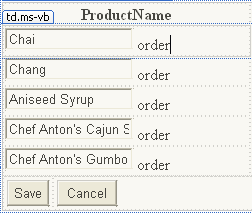
In the Data View created from Products.xml, position the cursor to the right of the text box that contains the product name, press the SPACEBAR, and then type order. Because a Data View uses XSLT formatting, the text "order" is added to every product field in the list.
-
In the Data View, select the text "order," right-click it, and then click Web Part Connections on the shortcut menu.
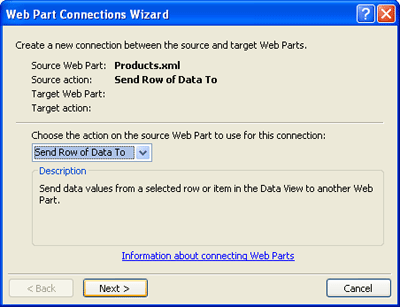
The Web Part Connections Wizard opens.
-
In the Choose the action on the source Web Part to use for this connection list, click Send Row of Data to, and then click Next.
-
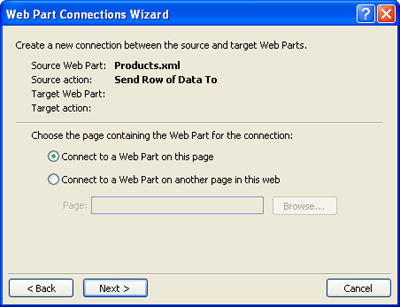
In the Choose the page containing the Web Part for the connection section, click Connect to a Web Part on this page, and then click Next.
-
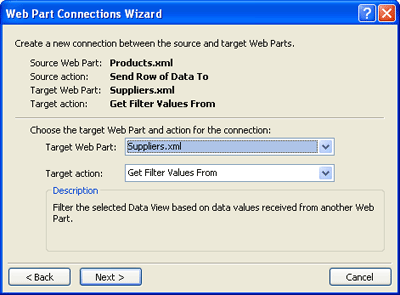
In the Target Web Part list, click suppliers.xml.
-
Because you want to filter the data in Suppliers.xml to match the SupplierID of the specific product in the first Data View, in the Target action list, click Get Filter Values From, and then click Next.
-
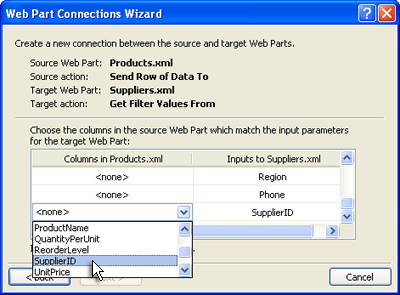
In the Inputs to Suppliers.xml column, scroll down the list until you see SupplierID. To the left of SupplierID in the list, in the Columns in Products.xml column, click the cell, then click the arrow, and then click SupplierID in the list. Click Next.
-
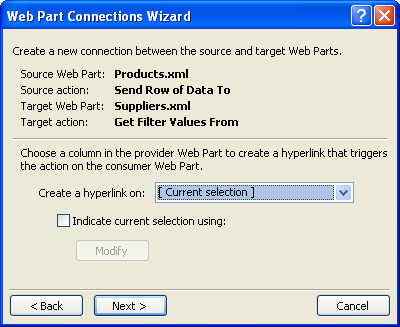
In the Create a hyperlink on list, click [ Current selection ], and then click Next.
-
Click Finish.
-
On the File menu, click Save. Or you can press CTRL+S.
The text "order" is now a hyperlink, and the Web Part connection is configured.
Test the Web Part connection
Now that the Web Part connection has been configured, you can test the connection by previewing the page in the browser.
-
To preview the file in the browser click Preview on the Common toolbar, or press F12.
Both Web Parts appear on the page in the browser. To display the supplier for a specific product, in the first Data View, click the order hyperlink next to the product that you want in the ProductName column. That supplier's contact information appears in the second Data View below.
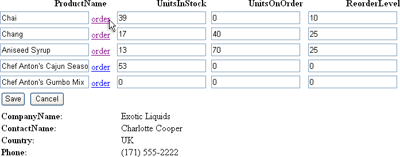
Note: Exotic Liquids is the supplier for Chai, Chang, and Aniseed Syrup. New Orleans Cajun Delights is the supplier for Chef Anton's Cajun Seasoning and Chef Anton's Gumbo Mix.
Remove a Web Part connection
You can also remove a Web Part connection so that the two Web Parts are no longer linked. When you connect Web Parts, each Web Part lists that connection, so you can remove the connection by working with the source or target Web Part. Removing the connection from the source Web Part also removes the connection from the target Web Part.
-
Right-click either Data View, and then click Web Part Connections on the shortcut menu.
-
In the Web Part Connections dialog box, click the connection that you want to remove, and then click Remove.
No comments:
Post a Comment