Note: To rotate text in Word, you must first place the text in a text box, and then rotate the text box.
-
Select a text box. For more info on inserting a text box, see Add, copy, or remove a text box in Word.
-
Do one of the following steps:
-
Select the text box, and then go to Shape Format or Drawing Tools Format > Rotate.
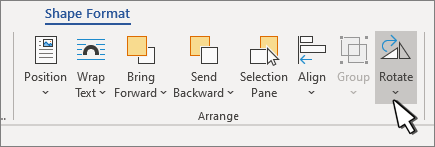
Use any of the rotate commands in the list.
-
Manually rotate the text box by selecting the text box rotation handle and dragging in the direction you want. To keep the rotation to 15 degree angles, press and hold Shift while you drag the rotation handle.
-
-
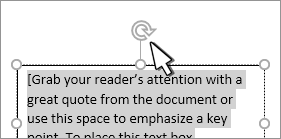
Select elsewhere on your document to view the rotated text box.
Note: A text box will appear horizontally when you select it to make editing the text easier.
Mirror text in a text box
This will reverse a line or paragraph of text in a text box.
-
Select the text box.
-
Select Shape Format or Drawing Tools Format.
-
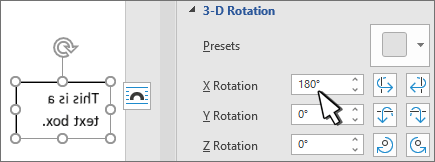
Select Text Effects
 > 3D Rotation > 3D Rotation Options.
 -
Under 3-D Rotation, set X Rotation to 180°.
Remove the border
-
Select the text box.
-
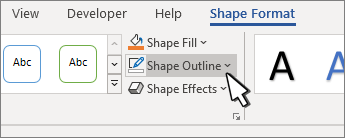
Go to Shape Format or Drawing Tools Format > Shape Outline, and then select No Outline.
The border around the text box disappears when you click or tap outside the text box.
Change the border
-
Select the text box border.
-
Go to Shape Format or Drawing Tools Format > Shape Outline to change the outline color, to change the line weight, or to change the line to dashes.
-
Select Shape Effects to add a shadow or a glow to the border.
Note: To rotate text in Word for Mac, you must first place the text in a text box, and then rotate the text box.
-
Select a text box to rotate. For more info on inserting a text box, see Add, copy, or remove a text box in Word
-
Select the rotation handle at the top of the text box, and then drag in the direction that you want.

-
To constrain the rotation to 15-degree angles, press and hold Shift while you drag the rotation handle.
-
When you rotate multiple shapes, they do not rotate as a group, but instead each shape rotates around its own center.
-
Alternatively you can select the object, hold down Option and press the left or right arrow keys to rotate.
-
Mirror text in a text box
-
Select the text box.
-
Select Shape Format.
-
Select Text Effects
> 3D Rotation > 3D Rotation Options. -
Under 3-D Rotation, set X Rotation to 180°.
Rotate to an exact angles
-
Select the text box you want to rotate.
-
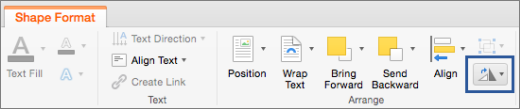
Go to Shape Format > Rotate.
-
If you don't see the Shape Format, make sure that you selected a text box.
-
The Rotate button could be hidden if your screen size is reduced. If you don't see the Rotate button, select Arrange to see hidden buttons in the Arrange group.

-
-
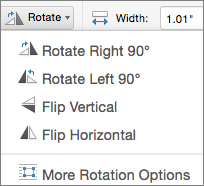
Select one of the following:
-
Select More Rotation Options.
Enter the amount that you want to rotate the object in the Rotation box. You can also use the arrows to rotate the object exactly where you want.
-
Select Rotate Right 90° to rotate the object 90 degrees to the right.
Select Rotate Left 90° to rotate the object 90 degrees to the left.
-
Group objects
When you group text boxes, you are combining them so that you can format, move, or copy them as a group.
-
Hold down Shift, select the text boxes that you want to group together, and then select Shape Format.
-
Go to Arrange > Group > Group.
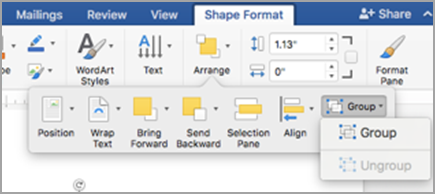
Tip: If Group appears dimmed or unavailable that's usually because you haven't already selected two, or more text boxes to be grouped together.
Rotate a text box
Note: To rotate text in Word for Mac, you must first place the text in a text box, and then rotate the text box.
-
Go to View > Print Layout.
-
Select the text box that you want to rotate or flip, and then select Format.
-
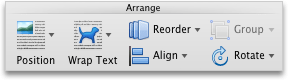
Under Arrange, select Rotate.
To rotate a text box to any degree, on the object, drag the rotation handle
 .
. -
Select any of the following:
-
Rotate Right 90
-
Rotate Left 90
-
Flip Vertical
-
Flip Horizontal
-
Group text boxes
When you group text boxes, you are combining them together so that you can format, move, or copy them as a group.
-
Go to View > Print Layout.
-
Hold down Shift, select the text box that you want to group together, and then select Format > Format Picture.
-
Under Arrange, select Group, and then select Group.
Tip: If Group appears dimmed or unavailable that's usually because you haven't already selected two or more text boxes to be grouped together.
Word for the web will display documents that contain rotated text boxes, but you can't insert or rotate text boxes. To insert or rotate a text box, open the document in Word for the desktop and make changes there.
No comments:
Post a Comment