View and Manage Queries in a Workbook (Power Query)
Note: Power Query is known as Get & Transform in Excel 2016. Information provided here applies to both. To learn more, see Get & Transform in Excel 2016.
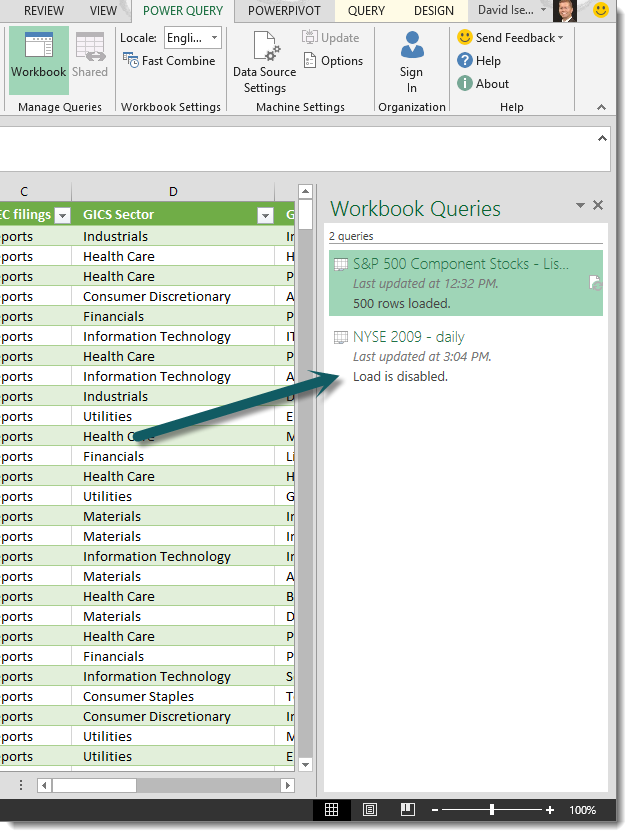
You can manage your Power Query queries in the Excel Workbook Queries pane.

This is especially helpful if you have too many queries in your Excel workbook, and you do not want to navigate through the sheets in the workbook to find the required query. The Workbook Queries pane also enables you to perform other actions on the workbook queries such as edit, duplicate, reference, merge, append, share, and delete a query.
To view and manage your queries in a workbook:
-
Open the Excel workbook that contains your queries.
-
Sign in to Power BI if you want to share any of your queries in the workbook. Otherwise, skip this step, and go to the next step. To sign in to Power BI, on the POWER QUERY tab, click Sign In. In the Sign In dialog box, click Sign In, and then enter your organizational account information that was used for signing up for Power BI.
-
In the Manage Queries section of the POWER QUERY tab, select Workbook.
-
The Workbook Queries pane displays all the queries in the workbook. The queries are sorted by the date and time when they were shared or last modified with the most recent one at the top of the list.
-
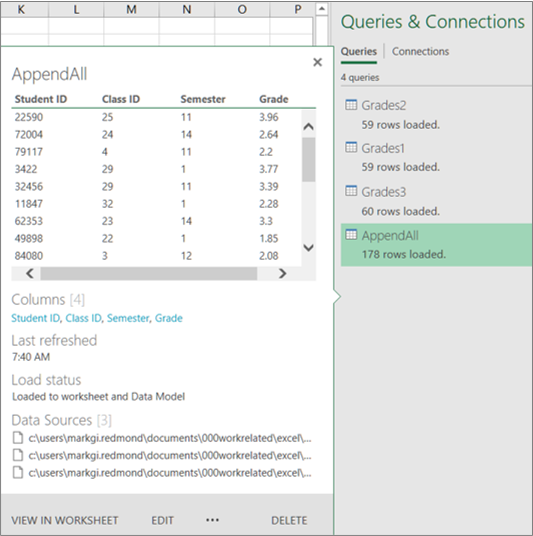
Click a query name to see the data referenced by the respective query in the workbook.
-
You can perform various action on a query in the Workbook Queries pane in either of the following two ways:
-
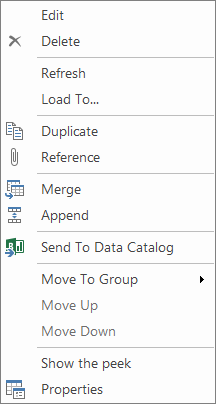
In the Workbook Queries pane, right-click a query, and then select the appropriate option from the context menu. With the context menu, you can

-
Point your mouse on a query name in the Workbook Queries pane, and in the preview fly out screen, select the appropriate option. Please note that the Duplicate, Reference, Merge, Append, and Properties options are available in a pop-up menu that appears when you click the ellipsis (…) next to the SEND TO DATA CATALOG option in the preview fly out screen.

-
-
You can perform the following actions on your workbook queries:
-
Edit: Edit the query in the Query Editor.
-
Duplicate: Creates a point-in-time copy of the query. By default, the name of the new query is the original query name appended with an integer value in the parenthesis, which increments automatically each time you duplicate the original query. For example, if you duplicate Query1, a new query with the same query steps is created with the name Query1 (2). You can change the name of the new query to identify it easily. Subsequent changes to the original query won't affect the new query.
-
Reference: Creates a new query that references the output of the original query. The new query follows a similar naming convention as query duplication. You can change the name of the new query to identify it easily. Subsequent changes to the original query will affect the new query if the output is changed.
-
Delete: Delete a query.
-
Merge and Append: Merge and append columns in a query with matching columns in other queries in the workbook. For more information about merging and appending queries in Power Query, see Combine multiple queries.
-
Send to Data Catalog: Share a query. For more information, see Share Queries. This option is available only if you are signed in to Power BI.
-
Move To Group: Create a new group or move a query to a group.
-
Properties: Edit name and description.
-
Thanks for providing this information
ReplyDeleteIgrowsoft solutions