Move a SmartArt graphic
To change how a SmartArt graphic fits in an Office document, you can either move it manually, or adjust its size by using options in the Size group.
This article discusses moving SmartArt graphics. For information about moving and aligning pictures, text boxes, or WordArt, see Align or arrange a picture, shape, text box, SmartArt graphic, or WordArt and Move a text box, WordArt, or shape. If you want to rotate or flip a shape in a SmartArt graphic, see Rotate or flip a SmartArt graphic shape. For help with changing the direction of a SmartArt graphic, see Change the direction of a SmartArt graphic.
Move a SmartArt graphic manually
-
Click the SmartArt graphic that you want to move to select it.
-
Rest the pointer on the border of the SmartArt graphic (but not on the dots).

-
When the pointer changes to a
 , drag the border to move the SmartArt graphic.
Tip: You can also use the arrow keys to move the SmartArt graphic. Click the SmartArt graphic to select it, and then press RIGHT ARROW, LEFT ARROW, UP ARROW, and DOWN ARROW to move the SmartArt graphic to the position where you want it.
Note: To move a SmartArt graphic to another slide or page in your document, click the SmartArt graphic that you want to move, and then press CTRL+X to cut it. Move to another page or slide, click where you want to move the SmartArt graphic to, and then press CTRL+V to paste the SmartArt graphic into its new location.
Specify an exact size for a SmartArt graphic
-
Click the SmartArt graphic to select it.
-
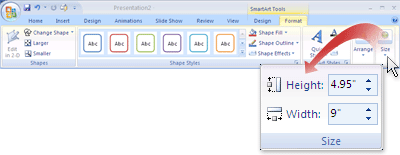
Under SmartArt Tools, on the Format tab, click Size, and then do one or both of the following:
-
Enter a number in the Height box.
-
Enter a number in the Width box.

If you don't see the SmartArt Tools or Format tabs, make sure that you've selected a SmartArt graphic.
-
No comments:
Post a Comment