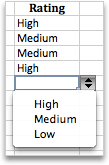
Create a drop-down list to enter data
Data entry is quicker and more accurate when you restrict values in a cell to choices from a drop-down list.

Start by making a list of valid entries on a sheet, and sort or rearrange the entries so that they appear in the order you want. Then you can use the entries as the source for your drop-down list of data. If the list is not large, you can easily refer to it and type the entries directly into the data validation tool.
-
Create a list of valid entries for the drop-down list, typed on a sheet in a single column or row without blank cells.
-
Select the cells that you want to restrict data entry in.
-
On the Data tab, under Tools, click Validate.

Note: If the validation command is unavailable, the sheet might be protected or the workbook may be shared. You cannot change data validation settings if your workbook is shared or your sheet is protected. For more information about workbook protection, see Protect a workbook.
-
Click the Settings tab, and then in the Allow pop-up menu, click List.
-
Click in the Source box, and then on your sheet, select your list of valid entries.
The dialog box minimizes to make the sheet easier to see.
-
Press RETURN or click the Expand
 button to restore the dialog box, and then click OK.
Tips:
-
You can also type values directly into the Source box, separated by a comma.
-
To modify the list of valid entries, simply change the values in the source list or edit the range in the Source box.
-
You can specify your own error message to respond to invalid data inputs. On the Data tab, click Validate, and then click the Error Alert tab.
-
No comments:
Post a Comment