Cancel Office 365 for business
Note For Office 365 Home, Personal, or University, see Cancel Office 365 for home.
You can cancel your Office 365 for business trial or paid subscription online in the Office 365 admin center at any time, if you have fewer than 25 licenses assigned to users. Any prorated credit will be returned to you within the next billing cycle.
In some cases, you might have to call support to cancel your subscription:
In some cases, you might have to call support to cancel your subscription:
In some cases, you might have to contact the 21Vianet support team:
-
If you purchased your subscription with an Office 365 product key.
Note: You can cancel your subscription, but you won't be eligible for a refund.
-
If you have more than 25 licenses assigned to users.
-
For any other subscriptions (like Microsoft Dynamics 365 or Microsoft Intune, or if the Cancel subscription option is unavailable.
Warning: If you cancel Office 365 before the end of your term, you may be subject to early termination fees.
Before you begin: Change custom domain settings
If you use a custom domain with your Office 365 subscription, there are a few extra steps that you need to do before you can cancel your subscription. If you don't have a custom domain, you can skip ahead to "Step 1. Save your data."
Update your domain's MX and other DNS records (if you're using a custom domain)
If you set up a custom domain with Office 365, you added DNS records so the domain would work with Office 365 services. Before you remove your domain, be sure to update the DNS records, such as your domain's MX record, at your DNS host.
For example, change the MX record at your DNS host so email sent to your domain stops coming to your Office 365 address and goes to your new email provider instead. (An MX record determines where email for your domain is sent.)
-
If your nameserver (NS) records are pointing to Office 365 nameservers, changing your MX record won't take effect until you change your NS records to point to your new DNS host (see Step 2).
-
Before you update the MX record, let your users know the date you'll be switching their email, and the new email provider you'll be using. Also, they'll need to take extra steps if they want to move their existing Office 365 email to the new provider.
-
On the day you change the MX record, follow the rest of the steps in this article.
Change your domain's NS records (if needed)
If you switched your nameserver (NS) records to Office 365 when you set up your domain, you must set up or update your MX record and other DNS records at the DNS host you're going to use, and then change your NS record to that DNS host.
If you didn't switch NS records when you set up your domain, when you change the MX record, your mail will start going to the new address right away.
For more information, see How Office 365 manages DNS records. To change your NS records, see "Custom DNS records for the domain" in Remove a domain from Office 365.
Step 1: Save your data
Your users lose access to their Office 365 data when the cancellation becomes effective, so have your users save their OneDrive for Business or SharePoint Online files to another location before you cancel the subscription. Any customer data that you leave behind may be deleted after 90 days, and will be deleted no later than 180 days after cancellation.
-
To move email, contacts, tasks, and calendar information to another account, see Export or backup email, contacts, and calendar to an Outlook .pst file.
-
To save a document library or list content (such as contacts) from a SharePoint Online environment (OneDrive for Business or team sites) to file shares or to a local computer, see Manual migration of SharePoint Online content.
Step 2: Cancel your subscription
If you added your own domain name to use with Office 365, you must remove the domain before you cancel your subscription. For more information, see Remove a domain from Office 365.
-
In the Office 365 admin center, go to the Subscriptions page, or choose Billing > Subscriptions.
In the Office 365 admin center, go to the Subscriptions page, or choose Billing > Subscriptions.
In the Office 365 admin center, go to the Subscriptions page, or choose Billing > Subscriptions.
-
On the Subscriptions page, choose a subscription.
-
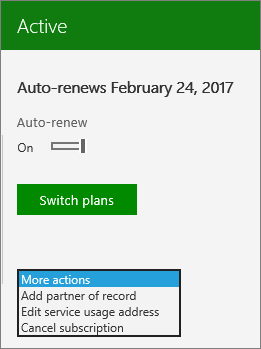
From the More actions menu, choose Cancel subscription.

-
Review the important dates, provide feedback about why you are cancelling, then choose Cancel subscription.
Your subscription will now appear in a Disabled state, and will have reduced functionality until it is deleted. For more information about what you can expect when a paid Office 365 for business subscription is cancelled, see What happens to my data and access when my Office 365 for business subscription ends?
Step 3: Uninstall Office (optional)
If you cancelled your subscription, and didn't move users to a different subscription that includes Office, Office 365 will run in reduced functionality mode. When this happens, users can only read and print documents, and Office 365 applications will show Unlicensed Product notifications. To avoid any confusion, have your users uninstall Office from their machines.
Get support


No comments:
Post a Comment