Assign a color category to a calendar appointment
You can track all items related to a particular project or task by using color categories to easily identify and organize the items. Besides calendar items, you can assign color categories to contacts, messages, tasks, notes, and journal items.
Color categories connect your calendar items for easy identification. The color categories connect you to other related items too, such as messages or contacts.

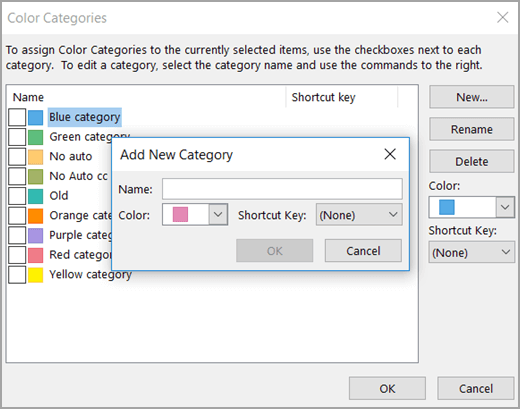
A category must be listed in the color category list before you can assign it. If it is not listed, you can simultaneously create a new color category and assign it to an item for the first time. You can also choose from several default color categories and rename them to be more meaningful to you.
To assign a color category, do the following:
-
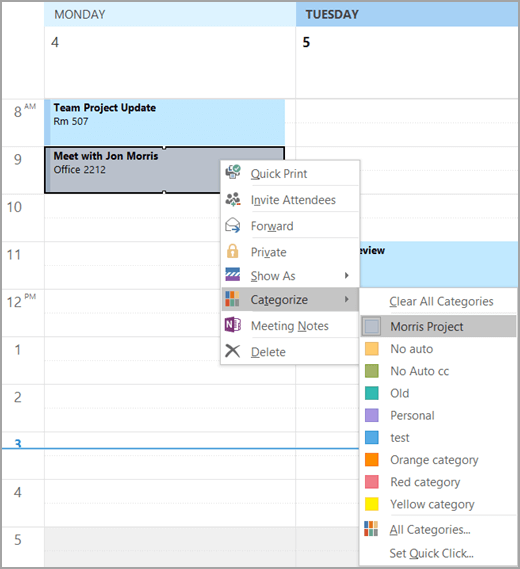
For an appointment or meeting in your Calendar Right-click the appointment, point to Categorize
 , and then click a color category.
 -
For an open appointment On the Appointment tab, in the Tags group, click Categorize
 , and then click a color category.
 -
For an open meeting request On the Meeting tab, in the Tags group, click Categorize
 , and then click a color category.
 -
For an open recurring meeting request On the Recurring Meeting tab, in the Tags group, click Categorize
 , and then click a color category.
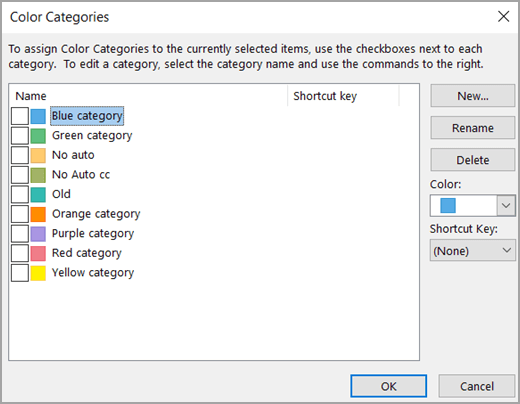
To see more categories or to create a new category, click All Categories to open the Color Categories dialog box.
To assign a color category from the Color Categories dialog box, select the check box next to the color category. The Color Categories dialog box is also a quick way to assign multiple categories to an item.

The first time that you assign a default color category to an item, you will be prompted to rename the category. At this time, you can also change the color of the category and choose a keyboard shortcut.

Notes:
-
You can change the color associated with a category at any time.
-
Another way to open the Categorize menu and Color Categories dialog box is by clicking Categorize
 on the toolbar.
 -
Only the 15 most recently used color categories appear on the Categorize menu. To see the rest, click All Categories on the Categorize menu.
To assign a color category, do the following:
-
For an appointment or meeting in your Calendar Right-click the appointment, point to Categorize
 , and then click a color category.
 -
For an open appointment On the Appointment tab, in the Options group, click Categorize
 , and then click a color category.
 -
For an open meeting request On the Meeting tab, in the Options group, click Categorize
 , and then click a color category.
 -
For an open recurring meeting request On the Recurring Meeting tab, in the Options group, click Categorize
 , and then click a color category.
To see more categories or to create a new category, click All Categories to open the Color Categories dialog box. To assign a color category from the Color Categories dialog box, select the check box next to the color category. The Color Categories dialog box is also a quick way to assign multiple categories to an item.
The first time that you assign a default color category to an item, you will be prompted to rename the category. At this time, you can also change the color of the category and choose a keyboard shortcut.
Notes:
-
You can change the color associated with a category at any time.
-
Another way to open the Categorize menu and Color Categories dialog box is by clicking Categorize
 on the toolbar.
 -
Only the 15 most recently used color categories appear on the Categorize menu. To see the rest, click All Categories on the Categorize menu.
No comments:
Post a Comment