You can have Word align objects—such as pictures, shapes, SmartArt, and charts—in relation to the edges of the page, the margins, or other objects.
Align a picture, shape, text box, SmartArt graphic, or WordArt
-
Select the objects to align.
To select multiple objects, select the first object, and then press and hold CTRL while you select the other objects.
-
Do one of the following:
-
To align a picture, select Picture Format or Picture Tools > Format.
-
To align a shape, text box, or WordArt, select Shape Format or Drawing Tools > Format.
-
-
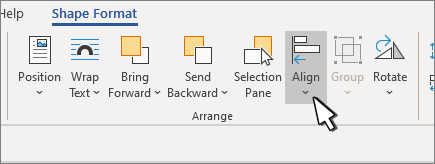
In the Arrange group, select Align.
-
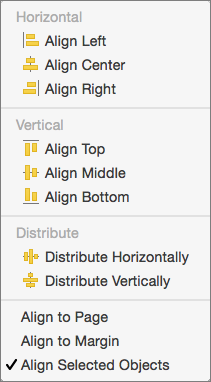
Choose of the following:
Important: If Align options are unavailable, you may only have a single item selected.
-
Align Left To align the edges of the objects to the left.
-
Align Center To align the objects vertically through their centers.
-
Align Right To align the edges of the objects to the right.
-
Align Top To align the top edges of the objects.
-
Align Middle To align the objects horizontally through their middles.
-
Align Bottom To align the bottom edges of the objects.
Notes:
-
When you align objects relative to each other by their edges, one of the objects remains stationary.
-
Align Middle aligns objects horizontally through the middles of the objects and Align Center aligns objects vertically through the centers of the objects. When you align objects relative to each other by their middles or centers, the objects are aligned along a horizontal or vertical line that represents the average of their original positions. No object necessarily remains stationary, and all of the objects might move.
-
Depending on the alignment option, objects might cover another object. If this happens, undo the alignment and move the objects to new positions before aligning again.
-
-
Arrange objects equal distances from each other
-
Select at least three objects to arrange. To select multiple objects, select the first object, and then press and hold CTRL while you select the other objects.
To select objects that are hidden, stacked, or behind text, go to Home > Find and Select > Select Objects, and then draw a box over the objects.
-
Do one of the following:
-
To arrange pictures equally, select Picture Format or Picture Tools > Format.
-
To arrange a group with shapes, text boxes, or WordArt equally, select Shape Format or Drawing Tools > Format.
-
-
In the Arrange group, select Align.
-
Choose one of the following:
-
Distribute Horizontally To center the objects horizontally.
-
Distribute Vertically To center the objects vertically.
-
Word can align objects to the left, center, right, top, middle, and bottom. You select whether you want those positions to be relative to the page, the margins, or other objects.
Note: If text wrapping for an object is set to In Line with Text, Word can only align it in relation to the page or the margins. To change it, Control + Click the object, point to Wrap Text, and then pick something other than In Line with Text. To learn more about text wrapping, see Control text wrapping around objects.
Tip: If you have several objects to position on a page, you might want to use a grid to help you.
Align an object with other objects, the margins, or the page
-
Hold down Shift and use the mouse or touchpad to select the objects that you want to align.
-
Select Shape Format or Picture Format.

-
Select Align. If you don't see Align on the Shape Format tab, select Arrange, and then choose Align.
-
Choose one of the following:
-
Align to Page
-
Align to Margin
-
Align Selected Objects
-
-
To choose whether the selected objects are aligned to the margins, the page, or relative to each other, select Align, and choose one of the following:
-
Align to Page
-
Align to Margin
-
Align Selected Objects
-
-
Select Align again, and then choose the type of alignment from one of the three categories: Horizontal, Vertical, or Distribute.
Tip: After you have objects aligned as you want, you can move them while preserving their relative positions by defining them as a group. For help with using groups, see Group or ungroup shapes, pictures, or other objects.
You can align objects in relation to an anchor, such as the margin, page, and paragraph. You can also enter a precise numeric position for the object in relation to the anchor.
Align an object with other objects, the margins, or the page
-
Select the object.
-
Select Format or Format Picture.
-
To choose whether the selected objects are aligned to the margins, the page, or relative to each other, select Align, and then select one of the following options:
-
Align to Page
-
Align to Margin
-
Align Selected Objects
-
-
Select Align again, and then choose the type of alignment that you want.
Align an object in relation to text
-
Select the object to select it.
-
Select Format or Format Picture.
-
Under Arrange, select Wrap Text, and then choose a style other than In Line with Text (for example, Tight
 ).
).
-
In the document, drag the object where you want it.
-
To fine-tune the picture's position, under Arrange, select Position, and then choose More Layout Options.
-
On the Position tab, select the options that you want for your horizontal and vertical anchors.
Note: To make sure that the selected object moves up or down with the paragraph that it's anchored to, select Move object with text.
No comments:
Post a Comment