Some people with visual impairments use a screen reader to read the information on the slide. When you create slides, putting the objects in a logical reading order is crucial for screen-reader users to understand the slide.
Check the reading order of slides
-
With your presentation open, select Review > Check Accessibility.
-
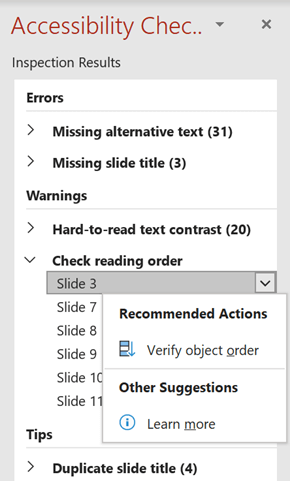
Select the Check reading order category in the Warnings section to open the list. When the reading order of the objects on a slide doesn't match one of the common ways objects are spatially ordered, Accessibility Checker lists the slide here.
-
Point at a slide number in the list, then select the adjoining drop-down arrow. Select the Verify object order command.

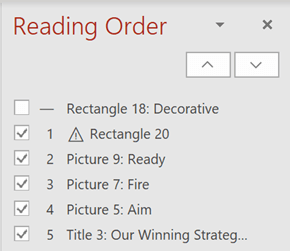
This opens the Reading Order pane:

Change the order of objects
Objects are listed in the order that the screen reader will read them in. The number next to each object indicates the position in the sequence. Objects without a number will be skipped because they are marked decorative.
If the order of the objects isn't logical, people using screen readers will have a difficult time understanding the slide.
To change the order that the objects are read in:
-
Select one or more items in the list. (Use Ctrl+Click to multi-select).
-
Drag the selection upward or downward, or click the up arrow (Move Up) or down arrow (Move Down).
Note: Changing the order of objects can affect how the slide looks when there are overlapping objects. If the slide does not look the way you want after changing the order, press Ctrl+Z to undo the change. You may still be able to improve how the slide is read by grouping objects in logical units and removing objects from the reading order by marking them decorative.
Group objects into logical units
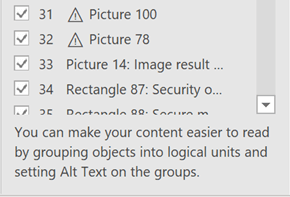
If you have complex diagrams or illustrations made of many objects, group the objects into logical units. That way, the screen-reader user can read the grouped units rather than all of the individual objects in them. And you'll only need to order the units and not all of the objects in them.
In cases where grouping may be beneficial, a tip appears at the bottom of the Reading Order pane on slides:

To group objects:
-
In the pane, use Ctrl+Click to select the items you want to group.
-
On the … Format tab at the right end of the ribbon, select Group > Group (or Arrange > Group > Group).
After you group the objects, only the group appears in the Reading Order pane, rather than all the objects in it. Click the item and then enter a description for the group.
Caution: If the objects have animation effects, the animations won't be preserved after you group them.
Add alt text to objects
Alternative text (alt text) is descriptive text which conveys the meaning and context of a visual item on the slide. Screen readers will read the alt text aloud, allowing people to better understand what is on the screen.
You don't need to add alt text to text boxes and shapes that have text in them, but all other objects need alt text. In the Reading Order Pane, a warning sign appears next to any item that needs alt text.

To add alt text for the object:
-
In the Reading Order Pane, click the item to select it.
-
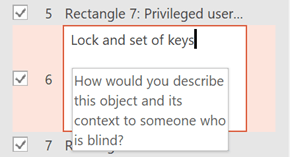
Click it again to open a text edit box and type a description for the object. Then press Enter.

The warning sign disappears after you've added the alt text.

Review automatically generated alt text
Pictures inserted in Microsoft 365 may have alt text that was automatically generated. A warning sign appears next to these items to remind you to review and edit the alt text.
-
Click the item in the Reading Order pane to select it.
-
Click it again to open a text edit box, then review and edit the description. Remove any comments added there such as Description automatically generated. Then press Enter.
The warning sign should disappear after you remove the comments.
Remove objects from the reading order
Decorative objects add visual interest but aren't informative (for example, stylistic borders). Screen readers skip over the decorative objects when reading in Slide Show mode.
To mark an object decorative and remove it from the reading order, clear the check box next to the item.

You don't need to change the position of the item in the list. The number next to the item goes away, indicating that it's no longer part of the reading order.

Keyboard shortcuts for the Reading Order pane
You can use these keyboard shortcuts in the Reading Order pane:
| To do this | Press |
|---|---|
| Move the keyboard focus through the major regions until it is in the Reading Order Pane | F6 |
| Navigate by keyboard through the buttons in the pane and then into the list | Tab |
| Move the focus among the items in the list | Up arrow, |
| Select an item in the list | Enter or spacebar |
| Edit the Alt Text of the item in the list that has focus | F2 |
| Add/remove the item from the selection (that is, multi-select) | Shift+Enter or Shift+spacebar |
| Select the current item and toggle whether it is in the reading order | Ctrl+Shift+R |
| Select the current item and move it up | Ctrl+Up arrow |
| Select the current item and move it down | Ctrl+Down arrow |
| Select the current item and move it to the beginning | Ctrl+Shift+Up arrow |
| Select the current item and move it to the end | Ctrl+Shift+Down arrow |
See Also
Make your PowerPoint presentations accessible to people with disabilities
Everything you need to know to write effective alt text
No comments:
Post a Comment