If you frequently create a certain type of document, such as a monthly report, a sales forecast, or a presentation with a company logo, save it as a template so you can use that as your starting point instead of recreating the file from scratch each time you need it. Start with a document that you already created, a document you downloaded, or a new Microsoft template you customized.
Save a template
-
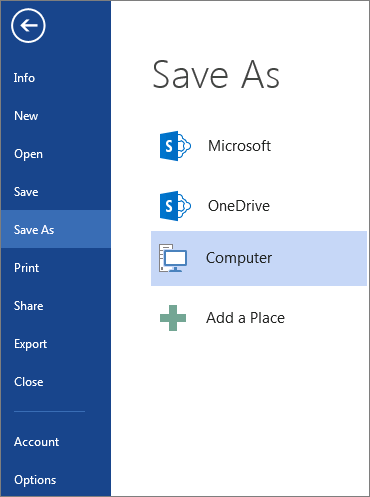
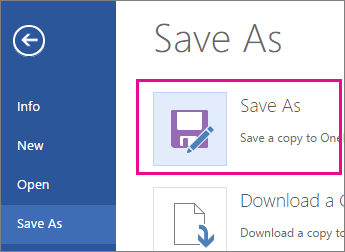
To save a file as a template, click File > Save As.
-
Double-click Computer or, in Office 2016 programs, double-click This PC.
-
Type a name for your template in the File name box.
-
For a basic template, click the template item in the Save as type list. In Word for example, click Word Template.
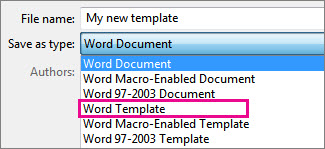
If your document contains macros, click Word Macro-Enabled Template.
Office automatically goes to the Custom Office Templates folder.
-
Click Save.
Tip: To change where your application automatically saves your templates, click File > Options > Save and type the folder and path you want to use in the Default personal templates location box. Any new templates you save will be stored in that folder, and when you click File > New > Personal, you'll see the templates in that folder.
Edit your template
To update your template, open the file, make the changes you want, and then save the template.
-
Click File > Open.
-
Double-click Computer or This PC.
-
Browse to the Custom Office Templates folder that's under My Documents.
-
Click your template, and click Open.
-
Make the changes you want, then save and close the template.
Use your template to make a new document
To start a new file based on your template, click File > New > Custom, and click your template.
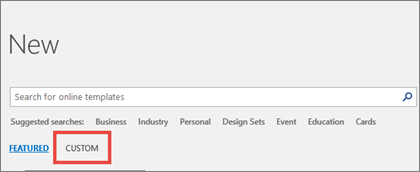
Note: If you're using Office 2013, this button may say Personal instead of Custom.
Use your templates from earlier versions of Office
If you made templates in an earlier version of Office, you can still use them in Office 2013 and 2016. The first step is to move them into the Custom Office Templates folder so your application can find them. To move your templates quickly, use the Fix it tool.
Word
-
Open the Word document that you want to save as a template.
-
On the File menu, click Save as Template.
-
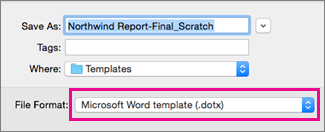
In the Save As box, type the name that you want to use for the new template.
-
(Optional) In the Where box, choose a location where the template will be saved.
-
Next to File Format, click Microsoft Word template (.dotx), or, if your document contains macros, click Microsoft Word Macro-Enabled template (.dotm).
-
Click Save.
Unless you select a different location, the template is saved in /Users/username/Library/Group Containers/UBF8T346G9.Office/User Content/Templates.
To change where Word automatically saves your templates, on the Word menu, click Preferences, and then under Personal Settings, click File Locations. Under File Locations, select User templates from the list, and then click Modify. Type the new folder and path you want to use, and Word will save any new templates in that folder.
You can customize an existing template to make it even more useful. Add static information to the existing template, and then save the file again (as a template).
-
On the File menu, click New from Template.
-
Click a template that is similar to the one you want to create, and then click Create.
Note: If you can't find a template, you can search for it based on keywords in the Search All Templates box.
-
Add, delete, or change any text, graphics, or formatting, and make any other changes that you want to appear in all new documents that you base on the template.
-
On the File menu, click Save as Template.
-
In the Save As box, type the name that you want to use for the new template.
-
(Optional) In the Where box, choose a location where the template will be saved.
-
Next to File Format, click Microsoft Word template (.dotx), or, if your template contains macros, click Microsoft Word Macro-Enabled template.
-
Click Save.
Unless you select a different location, the template is saved in /Users/username/Library/Group Containers/UBF8T346G9.Office/User Content/Templates.
To change where Word automatically saves your templates, on the Word menu, click Preferences, and then under Personal Settings, click File Locations. Under File Locations, select User templates from the list, and then click Modify. Type the new folder and path you want to use, and Word will save any new templates in that folder.
To start a new document based on your template, on the File menu, click New from Template, and then select the template you want to use.
-
In the Finder, open /Users/username/Library/Group Containers/UBF8T346G9.Office/User Content/Templates.
-
Drag the templates that you want to delete to the Trash.
PowerPoint
-
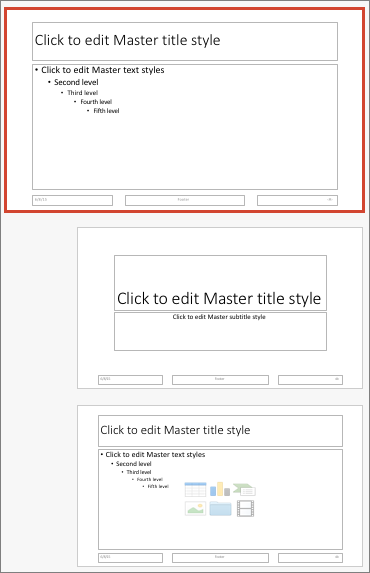
Open a blank presentation, and then on the View tab, click Slide Master.
The slide master is the largest slide image at the top of the slide thumbnail list. Associated layouts are positioned beneath it.
-
To make changes to the slide master or layouts, on the Slide Master tab, do any of these:

-
To add a colorful theme with special fonts, and effects, click Themes, and pick a theme.
-
To change the background, click Background Styles, and pick a background.
-
To add a placeholder for text, picture, chart, and other objects, in the thumbnail pane, click the slide layout that you want to hold the placeholder. From Insert Placeholder, pick the type of placeholder you want to add, and drag to draw the placeholder size.
-
-
Open the presentation that you want to save as a template.
-
On the File tab, click Save as Template.
-
In the Save As box, type the name that you want to use for the new template.
-
(Optional) In the Where box, choose a location where the template will be saved.
-
Next to File Format, click PowerPoint Template (.potx), or, if your presentation contains macros, click PowerPoint Macro-Enabled Template (.potm).
-
Click Save.
Unless you select a different location, the template is saved in /Users/username/Library/Group Containers/UBF8T346G9.Office/User Content/Templates.
You can customize an existing template to make it even more useful. Add static information to the existing template, and then save the file again (as a template).
-
On the File menu, click New from Template.
-
Click a template that is similar to the one you want to create, and then click Create.
Note: If you can't find a template, you can search for it based on keywords in the Search All Templates box.
-
Add, delete, or change any text, graphics, or formatting, and make any other changes that you want to appear in all new presentations that you base on the template.
-
On the File menu, click Save as Template.
-
In the Save As box, type the name that you want to use for the new template.
-
(Optional) In the Where box, choose a location where the template will be saved.
-
Next to File Format, click PowerPoint Template (.potx), or, if your template contains macros, click PowerPoint Macro-Enabled Template (.potm).
-
Click Save.
Unless you select a different location, the template is saved in /Users/username/Library/Group Containers/UBF8T346G9.Office/User Content/Templates.
To start a new presentation based on a template, on the File menu, click New from Template, and then select the template you want to use.
-
In the Finder, open /Users/username/Library/Group Containers/UBF8T346G9.Office/User Content/Templates.
-
Drag the templates that you want to delete to the Trash.
Excel
-
Open the workbook that you want to save as a template.
-
On the File menu, click Save as Template.
-
In the Save As box, type the name that you want to use for the new template.
-
(Optional) In the Where box, choose a location where the template will be saved.
-
Next to File Format, click Excel Template (.xltx), or, if your workbook contains macros, click Excel Macro-Enabled Template (.xltm).
-
Click Save.
Unless you select a different location, the template is saved in /Users/username/Library/Group Containers/UBF8T346G9.Office/User Content/Templates.
You can customize an existing template to make it even more useful. Add static information to the existing template, and then save the file again (as a template).
-
On the File menu, click New from Template.
-
Click a template that is similar to the one you want to create, and then click Create.
Note: If you can't find a template, you can search for it based on keywords in the Search All Templates box.
-
Add, delete, or change any content, graphics, or formatting, and make any other changes that you want to appear in all new workbooks that you base on the template.
-
On the File menu, click Save as Template.
-
In the Save As box, type the name that you want to use for the new template.
-
(Optional) In the Where box, choose a location where the template will be saved.
-
Next to File Format, click Excel Template (.xltx), or, if your template contains macros, click Excel Macro-Enabled Template (.xltm).
-
Click Save.
Unless you select a different location, the template is saved in /Users/username/Library/Group Containers/UBF8T346G9.Office/User Content/Templates.
To start a new workbook based on a template, on the File menu, click New from Template, and then select the template you want to use.
-
In the Finder, open /Users/username/Library/Group Containers/UBF8T346G9.Office/User Content/Templates.
-
Drag the templates that you want to delete to the Trash.
See also
Word
-
Open the document.
-
Add, delete, or change any text, graphics, or formatting, and make any other changes that you want to appear in all new documents that you base on the template.
-
On the File menu, click Save As.
-
On the Format pop-up menu, click Word Template (.dotx).
-
In the Save As box, type the name that you want to use for the new template, and then click Save.
Unless you select a different location, the template is saved in /Users/username/Library/Application Support/Microsoft/Office/User Templates/My Templates.
-
On the File menu, click Close.
To organize templates, use the Finder to create a new folder in /Users/username/Library/Application Support/Microsoft/Office/User Templates/My Templates, and then save your template in the new folder.
Note: If you are using Mac OS X 7 (Lion), the Library folder is hidden by default. To show the Library folder, in the Finder, click the Go menu, and then hold down OPTION.
You can customize an existing template to make it even more useful. Add static information to the existing template, and then save the file again (as a template).
-
On the Standard toolbar, click New from template
 .
. -
In the left navigation pane, under TEMPLATES, click All.
Note: If you can't find a template, you can search for it based on keywords in the Search box.
-
Click a template that is similar to the one that you want to create, and then click Choose.
-
Add, delete, or change any text, graphics, or formatting, and make any other changes that you want to appear in all new documents that you base on the template.
-
On the File menu, click Save As.
-
On the Format pop-up menu, click Word Template (.dotx).
-
In the Save As box, type the name that you want to use for the new template, and then click Save.
Unless you select a different location, the template is saved in /Users/username/Library/Application Support/Microsoft/Office/User Templates/My Templates.
To organize templates, use the Finder to create a new folder in /Users/username/Library/Application Support/Microsoft/Office/User Templates/My Templates, and then save your template in the new folder.
Note: If you are using Mac OS X 7 (Lion), the Library folder is hidden by default. To show the Library folder, in the Finder, click the Go menu, and then hold down OPTION.
-
On the Standard toolbar, click New from template
. -
In the left navigation pane, under TEMPLATES, click My Templates.
Note: If you created folders to organize your templates, the folders are displayed under My Templates. You need to click the folder to see the templates.
-
Click the template that you created, and then click Choose.
-
In the Finder, open /Users/username/Library/Application Support/Microsoft/Office/User Templates/My Templates.
Note: If you are using Mac OS X 7 (Lion), the Library folder is hidden by default. To show the Library folder, in the Finder, click the Go menu, and then hold down OPTION .
-
Drag the templates that you want to delete to the Trash.
PowerPoint
-
Open the presentation that you want to create the new template from.
-
Add, delete, or change any text, graphics, or formatting, and make any other changes that you want to appear in all new presentations that you base on the template.
-
On the File menu, click Save As.
-
On the Format pop-up menu, click PowerPoint Template (.potx).
-
In the Save As box, type the name that you want to use for the new template, and then click Save.
Unless you select a different location, the template is saved in /Users/username/Library/Application Support/Microsoft/Office/User Templates/My Templates.
To organize templates, use the Finder to create a new folder in /Users/username/Library/Application Support/Microsoft/Office/User Templates/My Templates, and then save your template in the new folder.
Note: If you are using Mac OS X 7 (Lion), the Library folder is hidden by default. To show the Library folder, in the Finder, click the Go menu, and then hold down OPTION.
You can customize an existing template to make it even more useful. Add static information to the existing template, and then save the file again (as a template).
-
On the Standard toolbar, click New from template
. -
In the left navigation pane, under TEMPLATES, click All.
Note: If you can't find a template, you can search for a template based on keywords in the Search box.
-
Click a template that is similar to the one that you want to create, and then click Choose.
-
Add, delete, or change any text, graphics, or formatting, and make any other changes that you want to appear in all new documents that you base on the template.
If you want to make one change to replicate it in several slide layouts, rather than changing each layout or slide individually, you can edit slide masters.
-
On the File menu, click Save As.
-
On the Format pop-up menu, click PowerPoint Template (.potx).
-
In the Save As box, type the name that you want to use for the new template, and then click Save.
Unless you select a different location, the template is saved in /Users/username/Library/Application Support/Microsoft/Office/User Templates/My Templates.
To organize templates, use the Finder to create a new folder in /Users/username/Library/Application Support/Microsoft/Office/User Templates/My Templates, and then save your template in the new folder.
Note: If you are using Mac OS X 7 (Lion), the Library folder is hidden by default. To show the Library folder, in the Finder, click the Go menu, and then hold down OPTION.
-
On the Standard toolbar, click New from template
. -
In the left navigation pane, under TEMPLATES, click My Templates.
Note: If you created folders to organize your templates, the folders are displayed under My Templates. You need to click the folder to see the templates.
-
In the right navigation pane, you can select the colors, font, and slide size for the template.
-
Click the template that you created, and then click Choose.
-
In the Finder, open /Users/username/Library/Application Support/Microsoft/Office/User Templates/My Templates.
Note: If you are using Mac OS X 7 (Lion), the Library folder is hidden by default. To show the Library folder, in the Finder, click the Go menu, and then hold down OPTION .
-
Drag the templates that you want to delete to the Trash.
Excel
-
Open the workbook that you want to create the new template from.
-
Add, delete, or change any text, graphics, or formatting, and make any other changes that you want to appear in all new documents that you base on the template.
-
On the File menu, click Save As.
-
On the Format pop-up menu, click Excel Template (.xltx).
-
In the Save As box, type the name that you want to use for the new template, and then click Save.
Unless you select a different location, the template is saved in /Users/username/Library/Application Support/Microsoft/Office/User Templates/My Templates.
To organize templates, use the Finder to create a new folder in /Users/username/Library/Application Support/Microsoft/Office/User Templates/My Templates, and then save your template in the new folder.
Note: If you are using Mac OS X 7 (Lion), the Library folder is hidden by default. To show the Library folder, in the Finder, click the Go menu, and then hold down OPTION.
You can customize an existing template to make it even more useful. Add static information to the existing template, and then save the file again (as a template).
-
On the Standard toolbar, click New from template
. -
In the left navigation pane, under TEMPLATES, click All.
Note: If you can't find a template, you can search for a template based on keywords in the Search box.
-
Click a template that is similar to the one that you want to create, and then click Choose.
-
Add, delete, or change any text, graphics, or formatting, and make any other changes that you want to appear in all new documents that you base on the template.
-
On the File menu, click Save As.
-
On the Format pop-up menu, click Excel Template (.xltx).
-
In the Save As box, type the name that you want to use for the new template, and then click Save.
Unless you select a different location, the template is saved in /Users/username/Library/Application Support/Microsoft/Office/User Templates/My Templates.
To organize templates, use the Finder to create a new folder in /Users/username/Library/Application Support/Microsoft/Office/User Templates/My Templates, and then save your template in the new folder.
Note: If you are using Mac OS X 7 (Lion), the Library folder is hidden by default. To show the Library folder, in the Finder, click the Go menu, and then hold down OPTION.
-
On the Standard toolbar, click New from template
. -
In the left navigation pane, under TEMPLATES, click My Templates.
Note: If you created folders to organize your templates, the folders are displayed under My Templates. You need to click the folder to see the templates.
-
Click the template that you created, and then click Choose.
-
In the Finder, open /Users/username/Library/Application Support/Microsoft/Office/User Templates/My Templates.
Note: If you are using Mac OS X 7 (Lion), the Library folder is hidden by default. To show the Library folder, in the Finder, click the Go menu, and then hold down OPTION .
-
Drag the templates that you want to delete to the Trash.
See also
If you think of your current document as a template, you can save it with a different name to create a new document that's based on the current one. Whenever you want to create a document like that, you'll open your document in Word for the web, go to File > Save As, and create a document that's a copy of the one you started with.
On the other hand, if you're thinking of the kind of templates you see by going to File > New, then no: you can't create those in Word for the web.
Instead, do this:
If you have the Word desktop application, use the Open in Word command in Word for the web to open the document in Word on your desktop.

From there, create a template. When you go to File > New in the Word desktop application, you'll be able to use your template for new documents. And if you store the documents online, you can edit them in Word for the web.
See Also
Microsoft Templates and Themes
Download free, pre-built templates
No comments:
Post a Comment