You can arrange your text into columns in PowerPoint. You can also specify the spacing (in inches) between the columns. Here's how:
Newer versions
-
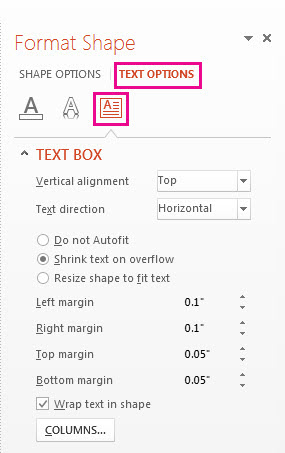
Right-click the text box, placeholder, or shape border, and click Format Shape .
-
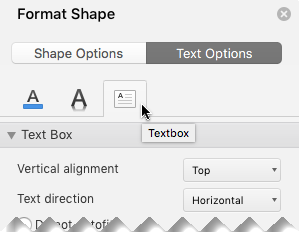
On the right side of the window, click Text Options > Textbox
 .
.
-
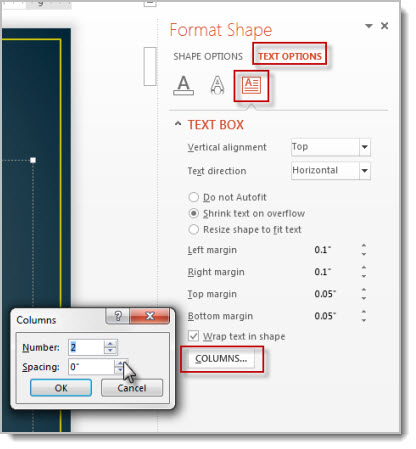
Click Columns , enter the number of columns in the Number box, and the space between each column (in inches) in the Spacing box.
If the Columns button is grayed out, it's likely because you are working on a table. Columns for tables are described in a separate article. See Add or delete table rows and columns .
-
Any text you now enter will appear in columns. If the object you right-clicked in step 1 already contained text, you'll see that the text now appears in columns.
You can adjust balance of text in your columns by adding or remove line breaks: Press Enter to add blank lines and move text to the next column, or press Backspace or Delete or remove blank lines and move text to the previous column.
You can also resize the box that contains the columns to make the columns more even, if you like.
Office 2007 or 2010
-
Right-click the text box, placeholder, or shape border, and click Format Shape .
-
In the Format Shape dialog box, select the Text Box tab on the left.
-
Click Columns , enter the number of columns in the Number box, and the space between each column (in inches) in the Spacing box.
If the Columns button is grayed out, it's likely because you are working on a table. Columns for tables are described in a separate article. See Add or delete table rows and columns .
-
Click OK , and then close the Format Shape dialog box. Any text you now enter will appear in columns. If the object you right-clicked in step 1 already contained text, you'll see that the text now appears in columns.
You can adjust balance of text in your columns by adding or remove line breaks: Press Enter to add blank lines and move text to the next column, or press Backspace or Delete or remove blank lines and move text to the previous column.
You can also resize the box that contains the columns to make the columns more even, if you like.
Newer versions
-
Right-click the text box, placeholder, or shape border, and click Format Shape .
-
On the right side of the window, click Text Options > Textbox
 .
. -
Click Columns , enter the number of columns in the Number box, and the space between each column (in inches) in the Spacing box.
If the Columns button is grayed out, it's likely because you are working on a table. Columns for tables are described in a separate article. See Add or delete table rows and columns .
-
Any text you now enter will appear in columns. If the object you right-clicked in step 1 already contained text, you'll see that the text now appears in columns.
You can adjust balance of text in your columns by adding or remove line breaks: Press Enter to add blank lines and move text to the next column, or press Backspace or Delete or remove blank lines and move text to the previous column.
You can also resize the box that contains the columns to make the columns more even, if you like.
Office 2011
-
Right-click the text box, placeholder, or shape border, and click Format Text .
-
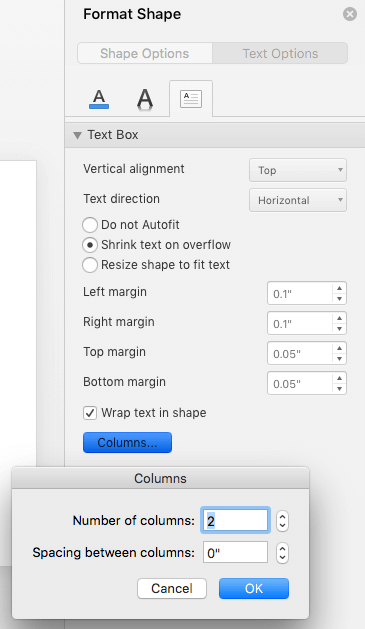
In the Format Text dialog box, on the left side, select the Columns tab.
If the Columns tab isn't available, it's likely because you are working on a table or on an object that doesn't support multiple columns. Columns for tables are described in a separate article. See Add or delete table rows and columns .
-
Enter a numeral in the Number of columns box, and enter the space you want between each column (in inches) in the Spacing between columns box.
-
Select OK . Any text you now enter will appear in columns. If the object you right-clicked in step 1 already contained text, you'll see that the text now appears in columns.
You can adjust balance of text in your columns by adding or remove line breaks: Press Enter to add blank lines and move text to the next column, or press Backspace or Delete or remove blank lines and move text to the previous column.
You can also resize the box that contains the columns to make the columns more even, if you like.
Column breaks
PowerPoint doesn't have the ability to insert a column break in a multi-column text box. If this is a feature you'd like to request, please send us your feedback to help us prioritize new features in future updates. See How do I give feedback on Microsoft Office? for more information.
Making columns in a table
If you're using a table , the feature for making columns is different. Read Add or delete table rows and columns instead of this article.
No comments:
Post a Comment