To make room for more information in a table, you can add rows and columns without leaving Word for the web.
-
First, if you're in Reading View, click Edit Document > Edit in Word for the web.

-
Click anywhere in the table that you want to change. You'll see Table Tools appear above the ribbon.

-
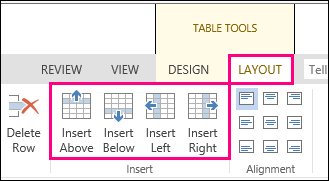
Under Table Tools, click Layout. This opens options for inserting rows and columns, plus other table options.
-
Put your cursor wherever in the table you want to add a column or row.
-
To insert a row, click Insert Above or Insert Below.
-
To insert a column, click Insert Left or Insert Right.
-
Tip: If you also want to change the look of your table, check out the options on the Table Tools > Design tab.
No comments:
Post a Comment