If you have Microsoft 365 or another email service based on Microsoft Exchange Online, use Outlook on the web to share your calendar with people inside or outside your organization. Depending on the permission you give them, they can view your calendar, edit it, or act as your delegate for meeting requests.
Notes:
-
Calendar sharing may not be available for your account, or may be limited to people in your organization, depending on your organization settings.
-
For Outlook.com, see Share your calendar in Outlook.com.
Note: If the instructions don't match what you see, you might be using an older version of Outlook on the web. Try the Instructions for classic Outlook on the web.
-
At the bottom of the page, select
 to go to Calendar.
 -
In Calendar, on the toolbar at the top of the page, select Share, and choose the calendar you want to share.

Note: You can't share calendars owned by other people.
-
Enter the name or email address of the person you want to share your calendar with.
-
Choose how you want the person to use your calendar:
-
Can view when I'm busy lets them see when you're busy but doesn't include details like the event location.
-
Can view titles and locations lets them see when you're busy, as well as the title and location of events.
-
Can view all details lets them see all the details of your events.
-
Can edit lets them edit your calendar.
-
Delegate lets them edit your calendar and share it with others.
-
-
Select Share. If you decide not to share your calendar right now, select
 .
.Notes:
-
When sharing your calendar with someone who's not using Outlook on the web, for example, someone using Gmail, they'll only be able to accept the invitation using a Microsoft 365 or an Outlook.com account.
-
ICS calendars are read-only, so even if you grant edit access to other people, they won't be able to edit your calendar.
-
How often your ICS calendar syncs depends on the email provider of the person you've shared it with.
-
Calendar items marked private are protected. Most people you share your calendar with see only the time of items marked private, not the title, location, or other details. Recurring series marked as private will also show the recurrence pattern.
-
You can change the permissions you've set for a calendar, or stop sharing the calendar completely, by right-clicking the calendar name under Calendars.
-
At the bottom of the page, select
 to go to Calendar.
 -
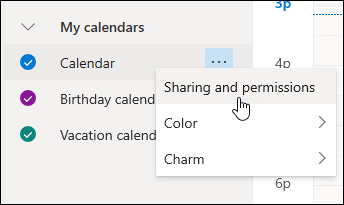
Under Calendars, right-click the calendar you want to update sharing settings for, and select Sharing and permissions.
-
Find the person whose permissions you want to change and either choose a new level of permissions or select
 to stop sharing your calendar with them.
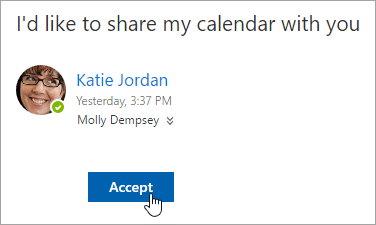
If you receive an invitation to share someone else's calendar, select Accept at the bottom of the message to add their calendar to your calendar view.
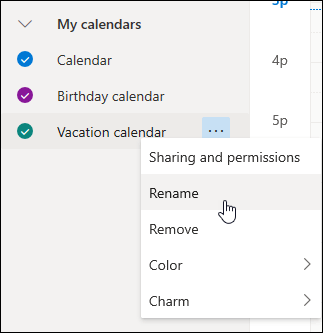
After you add another calendar, you can rename it, change its color, or remove it from your view. To do this, right-click the calendar in the navigation pane.
If you want to stop sharing your calendar with someone, you can remove their permissions.
-
At the bottom of the page, select
 to go to Calendar.
 -
In the left pane, right-click the calendar you want to stop sharing and select Sharing and permissions.
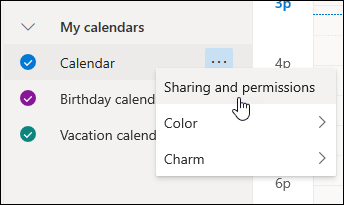
By default, your primary calendar is called "Calendar". If you created other calendars, you can select one of them instead. You can't remove sharing permissions from calendars owned by other people.
-
Choose the person you want to stop sharing your calendar with and select
 .
.The person is now removed from the list of people who have access to your calendar. Their copy of your calendar will no longer sync to your calendar or receive updates.
In Calendar settings, you can publish your calendar so anyone can view your calendar or subscribe to it.
-
In Calendar view, select Settings
 > View all Outlook settings.
 -
Select Shared calendars.
-
Under Publish a calendar, choose which calendar you want to publish and how much detail people can see.
-
Select Publish.
-
If you choose an HTML link, recipients can copy and paste the URL in a browser to view your calendar in a new browser window.
If you choose an ICS link, recipients can download the ICS file and import it into Outlook. This will add your events into their calendar, but recipients won't automatically receive any updates to your calendar. Alternatively, recipients can use the ICS link to subscribe to your calendar through Outlook. They'll see your calendar alongside their own and will automatically receive any updates to your calendar.
Notes:
-
HTML and ICS calendars are read-only, so recipients won't be able to edit your calendar.
-
How often your ICS calendar syncs depends on the recipient's email provider.
-
In Calendar view, select Settings
 > View all Outlook settings.
 -
Select Shared calendars.
-
Under Publish a calendar, select Unpublish.
Instructions for classic Outlook on the web
-
At the top of the page, select the app launcher
 , and select Calendar.
 -
At the top of the screen, select Share, and choose the calendar you want to share.

By default, your primary calendar is called "Calendar". If you created other calendars, you can select one of them to share instead. You cannot share calendars owned by other people.
-
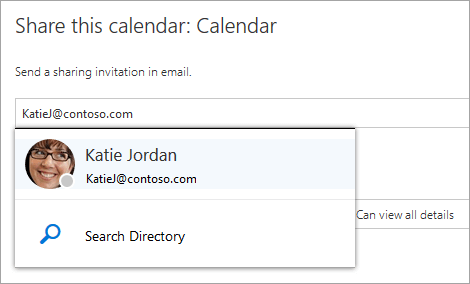
Enter the name or email address of the person with whom you want to share your calendar in the Send a sharing invitation in email box.
-
Choose how much information you want this person to see:
-
Can view when I'm busy lets the person see when you are busy but does not include details such as the event location.
-
Can view titles and locations lets the person see when you are busy as well as the title and location of events.
-
Can view all details lets the person see all the details of your events.
-
Can edit lets the person see all details of your events and edit your calendar (only available when sharing with people in your organization).
-
Delegate lets the person view and edit your calendar, as well as send and respond to meeting requests on your behalf (only available when sharing with people in your organization). For more information about editor and delegate access, see Calendar delegation in Outlook on the web.
-
-
Select Share. If you decide not to share your calendar right now, select Remove
 .
.
Notes:
-
When sharing a calendar other than your primary calendar—such as a project calendar that you created—you cannot select Delegate.
-
Calendar items marked private are protected. Most people with whom you share your calendar see only the time of items marked private, not the title, location, or other details. Recurring series marked as private will also show the recurrence pattern. The only exception to this is that you can give a delegate permission to view private events.
-
You might also see an entry for My organization in the list of people with whom you've shared the calendar. This is the default level of detail that others in your organization, or federated organizations, can see when viewing your calendar in Scheduling Assistant.
You can change the permissions you've set for a calendar, or stop sharing the calendar completely, by right-clicking the calendar name under Your calendars.
-
At the top of the page, select the app launcher
 , and select Calendar.
 -
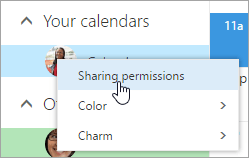
Under Your calendars, right-click the calendar for which you want to update sharing settings, and select Sharing permissions.
-
Find the person whose permissions you want to change and either choose a new level of permissions or select Remove
 to stop sharing your calendar with that person.
When you remove a person from the list of people with whom you've shared your calendar, the URL that was sent to that person stops working. If the user is also within your organization, the calendar is removed from their list of calendars.
If you receive an invitation to share someone else's calendar, select Accept in the message or the link in the invitation to add their calendar to your calendar view.

You also can go your calendar in Outlook on the web to add other people's calendars to your view. However, calendars opened this way won't appear in all of your Outlook clients. To ensure that other people's calendars appear in all of your Outlook clients, ask them to share their calendars with you.
-
At the top of the page, select the app launcher
 , and select Calendar.
 -
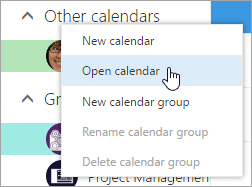
In the navigation pane, right-click Other calendars and select Open calendar.
-
To add a calendar, choose one of the following:
-
To add a calendar that belongs to someone in your organization, in the From directory box, enter his or her name and select Open. If that person has not shared his or her calendar directly with you, opening the calendar will display with the permissions he or she granted to the My organization user.
-
To add a calendar from outside your organization, in the Internet calendar box enter the URL, and select Open. The URL probably ends with the .ics file extension.
Note: If you try to add a calendar from the Internet and are sure the URL is correct, but you're not seeing any information, try removing the calendar and adding it again, changing the protocol from http to https.
-
After you add another calendar, you can rename it, change its color, or remove it from your view.
For information about editing someone else's calendar, see Manage someone else's calendar in Outlook Web App.
For more information about opening calendars from outside your organization or from ICS URLs, see Import or subscribe to a calendar in Outlook on the web.
If you would like to stop sharing your calendar with someone, use Outlook on the web to remove his or her permissions.
-
At the top of the page, select the app launcher
 , and select Calendar.
 -
At the top of the page, select Share, and choose the calendar you want to stop sharing.

By default, your primary calendar is called "Calendar". If you created other calendars, you can select one of them instead. You cannot remove sharing permissions from calendars owned by other people.
-
Choose the person with whom you want to stop sharing your calendar and select Remove
 .
.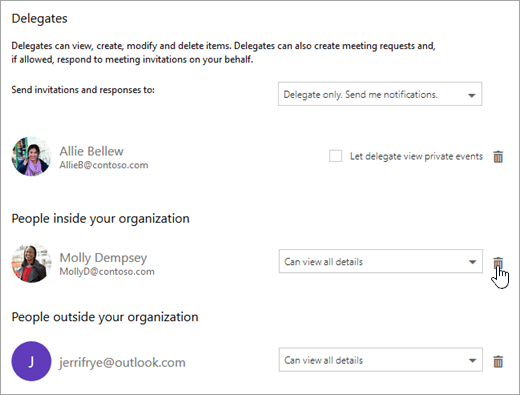
The person is now removed from the list of people with access to your calendar. If the person is inside your organization, your calendar will be removed from his or her list of calendars. If the person is outside your organization, his or her copy of your calendar is not removed but will no longer sync to your calendar or receive updates.
In Calendar settings, you can publish your calendar so anyone can view your calendar or subscribe to it.
-
In Calendar view, select Settings
 > Calendar.
 -
Under Shared calendars, select Calendar publishing.
-
Under Select a calendar, choose which calendar you want to publish from the drop-down menu.
-
Under Select permissions, choose how much detail people should see from the drop-down menu.
-
Select Save.
-
If you choose an HTML link, recipients can copy and paste the URL in a browser to view your calendar in a new browser window.
If you choose an ICS link, recipients can download the ICS file and import it into Outlook. This will add your events into their calendar, but recipients won't automatically receive any updates to your calendar. Alternatively, recipients can use the ICS link to subscribe to your calendar through Outlook. They'll see your calendar alongside their own and will automatically receive any updates to your calendar.
Notes:
-
HTML and ICS calendars are read-only, so recipients won't be able to edit your calendar.
-
How often your ICS calendar syncs depends on the recipient's email provider.
-
In Calendar view, select Settings
 > Calendar.
 -
Under Shared calendars, select Calendar publishing.
-
Under Select a calendar, choose the calendar your want to unpublish from the drop-down menu.
-
Under Select permissions, choose Not shared from the drop-down menu.
-
Select Save.
No comments:
Post a Comment