Text boxes and most shapes (except for lines and connectors) can include text, and you can position or wrap that text. You can also resize shapes for a better text fit, or change the direction of the text.
Specify text direction in a shape or text box
-
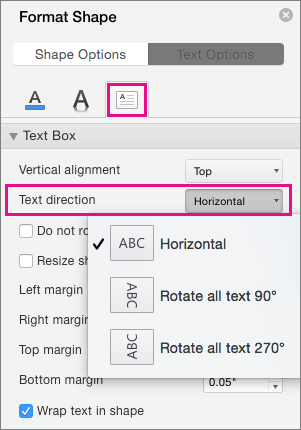
Control + Click the border of the shape or text box that contains the text, and then click Format Shape.
-
In the Format Shape pane on the right, click Text Options.
-
Click the third icon, Textbox, and then select the option that you want from the Text direction list.
Position text horizontally in a text box or shape
Change the horizontal alignment of a single paragraph or line
-
In the shape or text box, click in the paragraph or line of text that you want to modify.
-
Click Home, and in the Paragraph group, click the horizontal alignment option that you want.

Change the horizontal alignment of all text in a shape or text box
-
Click the border of the shape or text box to select it.
-
Click Home, and in the Paragraph group, click the horizontal alignment option that you want.
Automatically resize a shape to fit text
You can automatically increase the size of a text box or shape vertically so that the text fits inside it.
-
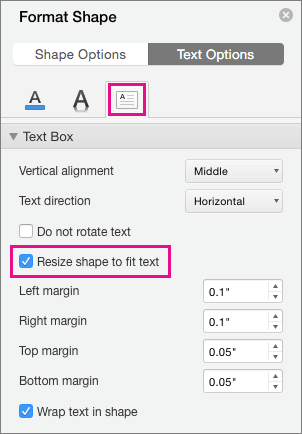
Control + Click the border of the shape or text box that you want to resize, and then click Format Shape.
-
In the Format Shape pane on the right, click Text Options.
-
Click Layout & Properties, and then select the check box next to Resize shape to fit text.
Change the default setting for wrapping text
By default, the text wraps automatically as you type in a text box or shape. If you don't want the text to wrap, do the following:
-
Control + Click the shape that contains the text, and then click Format Shape.
-
In the Format Shape pane on the right, click Text Options.
-
Click Layout & Properties, and then clear the check box next to Wrap text in shape.
See also
Add, copy, or remove a text box
Change the margins between text and the edge of a text box or shape
Specify text direction in a shape, text box, or table cell
-
Enter the text in the shape or text box or table cell, and then select the text.
-
Ctrl+Click the selected text, and then click Format Shape. On the Text Box tab in the dialog box, choose a direction from the Text Direction box.
Position text horizontally in a shape or text box
-
Select the text in the shape or text box.
-
On the Home tab, under Paragraph, click the horizontal alignment button that you want.

(Align Left, Centered, Align Right, Justified, or Distribute Text)
Position text vertically in a shape or text box
-
Select the text in the shape or text box.
-
On the Home tab, under Paragraph, click
 , and then click the vertical alignment that you want.
Wrap text in a shape or text box
By default, the text wraps automatically as you type in a text box or shape. If you don't want the text to wrap, do the following:
-
Select the text in the shape or text box.
-
On the Format menu, click Shape.
-
On the left side of the dialog box, click Text Box.
-
Under Internal Margin, clear the Wrap text in shape check box.
Resize a shape to fit text
-
Select the text in the shape or text box.
-
On the Format menu, click Shape.
-
On the left side of the dialog box, click Text Box.
-
Under Autofit, click Resize shape to fit text.
No comments:
Post a Comment