Access reports are a great way to view or print summarized data from your database, because you can display the information to your desired level of detail and in several formats. A report is divided into sections, and by inserting a page break you can start a new page within the section.
Learn right here how to insert and remove a page break control and how to force a page break in a grouped report.
Overview
Because data in an Access report is processed one record at a time, viewing the report in Design view helps you specify how each row is displayed. When you use print preview, you can see how the report will be displayed or printed. If you want, you can increase the magnification to zoom in on details.
This table lists the sections of a report and how the page displays when you insert page breaks:
Place a page break control in this section | To display new page |
|---|---|
| Report Header | Beginning of a report. Used for title page. |
| Page Header | Top of every page of the report. |
| Group Header | Before the first record in a group. |
| Detail | Prints each record in a report. |
| Group Footer | After the last record in a group. |
| Page Footer | Bottom of each page of the report. |
| Report Footer | At the end of a report. |
Insert a page break control
You can insert a page break in sections other than the Page Header and Page Footer sections of a report.
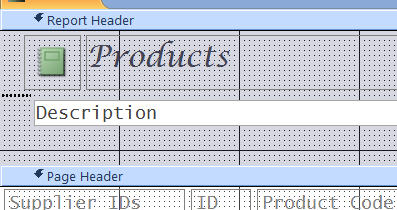
For example, to print a report's title page on a separate page, place the page break in the Report Header section after controls that you want to appear on the title page. In the example below, the page break control is between the header and the description text box.


Notice that only the Header appears on the first page, and the description along with the records appear on the next page.
Insert a page break
-
Open the report in Design view.
-
On the Design tab, in the Controls group, click Insert Page Break.
-
Click the location where you want to place the page break control. Access indicates the page break with a short line on the left edge of the report.
Note: Place the page break control either above or below an existing control on the report to avoid splitting data in that control.
Page breaks can be viewed in Print preview but not in Report view or Layout view.
To remove a page break
-
Select the page break control, and then press the Delete key.
Use the Force New Page setting in a grouped report
Some report designs are best when displayed with each group starting on a new page. You can create this format by using the Force New Page property to force a page break every time the group value changes.
Force New Page property settings
Force New Page property setting | Display result |
|---|---|
| None | (default setting) No forced page break. |
| Before Section | Starts printing the current section from the top of a new page when there is a new group. |
| After Section | Starts printing the next section from the top of new page when there is a new group. |
| Before & After | Starts printing the current and the next sections on a new page when there is a group. |
Tip: Before adding a forced page break to groups, consider if your report design might work better with a new group beginning on a new page.
To group a report, open the report in Design view, right click the column on which you want to group, and then click Group On.

When applying grouping, Access moves the grouping field to the leftmost column, and groups the remaining columns based on that column. In some cases, Access also adds a grand total to the Report Footer section.
To force a new page

-
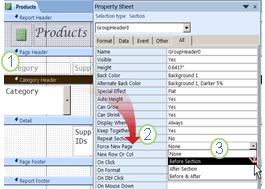
Open the grouped report in Design view and click anywhere in the Category Header.
-
If the property sheet is not already visible, click F4 to display it,
-
In theForce New Pageproperty, click a suitable option from the drop-down list.
To remove the forced page break
-
Right click the Category Header, and click Properties.
-
In the Force New Page property, click the drop-down list and select None.
No comments:
Post a Comment