You can delay the delivery of an individual message or you can use rules to delay the delivery of all messages by having them held in the Outbox for a specified time after you click Send.
Delay the delivery of a message
-
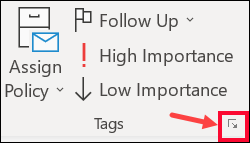
While composing a message, select the More options arrow from the Tags group in the Ribbon.

-
Under Delivery options, select the Do not deliver before check box, and then click the delivery date and time you want.

-
Click Close.
-
When you're done composing your email message, select Send.
After you click Send, the message remains in the Outbox folder until the delivery time.
If you decide later that you want to send the message immediately, do the following:
-
Switch to the Outbox folder.
-
Open the delayed message.
-
Select the More options arrow from the Tags group in the Ribbon.

-
Under Delivery options, clear the Do not deliver before check box.
-
Click Close and send.
Note: This feature works only when Outlook is in online mode.
Delay the delivery of all messages
You can delay the delivery of all messages by up to two hours by creating a rule.
-
Click File.
-
Click Manage Rules & Alerts.
-
Click New Rule.
-
In the Step 1: Select a template box, under Start from a Blank Rule, click Apply rule on messages I send, and then click Next.
-
In the Step 1: Select condition(s) list, select the check boxes for any options that you want, and then click Next.
If you do not select any check boxes, a confirmation dialog box appears. If you click Yes, the rule that you are creating is applied to all messages that you send.
-
In the Step 1: Select action(s) list, select the defer delivery by a number of minutes check box.
-
In the Step 2: Edit the rule description (click an underlined value) box, click the underlined phrase a number of and enter the number of minutes for which you want the messages to be held before it is sent.
Delivery can be delayed up to 120 minutes.
-
Click OK, and then click Next.
-
Select the check boxes for any exceptions that you want.
-
Click Next.
-
In the Step 1: Specify a name for this rule box, type a name for the rule.
-
Select the Turn on this rule check box.
-
Click Finish.
After you click Send, each message remains in the Outbox folder for the time that you specified.
Delay the delivery of a single message
-
In the message, on the Options tab, in the More Options group, click Delay Delivery
 .
. -
Click Message Options.
-
Under Delivery options, select the Do not deliver before check box, and then click the delivery date and time that you want.
After you click Send, the message remains in the Outbox folder until the delivery time.
Note: If you are using a POP3 account, Outlook must remain open until the message is sent. To determine the type of account you are using, on the Tools menu, click Account Settings. On the E-mail tab, the Type column lists the type of accounts that are in your active Outlook profile.
Delay the delivery of all messages
-
On the Tools menu, click Rules and Alerts, and then click New Rule.
-
In the Step 1: Select a template box, , under Start from a Blank Rule, click Check messages after sending, and then click Next.
-
In the Step 1: Select condition(s) list, select any options that you want, and then click Next.
If you do not select any check boxes, a confirmation dialog box appears. If you click Yes, the rule you are creating will be applied to all messages that you send.
-
In the Step 1: Select action(s) list, select defer delivery by a number of minutes.
-
In the Step 2: Edit the rule description (click an underlined value) box, click the underlined phrase a number of and enter the number of minutes for which you want the messages to be held before sending.
Delivery can be delayed up to 120 minutes.
-
Click OK, and then click Next.
-
Select any exceptions that you want.
-
Click Next.
-
In the Step 1: Specify a name for this rule box, type a name for the rule.
-
Select the Turn on this rule check box.
-
Click Finish.
After you click Send, each message remains in the Outbox folder for the amount of time you specified.
Note: If you are using a POP3 account, Outlook must remain open until the message is sent. To determine the type of account you are using, on the Tools menu, click Account Settings. On the E-mail tab, the Type column lists the type of accounts that are in your active Outlook profile.
No comments:
Post a Comment