Use a slide master to add consistency to your colors, fonts, headings, logos, and other styles, and to help unify the form of your presentation.
You can change a slide master's colors, fonts, or effects. You can hide or show placeholders.

1:07
Change the slide master
-
Select View > Slide Master.
-
Make the text, color, and alignment changes you want.
If you want to use a predefined theme, select that first by clicking Themes on the Slide Master tab. Then proceed with selecting Colors, Fonts, Effects, and Background Styles.
-
When you're done, select Close Master View.
See Also
To learn about slide masters, see What is a slide master?
To add or change placeholders in a Master Layout, see Add a placeholder to a layout
To change text attributes, see Change text alignment, indentation, and spacing.
To use more than one slide master in a presentation, see Use multiple slide masters in one presentation
Create and customize one or more slide masters
-
On the View tab, click Slide Master.

-
When you open Slide Master view, a blank slide-master with the default, associated layouts appears. If you want to add another slide master, do the following:
-
Click a location in the slide thumbnail pane where you want the new slide master to appear.
-
On the Slide Master tab, click Insert Slide Master.
Note: In the slide thumbnail pane, the slide master is the larger slide image, and the associated layouts are positioned beneath the slide master.
-
-
Do any of the following:
-
To create one or more custom layouts or to modify existing layouts, see Apply or change a slide layout.
-
To remove any of the built-in slide layouts that accompany the default slide master, in the slide thumbnail pane, click each slide layout that you want to delete, and then on the Slide Master tab, click Delete.
-
To apply a design or theme-based colors, fonts, effects and backgrounds, see Create your own theme in PowerPoint.
-
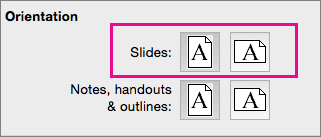
To set the page orientation for all of the slides in your presentation, on the Slide Master tab, click Slide Size > Page Setup. Under Orientation, click the orientation you want.

-
To add text that will appear as a footer at the bottom of all of the pages in your presentation, on the Slide Master tab, click Slide Size >Page Setup > Header/Footer.
-
-
After you make your changes, on the Slide Master tab, click Close Master.
-
If you want to save this as a template to reuse again, click File > Save as Template, type a file name, and click Save.
See Also
Create or change slide layouts in PowerPoint for Mac
Add a transparent picture (watermark) to your slides in PowerPoint for Mac
Add a logo, company name, or header or footer text to handouts
Add page numbers, the date and time, or footer text to all slides in PowerPoint for Mac
Change footer formatting on all slides in PowerPoint for Mac


