Use the Filter Actions Web Part
Use the Filter Actions Web Part when you have two or more filter Web Parts on one page, and you want to synchronize the display of the filter results. For example, you can create a financial dashboard with several Web Parts that a user can change with a click of a button, based on a specific department, quarter, and region, and even save that filtered display as a personal default view.
In this article
Learn more about using the Filter Actions Web Part
This section discusses adding a Filter Actions Web Part to a page and best practices for designing and maintaining pages.
Adding a Filter Actions Web Part to a Page
When you add a Filter Action Web Part to a page, it changes the behavior of the other filter Web Parts on the page. Unlike other filter Web Parts, you do not connect the Filter Actions Web Part to any other Web Part. Instead, a user must enter the desired values for each of the other filter Web Parts on the page, and then click the Filter Actions button to see the results. In effect, the Filter Actions button behaves as if a user is pressing ENTER or clicking OK for each of the other filter Web Parts.
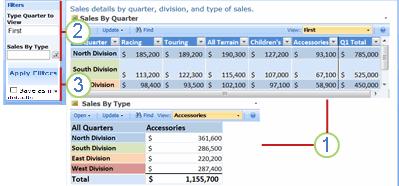
1. Two Excel Web Access Web Parts provide company sales information.
2. Two filter Web Parts can change the display results based on different values, such as "First" and "Accessories".
3. The Filter Action Web Part button displays the results with one click.
Best practices for designing and maintaining Web pages
Here are a couple of best practices to follow as you design and maintain Web pages:
-
Remove connections to disabled Web Part properties In page edit mode, you can see which filter Web Parts are currently connected and how they are connected by a message that is displayed underneath the filter Web Part.
In some cases, you may need to remove the connection to make a change to a disabled filter Web Part property. If this is the case, in the tool pane you see the following message to remind you:
"You must remove the connection between the Web Parts to make changes to disabled properties."
-
Remove unused Web Parts from the Web page If you inadvertently close a Web Part, rather than delete it, the Web Part remains on the page as a hidden Web Part. To find hidden Web Parts, find the Web page in the document library in which it is stored, point to the file name of the Web Part, click the arrow that appears, click Edit Properties, and then click the Open Web page in maintenance view link.
Add a Filter Actions Web Part to a page
Note: The following procedure assumes you are creating a Web page on a team site. Commands and instructions can vary on other sites.
-
If you have not done so already, add at least two filter Web Parts and at least one other connectable Web Part to the page.
Tip: It's a good idea to verify that the Web Parts are working as intended first, before going on to the next step.
-
Add the Filter Actions Web Part.
The Filter Actions Web Part has the following default behaviors: it displays a button for the user to click, the text on the button is Apply Filters, the position of the button is to the left in the Web Part zone, and the Save as my defaults check box is enabled. Optionally, you can change the default behavior by customizing the Filter Actions Web Part.Customize the Filter Actions Web Part:
-
Point to the Filter Actions Web Part, click the down arrow, and then click Edit Web Part.
The Filter Actions Web Part enters Edit Mode, and the Web Part tool pane is displayed.
-
You can customize the default settings of the Web Part under Filter Actions in the tool pane.
-
To not display a button, clear the Show Apply Filters button check box. This disables the Button text check box and the Button alignment list box.
-
To display different text on the Filter Actions button, enter the new text in the Button text text box.
-
To change the position of the Filter Actions Web Part in the Web Part zone, select Left, Center, or Right from the Button alignment list drop down menu.
-
To prevent users from changing to new default values for the other filter Web Parts on the page, clear the Allow users to save filter choices check box. By default, this check box is enabled.
-
-
To save the changes, click OK at the bottom of the tool pane.
Verify the results:
-
To exit Edit Mode and view the page, click the Page tab, and then click Stop Editing.
-
To dynamically change the results displayed on the page, enter values in the other filter Web Parts, and then click the Filter Actions button.
If the Allow users to save filter choices property is enabled, you can save to new default values by entering values for the other filter Web Parts on the page, selecting the Save as my defaults check box, and then clicking the Filter Actions button.
Note: If you don't see the Filter Actions button, make sure at least one of the filter Web Parts is connected to another connectable Web Part.
No comments:
Post a Comment