Create a memory-efficient Data Model using Excel and the Power Pivot add-in
In Excel 2013 or later, you can create data models containing millions of rows, and then perform powerful data analysis against these models. Data models can be created with or without the Power Pivot add-in to support any number of PivotTables, charts, and Power View visualizations in the same workbook.
Note: This article describes data models in Excel 2013. However, the same data modeling and Power Pivot features introduced in Excel 2013 also apply to Excel 2016. There's effectively little difference between these versions of Excel.
Although you can easily build huge data models in Excel, there are several reasons not to. First, large models that contain multitudes of tables and columns are overkill for most analyses, and make for a cumbersome Field List. Second, large models use up valuable memory, negatively affecting other applications and reports that share the same system resources. Finally, in Office 365, both SharePoint Online and Excel Web App limit the size of an Excel file to 10 MB. For workbook data models that contain millions of rows, you'll run into the 10 MB limit pretty quickly. See Data Model specification and limits.
In this article, you'll learn how to build a tightly constructed model that's easier to work with and uses less memory. Taking the time to learn best practices in efficient model design will pay off down the road for any model you create and use, whether you're viewing it in Excel 2013, Office 365 SharePoint Online, on an Office Web Apps Server, or in SharePoint 2013.
Consider also running the Workbook Size Optimizer. It analyzes your Excel workbook and if possible, compresses it further. Download the Workbook Size Optimizer.
In this article
Compression ratios and the in-memory analytics engine
Data models in Excel use the in-memory analytics engine to store data in memory. The engine implements powerful compression techniques to reduce storage requirements, shrinking a result set until it is a fraction of its original size.
On average, you can expect a data model to be 7 to 10 times smaller than the same data at its point of origin. For example, if you're importing 7 MB of data from a SQL Server database, the data model in Excel could easily be 1 MB or less. The degree of compression actually achieved depends primarily on the number of unique values in each column. The more unique values, the more memory is required to store them.
Why are we talking about compression and unique values? Because building an efficient model that minimizes memory usage is all about compression maximization, and the easiest way to do that is to get rid of any columns that you don't really need, especially if those columns include a large number of unique values.
Note: The differences in storage requirements for individual columns can be huge. In some cases, it is better to have multiple columns with a low number of unique values rather than one column with a high number of unique values. The section on Datetime optimizations covers this technique in detail.
Nothing beats a non-existent column for low memory usage
The most memory-efficient column is the one that you never imported in the first place. If you want to build an efficient model, look at each column and ask yourself whether it contributes to the analysis you want to perform. If it doesn't or you aren't sure, leave it out. You can always add new columns later if you need them.
Two examples of columns that should always be excluded
The first example relates to data that originates from a data warehouse. In a data warehouse, it's common to find artifacts of ETL processes that load and refresh data in the warehouse. Columns like "create date", "update date", and "ETL run" are created when the data is loaded. None of these columns are needed in the model and should be deselected when you import data.
The second example involves omitting the primary key column when importing a fact table.
Many tables, including fact tables, have primary keys. For most tables, such as those that contain customer, employee, or sales data, you'll want the table's primary key so that you can use it to create relationships in the model.
Fact tables are different. In a fact table, the primary key is used to uniquely identify each row. While necessary for normalization purposes, it's less useful in a data model where you want only those columns used for analysis or to establish table relationships. For this reason, when importing from a fact table, do not include its primary key. Primary keys in a fact table consume enormous amounts of space in the model, yet provide no benefit, as they cannot be used to create relationships.
Note: In data warehouses and multidimensional databases, large tables consisting of mostly numeric data are often referred to as "fact tables". Fact tables typically include business performance or transaction data, such as sales and cost data points that are aggregated and aligned to organizational units, products, market segments, geographical regions, and so on. All of the columns in a fact table that contain business data or that can be used to cross-reference data stored in other tables should be included in the model to support data analysis. The column you want to exclude is the primary key column of the fact table, which consists of unique values that exist only in the fact table and nowhere else. Because fact tables are so huge, some of the biggest gains in model efficiency are derived from excluding rows or columns from fact tables.
How to exclude unnecessary columns
Efficient models contain only those columns that you'll actually need in your workbook. If you want to control which columns are included in the model, you'll have to use the Table Import Wizard in the Power Pivot add-in to import the data rather than the "Import Data" dialog box in Excel.
When you start the Table import Wizard, you select which tables to import.
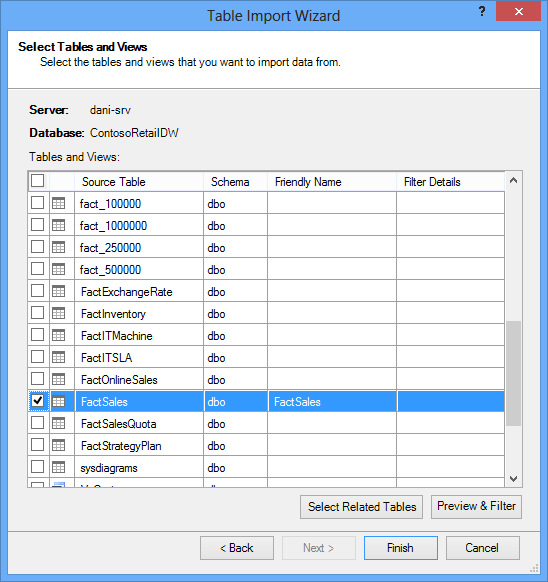
For each table, you can click the Preview & Filter button and select the parts of the table that you really need. We recommend that you first uncheck all columns, and then proceed to check the columns you do want, after considering whether they are required for the analysis.
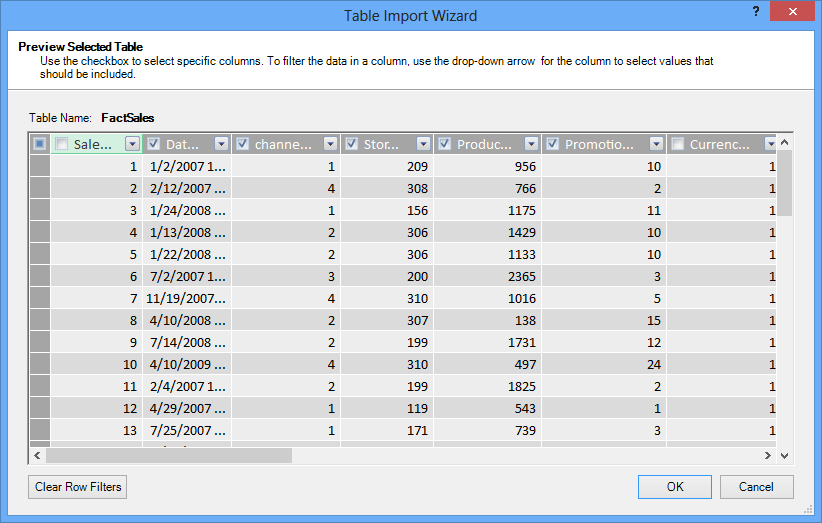
What about filtering just the necessary rows?
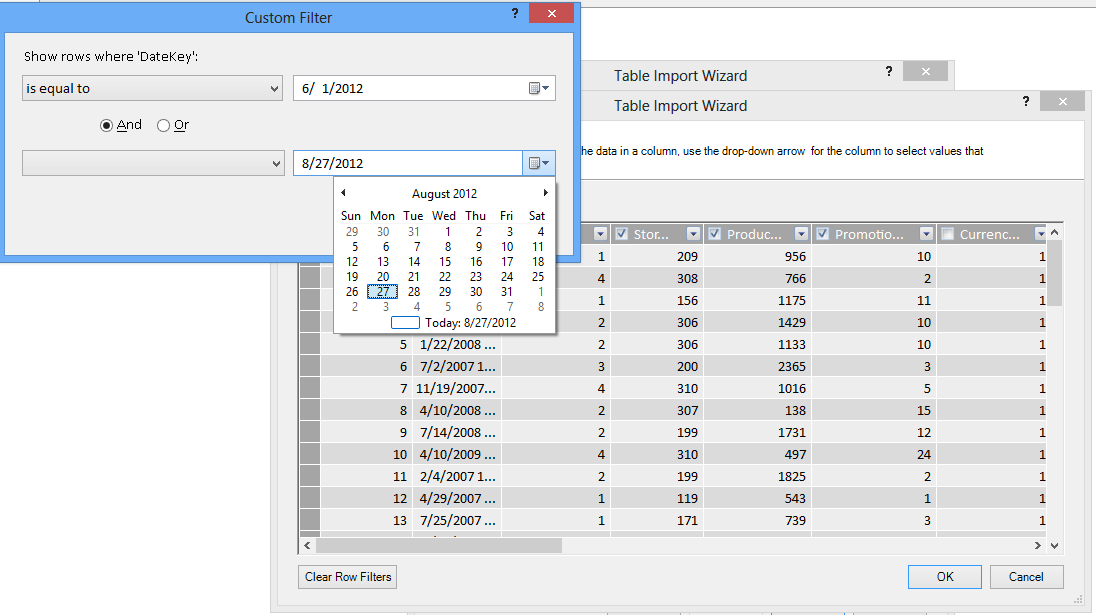
Many tables in corporate databases and data warehouses contain historical data accumulated over long periods of time. Additionally, you might find that the tables you're interested in contain information for areas of the business not required for your specific analysis.
Using the Table Import wizard, you can filter out historical or unrelated data, and thus save a lot of space in the model. In the following image, a date filter is used to retrieve only rows that contain data for the current year, excluding historical data that won't be needed.
What if we need the column; can we still reduce its space cost?
There are a few additional techniques you can apply to make a column a better candidate for compression. Remember that the only characteristic of the column that affects compression is the number of unique values. In this section, you'll learn how some columns can be modified to reduce the number of unique values.
Modifying Datetime columns
In many cases, Datetime columns take a lot of space. Fortunately, there are a number of ways to reduce the storage requirements for this data type. The techniques will vary depend on how you use the column, and your comfort level in building SQL queries.
Datetime columns include a date part and a time. When you ask yourself whether you need a column, ask the same question multiple times for a Datetime column:
-
Do I need the time part?
-
Do I need the time part at the level of hours? , minutes? , Seconds? , milliseconds?
-
Do I have multiple Datetime columns because I want to calculate the difference between them, or just to aggregate the data by year, month, quarter, and so on.
How you answer each of these questions determines your options for dealing with the Datetime column.
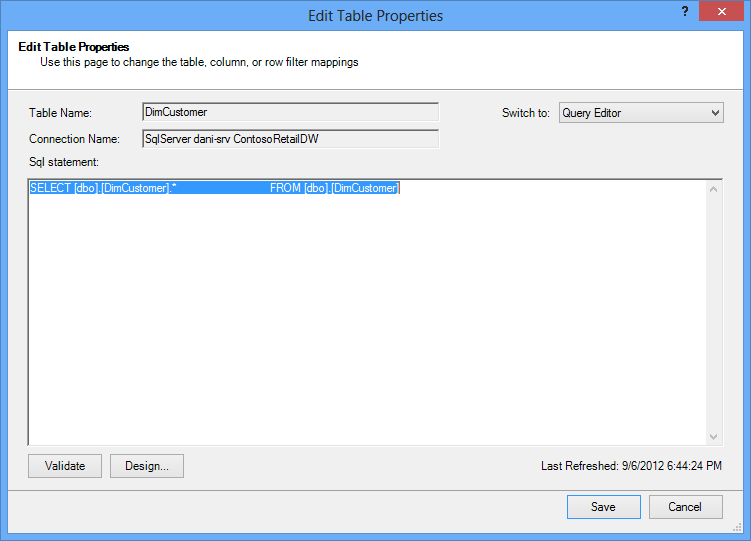
All of these solutions require modification of a SQL query. To make query modification easier, you should filter out at least one column in every table. By filtering out a column, you change query construction from an abbreviated format (SELECT *) to a SELECT statement that includes fully-qualified column names, which are far easier to modify.
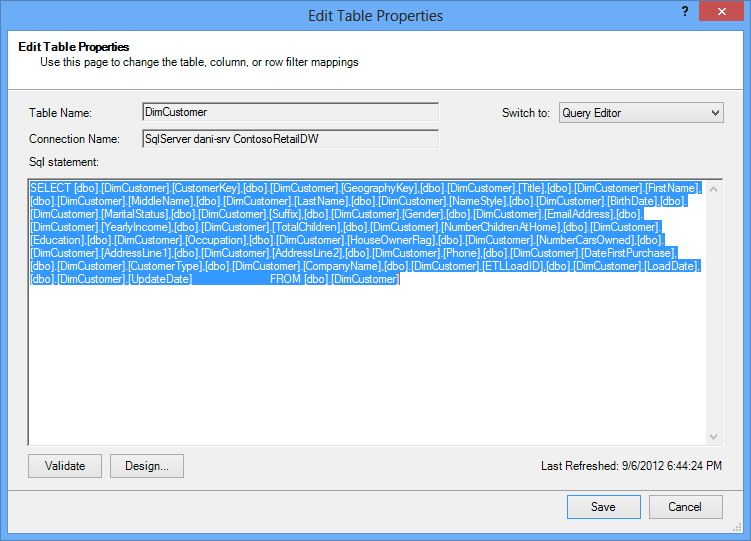
Let's take a look at the queries that are created for you. From the Table Properties dialog box, you can switch to the Query editor and see the current SQL query for each table.

From Table Properties, select Query Editor.
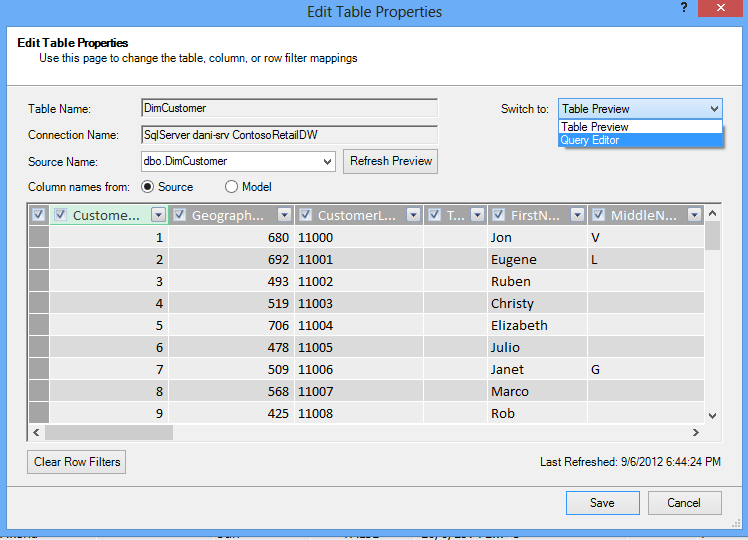
The Query Editor shows the SQL query used to populate the table. If you filtered out any column during import, your query includes fully-qualified column names:
| In contrast, if you imported a table in its entirety, without unchecking any column or applying any filter, you'll see the query as "Select * from ", which will be more difficult to modify: |
Modifying the SQL query
Now that you know how to find the query, you can modify it to further reduce the size of your model.
-
For columns containing currency or decimal data, if you don't need the decimals, use this syntax to get rid of the decimals:
"SELECT ROUND([Decimal_column_name],0)… ."
If you need the cents but not fractions of cents, replace the 0 by 2. If you use negative numbers, you can round to units, tens, hundreds etc.
-
If you have a Datetime column named dbo.Bigtable.[Date Time] and you do not need the Time part, use the syntax to get rid of the time:
"SELECT CAST (dbo.Bigtable.[Date time] as date) AS [Date time]) "
-
If you have a Datetime column named dbo.Bigtable.[Date Time] and you need both the Date and Time parts, use multiple columns in the SQL query instead of the single Datetime column:
"SELECT CAST (dbo.Bigtable.[Date Time] as date ) AS [Date Time],
datepart(hh, dbo.Bigtable.[Date Time]) as [Date Time Hours],
datepart(mi, dbo.Bigtable.[Date Time]) as [Date Time Minutes],
datepart(ss, dbo.Bigtable.[Date Time]) as [Date Time Seconds],
datepart(ms, dbo.Bigtable.[Date Time]) as [Date Time Milliseconds]"
Use as many columns as you need to store each part in separate columns.
-
If you need hours and minutes, and you prefer them together as one time column, you can use the syntax :
Timefromparts(datepart(hh, dbo.Bigtable.[Date Time]), datepart(mm, dbo.Bigtable.[Date Time])) as [Date Time HourMinute]
-
If you have two datetime columns, like [Start Time] and [End Time], and what you really need is the time difference between them in seconds as a column called [Duration], remove both columns from the list and add:
"datediff(ss,[Start Date],[End Date]) as [Duration]"
If you use the keyword ms instead of ss, you'll get the duration in milliseconds
Using DAX calculated measures instead of columns
If you've worked with the DAX expression language before, you might already know that calculated columns are used to derive new columns based on some other column in the model, while calculated measures are defined once in the model, but evaluated only when used in a PivotTable or other report.
One memory-saving technique is to replace regular or calculated columns with calculated measures. The classic example is Unit Price, Quantity, and Total. If you have all three, you can save space by maintaining just two and calculating the third one using DAX.
Which 2 columns you should keep?
In the above example, keep Quantity and Unit Price. These two have fewer values than the Total. To calculate Total, add a calculated measure like:
"TotalSales:=sumx('Sales Table','Sales Table'[Unit Price]*'Sales Table'[Quantity])"
Calculated columns are like regular columns in that both take up space in the model. In contrast, calculated measures are calculated on the fly and do not take space.
Conclusion
In this article, we talked about several approaches that can help you build a more memory-efficient model. The way to reduce the file size and memory requirements of a data model is to reduce the overall number of columns and rows, and the number of unique values appearing in each column. Here are some techniques we covered:
-
Removing columns is of course the best way to save space. Decide which columns you really need.
-
Sometimes you can remove a column and replace it with a calculated measure in the table.
-
You may not need all the rows in a table. You can filter out rows in the Table Import Wizard.
-
In general, breaking apart a single column into multiple distinct parts is a good way to reduce the number of unique values in a column. Each one of the parts will have a small number of unique values, and the combined total will be smaller than the original unified column.
-
In many cases, you also need the distinct parts to use as slicers in your reports. When appropriate, you can create hierarchies from parts like Hours, Minutes, and Seconds.
-
Many times, columns contain more information than you need them too. For example, suppose a column stores decimals, but you've applied formatting to hide all the decimals. Rounding can be very effective in reducing the size of a numeric column.
Now that you've done what you can to reduce the size of your workbook, consider also running the Workbook Size Optimizer. It analyzes your Excel workbook and if possible, compresses it further. Download the Workbook Size Optimizer.
Related links
Data Model specification and limits
Workbook Size Optimizer download
Power Pivot: Powerful data analysis and data modeling in Excel
No comments:
Post a Comment