AutoArchive settings explained
AutoArchive helps manage the space in your mailbox or on the e-mail server you are using by automatically moving items to an archive location. AutoArchive performs one or both of the following actions for items in a folder, depending on the conditions set.
-
Outlook moves items to an archive file, removing them from their original location, generally one of your working folders.
Where does Outlook move my items?
The archive file is a special type of data file, a Personal Folders file (.pst). The first time AutoArchive runs, Outlook creates the archive file automatically in the following locations:
-
Windows Vista C:\Users\YourUserName\AppData\Local\Microsoft\Outlook\Archive.pst
-
Microsoft Windows XP C:\Documents and Settings\YourUserName \Local Settings\Application Data\Microsoft\Outlook\Archive.pst
After Outlook archives items for the first time, you can access the items in the file directly from Archive Folders in your Outlook Folder List, which is located in the Navigation Pane. You can also create your own archive files for individual folders.
Note: If you don't see the Local Settings or Local folders, they might be hidden.
How do I display hidden folders?
-
Windows Vista
-
Click the Start button, and then click Control Panel.
-
Click Appearance and Personalization.
Note: If you are using Control Panel Classic View, double-click Folder Options, and then go to step 4.
-
Click Folder Options.
-
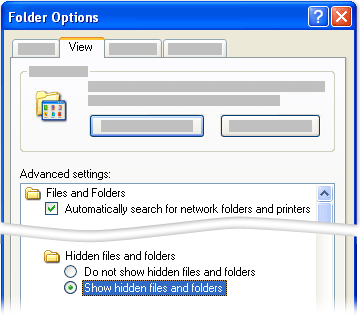
On the View tab, under Advanced settings, under Files and Folders, under Hidden files and folders, select Show hidden files and folders.
-
-
Windows XP
-
Click the Start button, and then click Control Panel.
-
Click Folder Options.

-
Click the View tab, and then click the Show hidden files and folders option.
-
The archive file is a special type of data file, a Personal Folders file (.pst). The first time AutoArchive runs, Outlook creates the archive file automatically in the following locations:
-
Windows Vista C:\Users\YourUserName\AppData\Local\Microsoft\Outlook\Archive.pst
-
Microsoft Windows XP C:\Documents and Settings\YourUserName \Local Settings\Application Data\Microsoft\Outlook\Archive.pst
After Outlook archives items for the first time, you can access the items in the file directly from Archive Folders in your Outlook Folder List, which is located in the Navigation Pane. You can also create your own archive files for individual folders.
Note: If you don't see the Local Settings or Local folders, they might be hidden.
How do I display hidden folders?
-
Windows Vista
-
Click the Start button, and then click Control Panel.
-
Click Appearance and Personalization.
Note: If you are using Control Panel Classic View, double-click Folder Options, and then go to step 4.
-
Click Folder Options.
-
On the View tab, under Advanced settings, under Files and Folders, under Hidden files and folders, select Show hidden files and folders.
-
-
Windows XP
-
Click the Start button, and then click Control Panel.
-
Click Folder Options.

-
Click the View tab, and then click the Show hidden files and folders option.
-
-
-
-
AutoArchive permanently deletes expired items. Expired items are items that have passed their aging periods.
Tell me more about when specific Microsoft Outlook items expire
Default aging periods for when items in folders expire or are deleted
Folder
Aging period
Inbox and Drafts
6 months
Sent Items and Deleted Items
2 months
Outbox
3 months
Calendar
6 months
Tasks
6 months
Notes
6 months
Journal
6 months
Note: Folders that you create that contain the same type of items as the Inbox, Calendar, Tasks, Notes, or Journal have the same default, six-month aging period, for example, an e-mail folder that you create for status reports received from a co-worker or a contact folder you create for personal contacts.
Determine the age of an item
Item type
When the aging period starts
E-mail message
The received date/time or when you last changed and saved the message, whichever is later.
Calendar meeting, event, or appointment
The date when you last changed and saved the item, whichever is later. Recurring items are not AutoArchived.
Task
The completion date or when you last changed and saved the task. Tasks that are not marked complete are not AutoArchived. Tasks assigned to other people are archived only if marked complete.
Note
When you last changed and saved the note.
Journal entry
The date the Journal entry was created or when you last changed and saved the entry.
Contact
Contacts are not archived by default. However, you can manually archive them.
You can customize the conditions for these settings to fit your storage needs. For more information, see the descriptions below or for a more in-depth look at AutoArchive, see Use AutoArchive to back up or delete items.
The settings for expiring items and deleting items can be especially confusing.
Tell me more about expiring and deleing items.
-
Items are stored in their archived locations unless you change one or more AutoArchive settings, choosing to have the items deleted when they expire. The items are not deleted from their archived locations, they can only automatically deleted before they are moved to their archive location. Once they are archived, they can only be deleted manually.
-
Choosing an option to have items deleted permanently deletes the items automatically when they expire. They are not archived. For instance, if you click Delete expired items (e-mail folders only), this option deletes all messages in all your e-mail folders, such as Inbox, Sent, or Drafts, when they reach the end of their aging periods. The messages are not archived.
Settings and options for AutoArchive
See the following descriptions for the settings and options that you can apply when customizing AutoArchive.

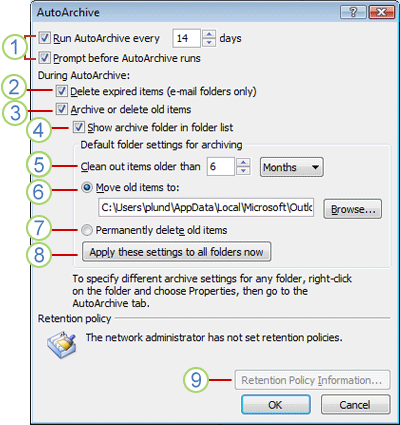
1. Run AutoArchive every Choose how often you want AutoArchive to run. Archiving many items at the same time might slow down your computer's performance. Therefore, it is better to choose a period of time that shortens the AutoArchive process. You should consider how many items you typically receive during a given time and adjust the timeframe accordingly.
Prompt before AutoArchive runs Choose this option if you want Outlook to display a reminder message before AutoArchive processes your Outlook items. When you see the message, you can click No to cancel that AutoArchive session.
2. Delete expired items (e-mail folders only) This option is not selected by default. You can choose to have e-mail messages deleted when their aging period has expired. The default period for your Inbox and Draft items is six months and three months for your Sent Items, but you can change these periods using the Clean out items older than option.
Tell me more about when specific Microsoft Outlook items expire
Default aging periods for when items in folders expire or are deleted
| Folder | Aging period |
| Inbox and Drafts | 6 months |
| Sent Items and Deleted Items | 2 months |
| Outbox | 3 months |
| Calendar | 6 months |
| Tasks | 6 months |
| Notes | 6 months |
| Journal | 6 months |
Note: Folders that you create that contain the same type of items as the Inbox, Calendar, Tasks, Notes, or Journal have the same default, six-month aging period.
Determine the age of an item
| Item type | When the aging period starts |
| E-mail message | The received date/time or when you last changed and saved the message, whichever is later. |
| Calendar meeting, event, or appointment | The date when you last changed and saved the item, whichever is later. Recurring items are not AutoArchived. |
| Task | The completion date or when you last changed and saved the task. Tasks that are not marked complete are not AutoArchived. Tasks assigned to other people are archived only if marked complete. |
| Note | When you last changed and saved the note. |
| Journal entry | The date the Journal entry was created or when you last changed and saved the entry. |
| Contact | Contacts are not archived by default. However, you can manually archive them. |
3. Archive or delete old items Choose this option if you want your Outlook items archived, and then deleted when they reach the end of the aging period. Choose additional settings to apply to both archiving and deletion.
4. Show archive folder in folder list Choose to have the Archive folder listed with your other working folders in the Navigation Pane. In the main Archive folder, you can open the subfolders and view your archived items. When viewing your archived items, you can verify that the correct items were archived, and you can also drag any items that you need back to a working folder.
5. Clean out items older than Choose the default configure for when you want your items archived, in days, weeks, or months. You can configure a period of one day up to a period of 60 months. "Clean" means to archive — store — items. It does not mean "delete" unless you have selected that setting for the folders elsewhere.
6. Move old items to The default setting for this location is different for computers running the Windows Vista and Microsoft Windows XP operating systems. If you want to set another destination for the archived items, you can browse to and set a different location. Items are moved to this location after their aging period.
-
Windows Vista C:\Users\YourUserName\AppData\Local\Microsoft\Outlook\Archive.pst
-
Microsoft Windows XP C:\Documents and Settings\YourUserName \Local Settings\Application Data\Microsoft\Outlook\Archive.pst
Note: Items archived in a custom location are not deleted unless you open the folders and delete them manually.
7. Permanently delete items This option immediately deletes the expired items instead of moving them to the default location, such as another folder that you designated or the Deleted Items folder.
8. Apply these settings to all folders now This option applies the AutoArchive settings, including your changes, to all of your folders. To specify different settings for one or more folders, do not choose this option. Instead, use the instructions shown below the button that explain how to specify settings for individual folders. Changes made to specific folders apply only to those folders.
9. Retention Policy Information In your organization, a system administrator might set retention policies that determine when and how your mailbox items are AutoArchived. You can view the policies here, but you can't change them without the appropriate permissions.
No comments:
Post a Comment