Sort and filter data for a mail merge
You can use mail merge to create and send bulk mail and to create envelopes and labels. Your mailing list is the data source for mail merge. Word pulls information from your mailing list and inserts it into your mail merge document.
Edit your mailing list
With mail merge, you can sort and filter data in your mailing list to select only the records you want.
-
If necessary, open your mail merge document.
-
On the Mailings tab, in the Start Mail Merge group, choose Edit Recipient List.
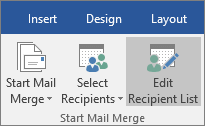
Tip: If Edit Recipient List is unavailable, choose Select Recipients and connect the document to the mailing list you want to use.
-
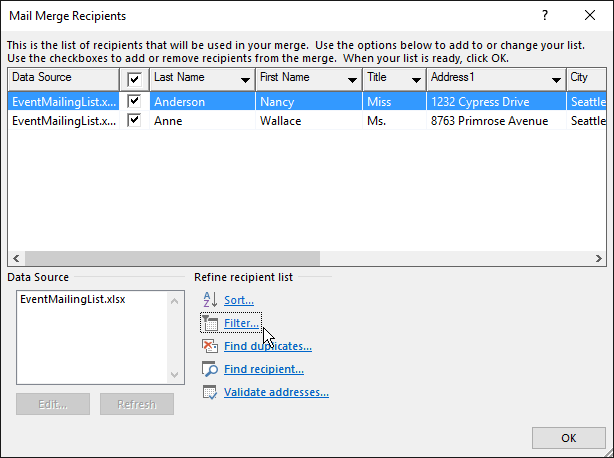
In the Mail Merge Recipients dialog box, select the check box next to each recipient whose record is to be included in the merge.

Tip: To group rows or to restrict your view to certain rows, sort or filter the mailing list.
More options
In the Mail Merge Recipients dialog box, there are options to refine the recipient list. The two most frequently used options are to sort and to filter the list to make it easier to find names and addresses. For details, go to the "Sort recipient list" or the "Filter recipient list" that follows.

Sort recipient list
There are many ways to sort your recipient list. The steps below provide you with just one example of what can be done to sort records.
-
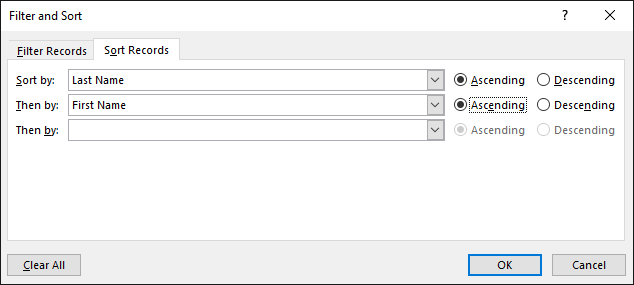
Under Refine recipient list, choose Sort, and the Filter and Sort dialog box opens.
-
On the Sort Records tab, choose the Sort Records box down arrow, choose the column name in your Excel mailing list that you want to sort by, and then choose Ascending or Descending as the sort order.
-
(Optional) Choose the Then by box down arrow, choose the name of a second column that you want to sort by, and then choose Ascending or Descending as the sort order.
-
(Optional) Repeat step 3 if you need to add another column name to sort by.
-
Choose OK and see sort results.
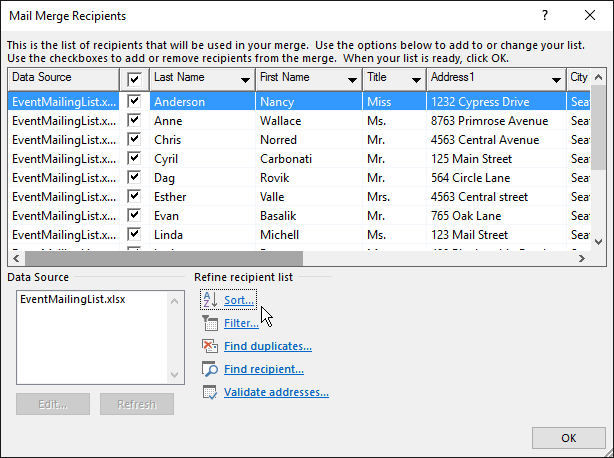
Note: The recipient list now is in ascending alphabetical order.
Filter recipient list
You can filter your mailing list to see only the recipients you want to include in the mail merge. Your filter, for example, might return records for people in a specific city or for inventory items at a specific price.
In the following steps, you're defining conditions to use to filter your mailing list. Filtering uses simple criteria (expressions) based on the choices you make to evaluate the existence of the data you defined.
-
Under Refine recipient list, choose Filter, and the Filter and Sort dialog box opens.
-
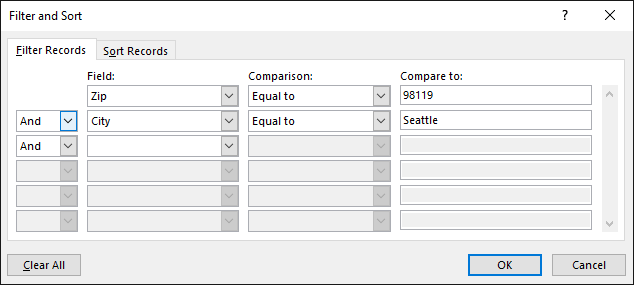
On the Filter Records tab, choose the Field box down arrow, and then choose the column name in your Excel mailing list that you want to use as the first-level filter.
Note: The Filter Records tab is formatted like a form with four columns. From left to right, the columns are condition, field, comparison operator, and user-defined match criteria.
-
Choose the Comparison box down arrow, and then choose Equal to or another comparison option.
-
In the Compare to box, type data you want the selection in the Field box to match.
-
(Optional) To add a second-level filter, in the far-left column, do one of the following:
-
Choose And to make sure both the filter conditions are met, and then repeat step 2 through step 4.
or
-
Choose Or to make sure either filter condition is met, and then repeat step 2 through step 4.
-
-
Repeat step 5 as needed.
-
Choose OK when done, and then view the results of the filtered records.
Find a recipient
You can search the mailing list and find a specific recipient or group of recipients that share a common attribute, such as a last name, a postal code, or a membership number.
-
In the Mail Merge Recipients dialog box, under Refine recipient list, choose Find recipient.
-
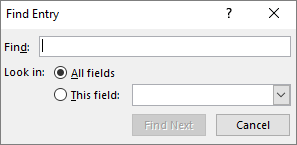
In the Find Entry dialog box, in the Find box, type the attribute name you want to search for in your mailing list.
-
For Look in, do one of the following:
-
Accept the default All fields option.
or
-
Choose This Field, and in the drop-down list choose the column name you want to search.
-
-
Choose Find Next.
Note: If a match to the search entry is found, the entry in your mailing list is highlighted. Choose Find Next again, and if another match exists, it also will be highlighted.
See also
Watch Take mail merge to the next level - A free video training that explains sorting and filtering mail merge fields, customising your mail merge with personalised messages and inserting custom merge fields.
Microsoft Office Tutorials: Sort And Filter Data For A Mail Merge >>>>> Download Now
ReplyDelete>>>>> Download Full
Microsoft Office Tutorials: Sort And Filter Data For A Mail Merge >>>>> Download LINK
>>>>> Download Now
Microsoft Office Tutorials: Sort And Filter Data For A Mail Merge >>>>> Download Full
>>>>> Download LINK Fw